> ## Documentation Index
> Fetch the complete documentation index at: https://docs.tenderly.co/llms.txt
> Use this file to discover all available pages before exploring further.
# Custom Oracle कैसे बनाएँ
> वास्तविक-दुनिया के systems से data इकट्ठा करने के लिए custom oracle बनाने हेतु Web3 Actions का उपयोग करना सीखें।
इस tutorial में, हम आपको दिखाएंगे कि **Tenderly Web3 Actions का उपयोग करके एक custom Web3 oracle कैसे बनाएँ**। एक oracle वास्तविक-दुनिया के systems से data इकट्ठा करता है और इसे blockchain पर भेजता है। यह Web2 applications से smart contracts की ओर data streaming के लिए एक entry point के रूप में कार्य करता है।
oracles का उपयोग करके, हम अपने smart contracts के भीतर से blockchain के बाहर के sources (जैसे, exchanges, traffic और weather data, gas rates, oil prices, आदि) से data access कर सकते हैं।
पूरा code [**इस Github repo**](https://github.com/Tenderly/examples-web3-actions/) में उपलब्ध है।
## Project अवलोकन
इस project का उद्देश्य आपको यह सिखाना है कि Web3 Action कैसे बनाएँ जो एक Web2 API से data प्राप्त करता है जब भी कोई smart contract एक on-chain event के माध्यम से data request करता है। यह data तब उस contract को भेजा जाएगा जिसने इसका अनुरोध किया था।
यहाँ project के flow का एक quick breakdown है।
* एक Consumer बनाएँ – एक smart contract जो Oracle Contract से ETH price का अनुरोध करता है।
* Oracle Contract `RequestCoinPrice` event के साथ CoinGecko API से एक नए coin price का अनुरोध करता है।
* एक बार price request देखा गया, तो Web3 Action को value fetch करने के लिए कॉल किया जाता है।
* price value को उस Oracle Contract पर वापस push किया जाता है जिसने इसका अनुरोध किया था।
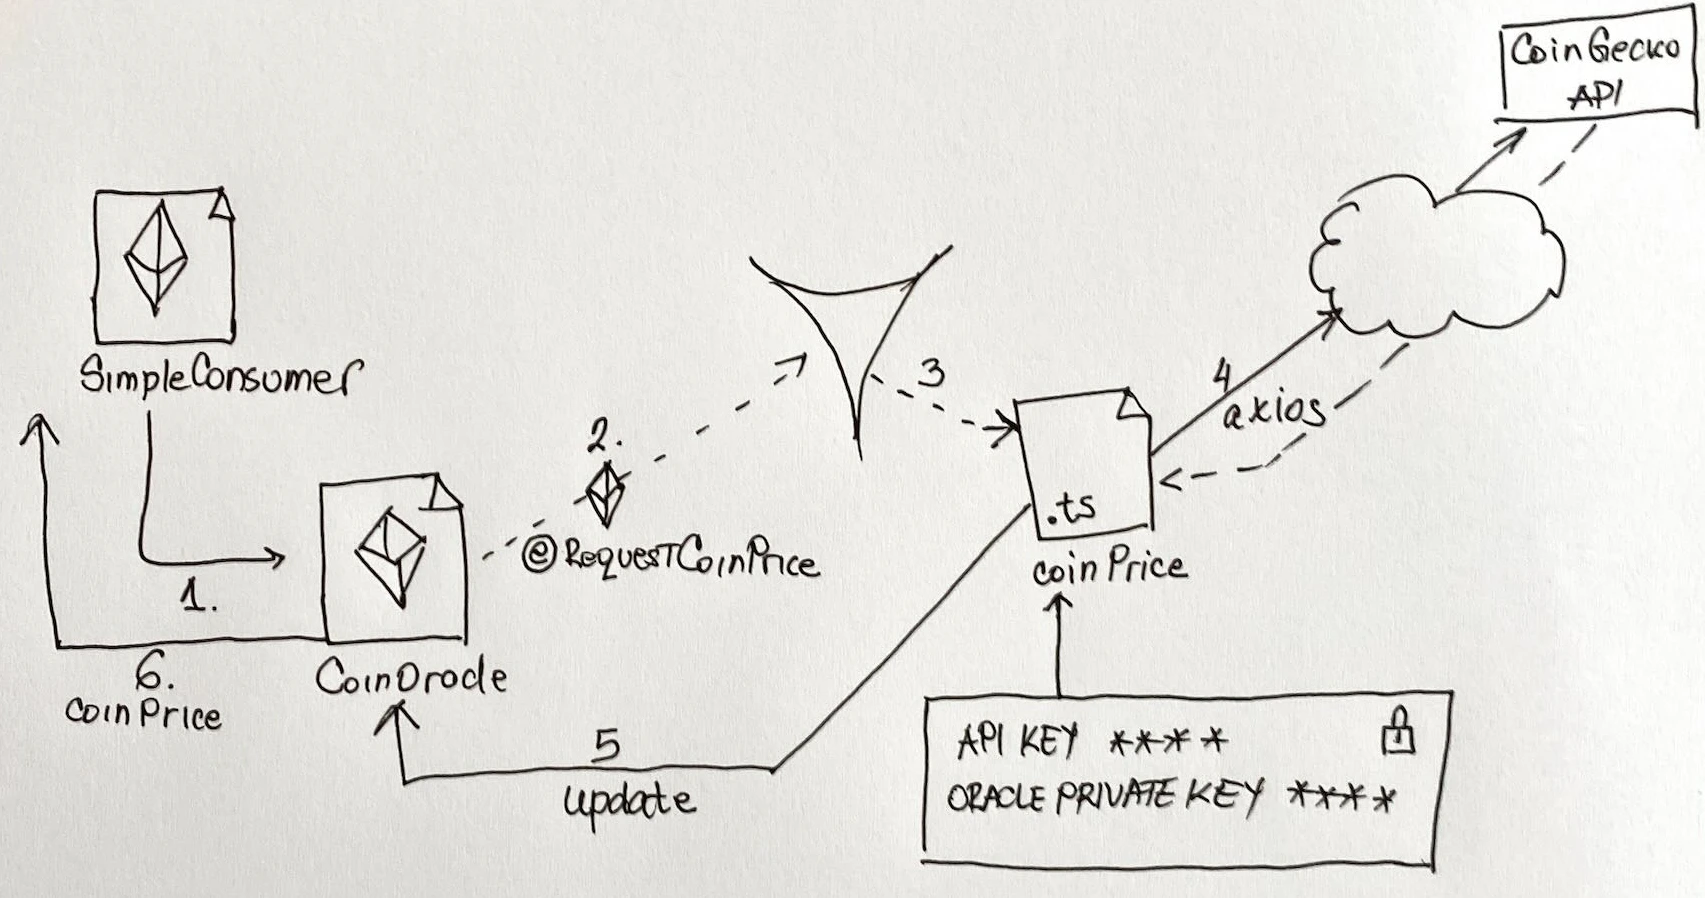 हम इस project के लिए एक pre-made smart contract का उपयोग करते हैं। code का अन्वेषण करें और इसे अपने use case के अनुसार अनुकूलित करने के लिए स्वतंत्र महसूस करें।
ध्यान दें कि `SimpleConsumer` contract केवल उसी `CoinOracle` से आने वाले `coinPrice` को स्वीकार करता है जिसे उसे deploy होने पर assign किया गया था। इसके अतिरिक्त, `CoinOracle` केवल तभी updates स्वीकार करता है जब यह उसी Wallet द्वारा signed हो जिसने इसे deploy किया था (`owner`)।
## योजना
यहाँ हमारे oracle का निर्माण करने के लिए हमें उठाए जाने वाले चरणों की सूची है:
* `CoinOracle` और `SimpleCoinConsumer` smart contracts deploy करें।
* Ethereum providers में से एक का उपयोग करने के लिए आवश्यक API key और अन्य जानकारी प्राप्त करें। हम इस data को Web3 Actions Secrets में store करेंगे (*interaction 5 के लिए आवश्यक*)।
* Oracle Contract को deploy करने वाले account (`owner`) की Private Key प्राप्त करें और इसे Web3 Actions Secrets में store करें (*interaction 5 में transactions पर हस्ताक्षर करने के लिए आवश्यक*)।
* अपने dev environment पर Tenderly की Web3 Actions directory को initialize करें और npm dependencies जोड़ें।
* एक Web3 Action बनाएँ जो oracle को price updates भेजेगा।
### 1: Smart Contracts Deploy करें
`CoinOracle` और `SimpleCoinConsumer` दोनों contracts एक ही file में संग्रहीत हैं: `CoinOracle.sol`। [**हमारे GitHub repo में**](https://github.com/Tenderly/examples-web3-actions/blob/main/simple-coin-oracle/CoinOracle.sol) source code देखें।
`CoinOracle` contact को पहले deploy किया जाना चाहिए, `SimpleCoinConsumer` contract से पहले, अधिमानतः एक अलग Wallet का उपयोग करके। constructor parameter के रूप में `CoinOracle` address पास करना सुनिश्चित करें।
इस tutorial के प्रयोजन के लिए, हम Ropsten test network (ID 3 है) पर deploy करेंगे लेकिन आप एक अलग का उपयोग करने के लिए स्वतंत्र हैं।
### 2: Web3 Actions Initialize करें
इस tutorial के लिए, आपको **Tenderly Dashboard** तक पहुँच की आवश्यकता होगी। यदि आपके पास account नहीं है, तो [**यहाँ मुफ्त में sign up करें**](https://dashboard.tenderly.co/register?utm_source=homepage) (कोई cc आवश्यक भी नहीं)।
**Tenderly CLI स्थापित करें (** [**इस installation guide**](https://github.com/Tenderly/tenderly-cli#installation) **का पालन करें)**। अपने machine पर Tenderly CLI स्थापित होने के बाद, एक नई directory `tdly-actions` बनाएँ और `cd` इसमें अपनी Web3 Actions को `tenderly actions init` command का उपयोग करके initialize करें।
```bash theme={"theme":{"light":"catppuccin-latte","dark":"catppuccin-mocha"}}
$ cd tdly-actions
$ tenderly actions init
```
जब prompt किया जाए, तो अपने Tenderly projects का चयन करें जहाँ आप Web3 Actions deploy करना चाहते हैं। CLI द्वारा बनाई गई files का अन्वेषण करने के लिए directory की contents list करें:
```bash title="example" showLineNumbers theme={"theme":{"light":"catppuccin-latte","dark":"catppuccin-mocha"}}
ls actions
example.ts
tsconfig.json
package.json
```
Tenderly CLI एक npm project भी बनाएगा जो आपकी Web3 Actions को किसी भी npm package का उपयोग करने की अनुमति देगा।
**NPM dependencies स्थापित करें** - हम बाहरी API के लिए requests बनाने के लिए Axios और blockchain के साथ interact करने के लिए Ethers का उपयोग करेंगे। अपने npm project में इन dependencies को जोड़ने के लिए अपने terminal से निम्न command चलाएँ:
```bash title="example" showLineNumbers theme={"theme":{"light":"catppuccin-latte","dark":"catppuccin-mocha"}}
cd actions && npm install --save-dev axios ethers @types/node && cd ..
```
### 3: अपनी Web3 Action बनाएँ
आगे बढ़ने से पहले, `CoinOracleContract.json` file को `actions` directory में copy करें। **आप इस JSON file को Remix में या** [**इस GitHub repo**](https://github.com/Tenderly/examples-web3-actions/blob/main/simple-coin-oracle/actions/CoinOracleContract.json) में पा सकते हैं।
आपकी Web3 Action code द्वारा उपयोग की जाने वाली और referenced सभी files को{' '}
`actions` directory में रखा जाना चाहिए (जैसे{' '}
`CoinOracleContract.json`)।
अपने deploy किए गए `Oracle` के address पर `CONTRACT_ADDRESS` variable सेट करें:
```typescript title="example.ts" showLineNumbers theme={"theme":{"light":"catppuccin-latte","dark":"catppuccin-mocha"}}
const CONTRACT_ADDRESS = '...'; // replace with contract address
export const coinPrice: ActionFn = async (context: Context, event: Event) => {
let transactionEvent = event as TransactionEvent;
const ifc = new ethers.utils.Interface(CoinOracleContract.abi);
const { data, topics } = transactionEvent.logs[0];
const priceRequest = ifc.decodeEventLog('RequestCoinPrice', data, topics);
const price = await getPrice();
const oc = await oracleContract(context, ifc);
await oc.update(priceRequest.reqId, price, {
gasLimit: 250000,
gasPrice: ethers.utils.parseUnits('100', 'gwei'),
});
console.log(`Processed: ${priceRequest.reqId} with price in cents: ${price}`);
};
const getPrice = async (coin: string) => {
const coinInfo = await axios.get(`https://api.coingecko.com/api/v3/coins/${coin}`);
return coinInfo.data.market_data.current_price.usd * 100;
};
const oracleContract = async (context: Context, contractInterface: ethers.utils.Interface) => {
const etherscanApiKey = await context.secrets.get('oracle.providerApiKey');
const provider = ethers.getDefaultProvider(ethers.providers.getNetwork(3), {
etherscan: etherscanApiKey,
});
const oracleWallet = new ethers.Wallet(
await context.secrets.get('oracle.addressPrivateKey'),
provider,
);
const contract = new ethers.Contract(CONTRACT_ADDRESS, contractInterface, oracleWallet);
return contract;
};
```
हमारी Web3 Action `getPrice` में Axios का उपयोग करके CoinGecko API को कॉल करेगी। API से हमें प्राप्त होने वाला परिणाम cents में price होगा। हम इस data को अपने smart contract को वापस भेजेंगे।
हालाँकि, आगे बढ़ने से पहले, हमें कुछ plumbing का ध्यान रखना होगा।
**Off-road: Typescript से निपटें।** यदि Typescript कोई error फेंकता है, तो अपनी `tsconfig.json` file में `compilerOptions` के तहत निम्न दो lines जोड़ें। यह Typescript को JSON file को ES module के रूप में import करने पर हम पर frown करने से रोक देगा।
```json title="example.json" showLineNumbers theme={"theme":{"light":"catppuccin-latte","dark":"catppuccin-mocha"}}
"esModuleInterop": true,
"resolveJsonModule": true
```
**Plumbing: Ethers Interface Instantiate करें।** `CoinOracleContract.json` file एक `Interface` instance बनाती है जिसका उपयोग Ethers smart contracts के साथ interact करते समय exchanged data को encode और decode करने के लिए करता है। हम पूरी JSON file का `abi` भाग पास कर रहे हैं।
**Event Data प्राप्त करें।** `decodeEventLog` करने के लिए हमारे द्वारा बनाई गई `Interface` (`ifc`) का उपयोग करें। हम जानते हैं कि पहली log entry (`logs[0]`) `RequestCoinPrice` event के अनुरूप है, इसलिए यह वह है जिसे हम decode करना चाहते हैं। अधिक जटिल interactions में, आपको इसे dynamically करने की आवश्यकता हो सकती है[ **जैसा कि हमने यहाँ किया है**](/monitoring/web3-actions/tutorials/on-chain-events)।
**आवश्यक Web3 Plumbing उर्फ Boilerplate।** अपने Oracle Contract के साथ interact करने के लिए, हमें कुछ plumbing करने की आवश्यकता है। contract की एक प्रतिबंध है - updates केवल `owner` द्वारा भेजे जा सकते हैं। इसका मतलब है कि हमें उस address से transactions भेजने की आवश्यकता है जिसने इसे deploy किया था। plumbing `oracleContract` function में की जाती है, और यहाँ चरणों का breakdown है।
**Plumbing: एक Provider Object कॉन्फ़िगर करें।** हम network `3` (Ropsten का ID) के साथ काम करने के लिए `ethers.getDefaultProvider` का उपयोग करके provider प्राप्त कर सकते हैं। हम एक दूसरा argument भी पास कर रहे हैं – एक configuration object जिसमें API key है। अन्य providers को कॉन्फ़िगर करने और `JsonRpcProvider` जैसे alternatives का उपयोग करने के तरीके पर अधिक जानकारी के लिए [**ethers docs**](https://docs.ethers.io/v5/api/providers/#providers-getDefaultProvider) से परामर्श करें।
**Plumbing: एक Wallet बनाएँ।** आपको यह सुनिश्चित करने के लिए एक `Wallet` बनाने की आवश्यकता है कि हमारे oracle से उत्पन्न प्रत्येक transaction उसी address द्वारा signed और funded हो जिसने contract को deploy किया था। चूंकि Wallet की private key संवेदनशील जानकारी है, हम इसे *Secrets* से पढ़ रहे हैं:
`await context.secrets.get("w3_oracle.oracle_address_private_key")`
**Plumbing: एक Contract बनाएँ।** यह वह चरण है जहाँ हम अब तक बनाई गई हर चीज़ को एक साथ जोड़ते हैं:
हम इस project के लिए एक pre-made smart contract का उपयोग करते हैं। code का अन्वेषण करें और इसे अपने use case के अनुसार अनुकूलित करने के लिए स्वतंत्र महसूस करें।
ध्यान दें कि `SimpleConsumer` contract केवल उसी `CoinOracle` से आने वाले `coinPrice` को स्वीकार करता है जिसे उसे deploy होने पर assign किया गया था। इसके अतिरिक्त, `CoinOracle` केवल तभी updates स्वीकार करता है जब यह उसी Wallet द्वारा signed हो जिसने इसे deploy किया था (`owner`)।
## योजना
यहाँ हमारे oracle का निर्माण करने के लिए हमें उठाए जाने वाले चरणों की सूची है:
* `CoinOracle` और `SimpleCoinConsumer` smart contracts deploy करें।
* Ethereum providers में से एक का उपयोग करने के लिए आवश्यक API key और अन्य जानकारी प्राप्त करें। हम इस data को Web3 Actions Secrets में store करेंगे (*interaction 5 के लिए आवश्यक*)।
* Oracle Contract को deploy करने वाले account (`owner`) की Private Key प्राप्त करें और इसे Web3 Actions Secrets में store करें (*interaction 5 में transactions पर हस्ताक्षर करने के लिए आवश्यक*)।
* अपने dev environment पर Tenderly की Web3 Actions directory को initialize करें और npm dependencies जोड़ें।
* एक Web3 Action बनाएँ जो oracle को price updates भेजेगा।
### 1: Smart Contracts Deploy करें
`CoinOracle` और `SimpleCoinConsumer` दोनों contracts एक ही file में संग्रहीत हैं: `CoinOracle.sol`। [**हमारे GitHub repo में**](https://github.com/Tenderly/examples-web3-actions/blob/main/simple-coin-oracle/CoinOracle.sol) source code देखें।
`CoinOracle` contact को पहले deploy किया जाना चाहिए, `SimpleCoinConsumer` contract से पहले, अधिमानतः एक अलग Wallet का उपयोग करके। constructor parameter के रूप में `CoinOracle` address पास करना सुनिश्चित करें।
इस tutorial के प्रयोजन के लिए, हम Ropsten test network (ID 3 है) पर deploy करेंगे लेकिन आप एक अलग का उपयोग करने के लिए स्वतंत्र हैं।
### 2: Web3 Actions Initialize करें
इस tutorial के लिए, आपको **Tenderly Dashboard** तक पहुँच की आवश्यकता होगी। यदि आपके पास account नहीं है, तो [**यहाँ मुफ्त में sign up करें**](https://dashboard.tenderly.co/register?utm_source=homepage) (कोई cc आवश्यक भी नहीं)।
**Tenderly CLI स्थापित करें (** [**इस installation guide**](https://github.com/Tenderly/tenderly-cli#installation) **का पालन करें)**। अपने machine पर Tenderly CLI स्थापित होने के बाद, एक नई directory `tdly-actions` बनाएँ और `cd` इसमें अपनी Web3 Actions को `tenderly actions init` command का उपयोग करके initialize करें।
```bash theme={"theme":{"light":"catppuccin-latte","dark":"catppuccin-mocha"}}
$ cd tdly-actions
$ tenderly actions init
```
जब prompt किया जाए, तो अपने Tenderly projects का चयन करें जहाँ आप Web3 Actions deploy करना चाहते हैं। CLI द्वारा बनाई गई files का अन्वेषण करने के लिए directory की contents list करें:
```bash title="example" showLineNumbers theme={"theme":{"light":"catppuccin-latte","dark":"catppuccin-mocha"}}
ls actions
example.ts
tsconfig.json
package.json
```
Tenderly CLI एक npm project भी बनाएगा जो आपकी Web3 Actions को किसी भी npm package का उपयोग करने की अनुमति देगा।
**NPM dependencies स्थापित करें** - हम बाहरी API के लिए requests बनाने के लिए Axios और blockchain के साथ interact करने के लिए Ethers का उपयोग करेंगे। अपने npm project में इन dependencies को जोड़ने के लिए अपने terminal से निम्न command चलाएँ:
```bash title="example" showLineNumbers theme={"theme":{"light":"catppuccin-latte","dark":"catppuccin-mocha"}}
cd actions && npm install --save-dev axios ethers @types/node && cd ..
```
### 3: अपनी Web3 Action बनाएँ
आगे बढ़ने से पहले, `CoinOracleContract.json` file को `actions` directory में copy करें। **आप इस JSON file को Remix में या** [**इस GitHub repo**](https://github.com/Tenderly/examples-web3-actions/blob/main/simple-coin-oracle/actions/CoinOracleContract.json) में पा सकते हैं।
आपकी Web3 Action code द्वारा उपयोग की जाने वाली और referenced सभी files को{' '}
`actions` directory में रखा जाना चाहिए (जैसे{' '}
`CoinOracleContract.json`)।
अपने deploy किए गए `Oracle` के address पर `CONTRACT_ADDRESS` variable सेट करें:
```typescript title="example.ts" showLineNumbers theme={"theme":{"light":"catppuccin-latte","dark":"catppuccin-mocha"}}
const CONTRACT_ADDRESS = '...'; // replace with contract address
export const coinPrice: ActionFn = async (context: Context, event: Event) => {
let transactionEvent = event as TransactionEvent;
const ifc = new ethers.utils.Interface(CoinOracleContract.abi);
const { data, topics } = transactionEvent.logs[0];
const priceRequest = ifc.decodeEventLog('RequestCoinPrice', data, topics);
const price = await getPrice();
const oc = await oracleContract(context, ifc);
await oc.update(priceRequest.reqId, price, {
gasLimit: 250000,
gasPrice: ethers.utils.parseUnits('100', 'gwei'),
});
console.log(`Processed: ${priceRequest.reqId} with price in cents: ${price}`);
};
const getPrice = async (coin: string) => {
const coinInfo = await axios.get(`https://api.coingecko.com/api/v3/coins/${coin}`);
return coinInfo.data.market_data.current_price.usd * 100;
};
const oracleContract = async (context: Context, contractInterface: ethers.utils.Interface) => {
const etherscanApiKey = await context.secrets.get('oracle.providerApiKey');
const provider = ethers.getDefaultProvider(ethers.providers.getNetwork(3), {
etherscan: etherscanApiKey,
});
const oracleWallet = new ethers.Wallet(
await context.secrets.get('oracle.addressPrivateKey'),
provider,
);
const contract = new ethers.Contract(CONTRACT_ADDRESS, contractInterface, oracleWallet);
return contract;
};
```
हमारी Web3 Action `getPrice` में Axios का उपयोग करके CoinGecko API को कॉल करेगी। API से हमें प्राप्त होने वाला परिणाम cents में price होगा। हम इस data को अपने smart contract को वापस भेजेंगे।
हालाँकि, आगे बढ़ने से पहले, हमें कुछ plumbing का ध्यान रखना होगा।
**Off-road: Typescript से निपटें।** यदि Typescript कोई error फेंकता है, तो अपनी `tsconfig.json` file में `compilerOptions` के तहत निम्न दो lines जोड़ें। यह Typescript को JSON file को ES module के रूप में import करने पर हम पर frown करने से रोक देगा।
```json title="example.json" showLineNumbers theme={"theme":{"light":"catppuccin-latte","dark":"catppuccin-mocha"}}
"esModuleInterop": true,
"resolveJsonModule": true
```
**Plumbing: Ethers Interface Instantiate करें।** `CoinOracleContract.json` file एक `Interface` instance बनाती है जिसका उपयोग Ethers smart contracts के साथ interact करते समय exchanged data को encode और decode करने के लिए करता है। हम पूरी JSON file का `abi` भाग पास कर रहे हैं।
**Event Data प्राप्त करें।** `decodeEventLog` करने के लिए हमारे द्वारा बनाई गई `Interface` (`ifc`) का उपयोग करें। हम जानते हैं कि पहली log entry (`logs[0]`) `RequestCoinPrice` event के अनुरूप है, इसलिए यह वह है जिसे हम decode करना चाहते हैं। अधिक जटिल interactions में, आपको इसे dynamically करने की आवश्यकता हो सकती है[ **जैसा कि हमने यहाँ किया है**](/monitoring/web3-actions/tutorials/on-chain-events)।
**आवश्यक Web3 Plumbing उर्फ Boilerplate।** अपने Oracle Contract के साथ interact करने के लिए, हमें कुछ plumbing करने की आवश्यकता है। contract की एक प्रतिबंध है - updates केवल `owner` द्वारा भेजे जा सकते हैं। इसका मतलब है कि हमें उस address से transactions भेजने की आवश्यकता है जिसने इसे deploy किया था। plumbing `oracleContract` function में की जाती है, और यहाँ चरणों का breakdown है।
**Plumbing: एक Provider Object कॉन्फ़िगर करें।** हम network `3` (Ropsten का ID) के साथ काम करने के लिए `ethers.getDefaultProvider` का उपयोग करके provider प्राप्त कर सकते हैं। हम एक दूसरा argument भी पास कर रहे हैं – एक configuration object जिसमें API key है। अन्य providers को कॉन्फ़िगर करने और `JsonRpcProvider` जैसे alternatives का उपयोग करने के तरीके पर अधिक जानकारी के लिए [**ethers docs**](https://docs.ethers.io/v5/api/providers/#providers-getDefaultProvider) से परामर्श करें।
**Plumbing: एक Wallet बनाएँ।** आपको यह सुनिश्चित करने के लिए एक `Wallet` बनाने की आवश्यकता है कि हमारे oracle से उत्पन्न प्रत्येक transaction उसी address द्वारा signed और funded हो जिसने contract को deploy किया था। चूंकि Wallet की private key संवेदनशील जानकारी है, हम इसे *Secrets* से पढ़ रहे हैं:
`await context.secrets.get("w3_oracle.oracle_address_private_key")`
**Plumbing: एक Contract बनाएँ।** यह वह चरण है जहाँ हम अब तक बनाई गई हर चीज़ को एक साथ जोड़ते हैं:
-
`Contract` instance{' '}
`CONTRACT_ADDRESS` पास करके।
-
`contractInterface` उस data को encode करने के लिए जिसे हम network पर भेजना चाहते हैं।
-
`oracleWallet` transaction पर हस्ताक्षर करने के लिए।
**🎉 Oracle Contract को Data वापस भेजें।** plumbing पूरी होने के साथ, अंतिम line function `receiveWeatherUpdate` को invoke करती है और हमारे oracle द्वारा तैयार की गई prediction भेजती है। यह bit हमारे smart contract पर एक transaction जारी करता है।
### 4: निर्दिष्ट करें कि आपकी Web3 Action कब Execute होती है
हम हर बार `RequestCoinPrice` event को `OracleContract` द्वारा Ropsten network पर fire करने पर transaction को execute करना चाहते हैं। हम यह केवल transaction के mine होने के बाद ही करना चाहते हैं।
`YOUR_USERNAME` और `YOUR_PROJECT_SLUG` को अपने Tenderly username और अपने project के slug से बदलें। आप उन्हें Dashboard URL से copy कर सकते हैं:
`https://dashboard.tenderly.co/{YOUR_USERNAME}/{YOUR_PROJECT_SLUG}/transactions`
साथ ही, `CONTRACT_ADDRESS` को अपने deploy किए गए Oracle Contract के address से बदलें:
```yaml title="example.yaml" showLineNumbers theme={"theme":{"light":"catppuccin-latte","dark":"catppuccin-mocha"}}
account_id: ''
actions:
YOUR_USERNAME/YOUR_PROJECT_SLUG:
runtime: v1
sources: actions
specs:
coinOracle:
description: Swapit
function: coinOracle:coinPrice
trigger:
type: transaction
transaction:
status:
- mined
filters:
- network: 3
eventEmitted:
contract:
address: CONTRACT_ADDRESS
name: RequestCoinPrice
project_slug: ''
```
### 5: Web3 Action Secrets बनाएँ
Web3 Actions के लिए deploy किए गए `OracleContract` पर operations करने के लिए, हमें contract तक पहुँचने का एक तरीका चाहिए। आप कोई भी provider service (Infura, QuickNode, Alchemy, Etherscan, आदि) चुन सकते हैं। access स्थापित करने के लिए क्या आवश्यक है, यह जानने के लिए [**Ethers' Default Provider docs**](https://docs.ethers.io/v5/api/providers/#providers-getDefaultProvider) देखें।
चूंकि हम Etherscan को provider के रूप में उपयोग कर रहे हैं, हमें केवल API key की आवश्यकता है। key Web3 Actions Secrets में store की जाएगी।
अपने सभी संवेदनशील data को Web3 Actions Secrets में सुरक्षित रूप से रखें (जैसे, API keys, Wallet private keys, आदि)। Secrets अत्यंत सुरक्षित हैं, इसलिए भले ही आप values को{' '}
`console.log` करने का प्रयास करें, वे hidden रहेंगे।
**Secrets.** Web3 Actions Secrets में आपके द्वारा copy की गई private key रखने के लिए अपने Tenderly Dashboard पर जाएँ। sidebar से, "Actions" पर जाएँ, "Secrets" पर क्लिक करें, और फिर "Add New" पर क्लिक करें। secret का नाम `oracle.providerApiKey` रखें और API token के साथ-साथ अपनी आवश्यक किसी अन्य संवेदनशील जानकारी को paste करें।
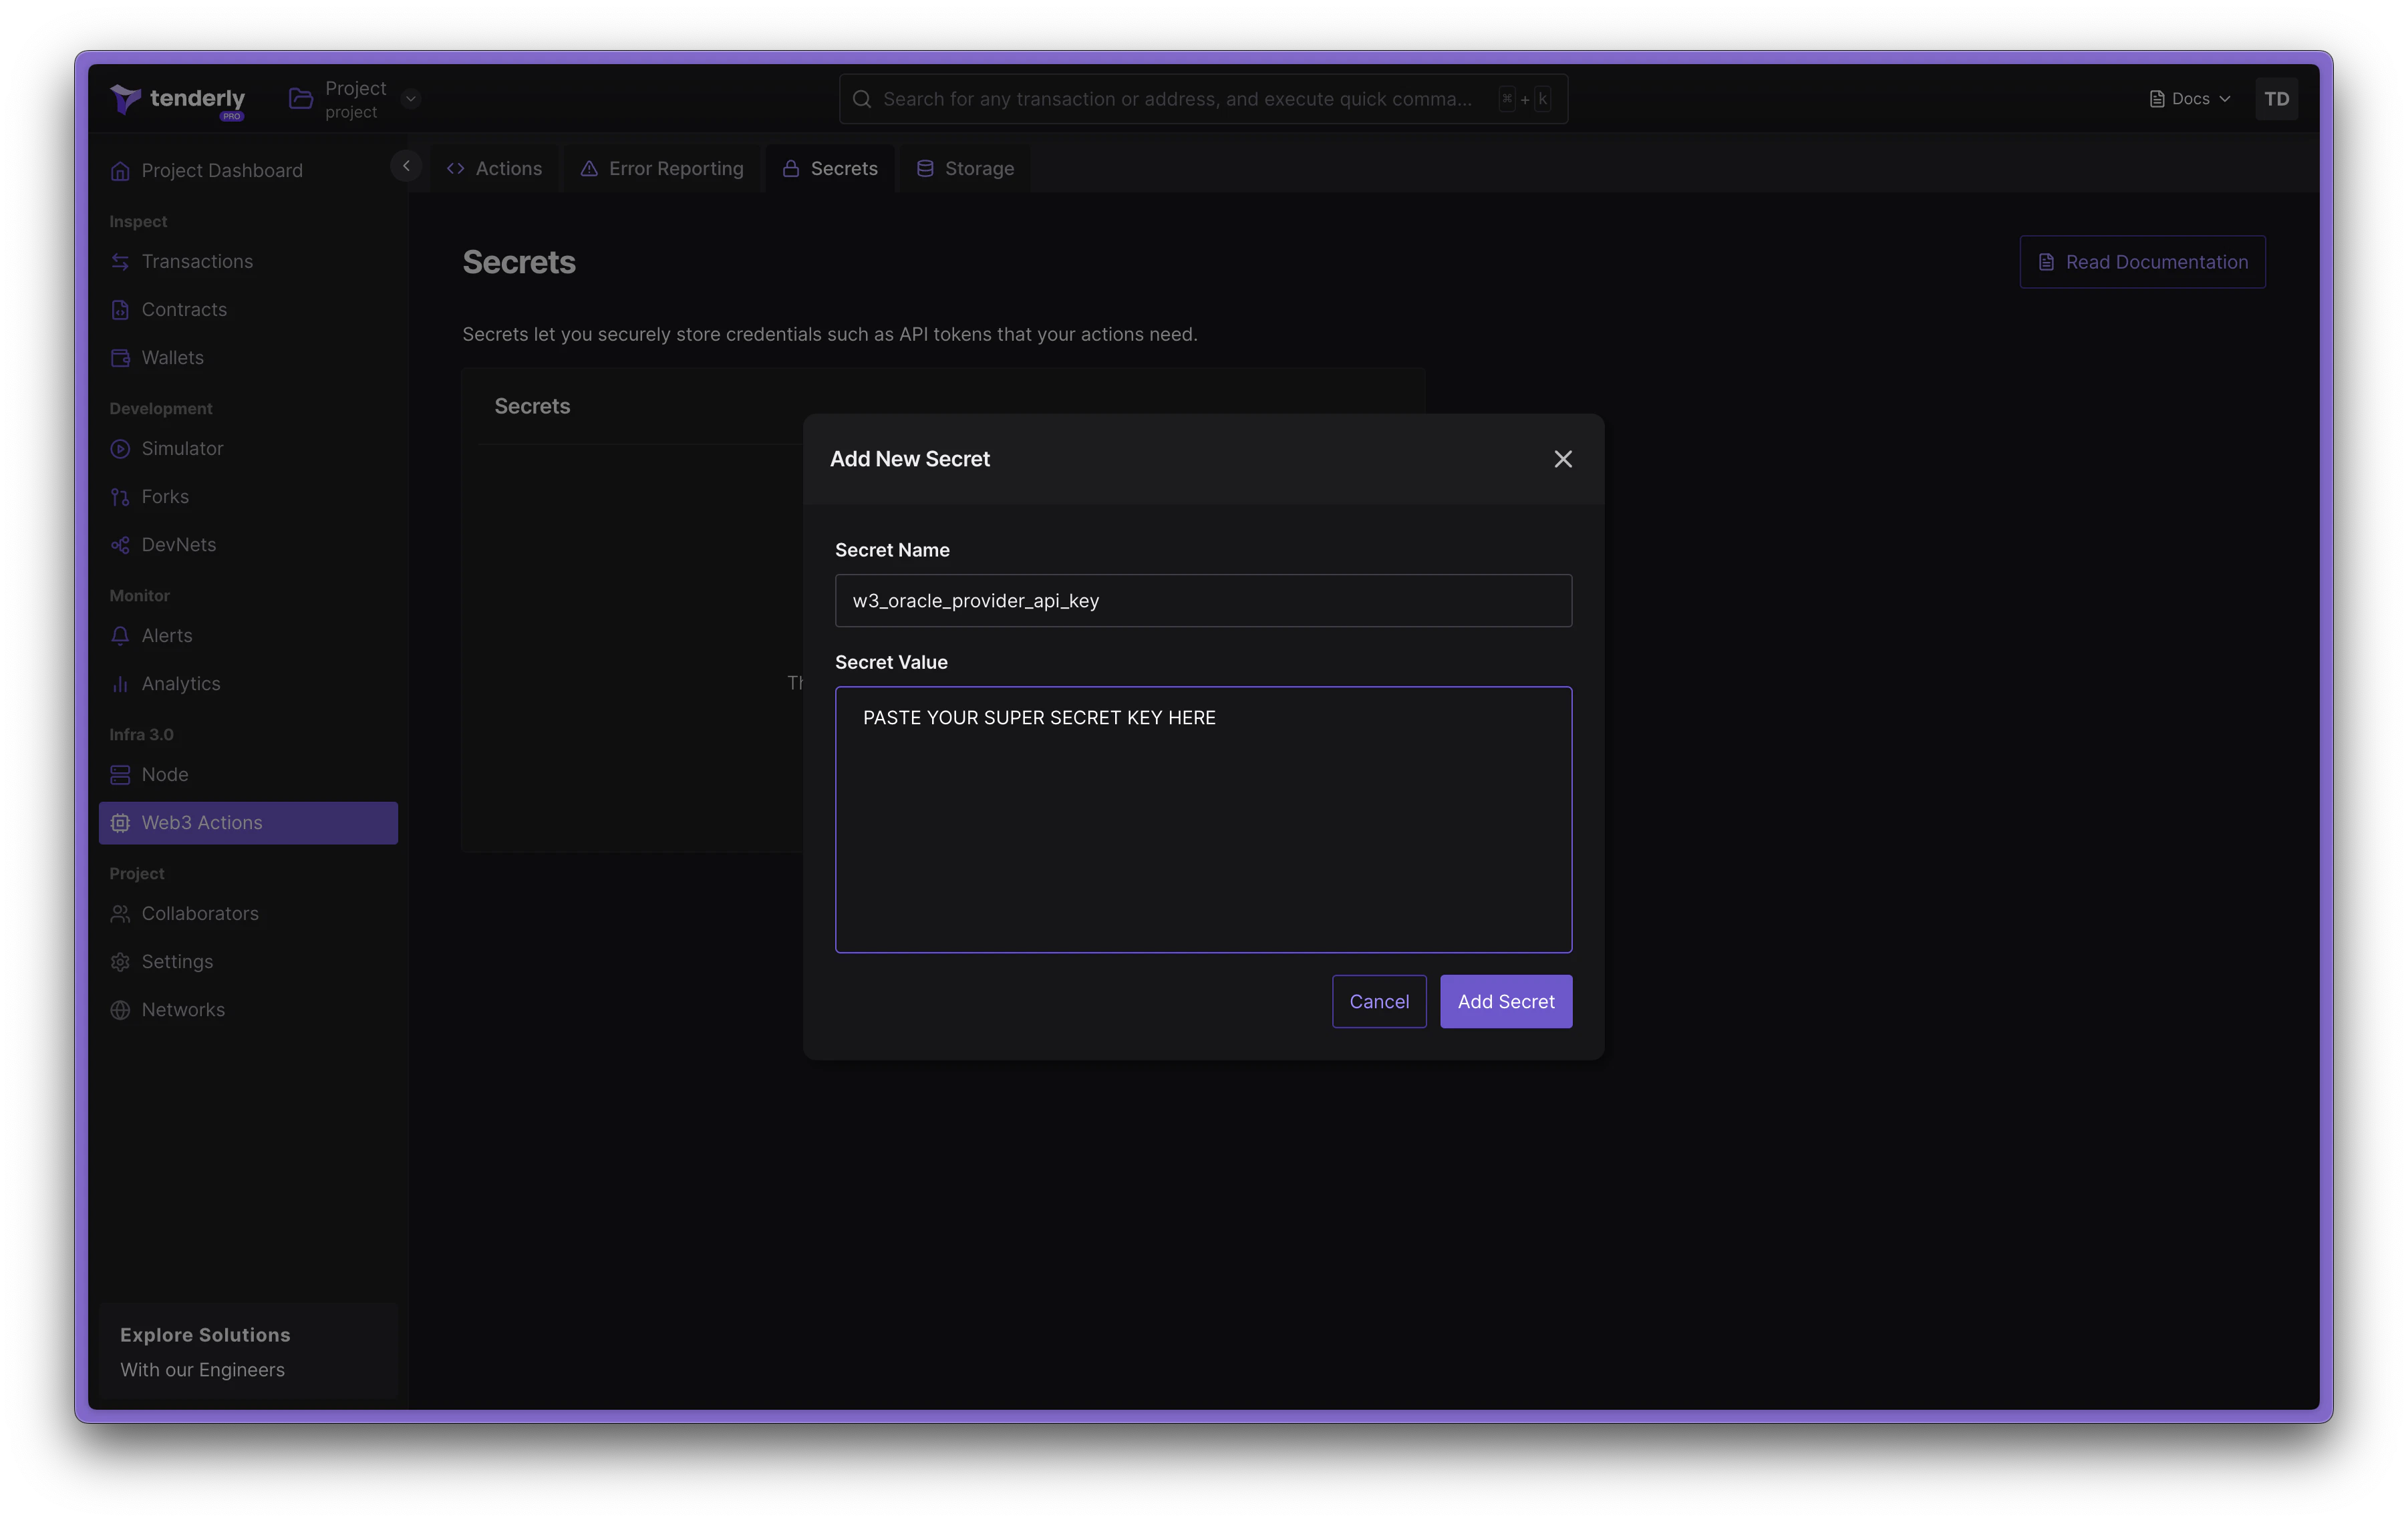 **Oracle Wallet Private Key Store करें।** chain पर transactions भेजने के लिए, हमारी Web3 Action को transactions पर हस्ताक्षर करने और उन्हें fund करने के लिए एक private key की आवश्यकता है। `OracleContract` को केवल उन updates को स्वीकार करने के लिए designed किया गया है जो उन्हें deploy करने वाले address द्वारा signed हैं।
यदि आप Metamask का उपयोग कर रहे हैं, तो उस account को चुनें जिसका उपयोग आपने smart contract को deploy करने के लिए किया था और [**इस Metamask गाइड**](https://metamask.zendesk.com/hc/en-us/articles/360015289632-How-to-Export-an-Account-Private-Key) का पालन करते हुए इसकी private key copy करें।
Tenderly Dashboard में, `w3_oracle.oracle_address_private_key` नामक एक नया Secret बनाएँ और private key paste करें।
### 6: अपनी Web3 Action Deploy करें
अपने project के root (जिस folder में `tenderly.yaml` file है) पर जाएँ और निम्न command चलाएँ:
```bash title="example" showLineNumbers theme={"theme":{"light":"catppuccin-latte","dark":"catppuccin-mocha"}}
tenderly actions deploy
```
CLI द्वारा successful deployment दिखाने के बाद, आप Tenderly Dashboard पर जा सकते हैं। वहाँ आपको यह देखना चाहिए कि आपकी Web3 Action deploy हो गई है (या deploy होने के लिए तैयार हो रही है)।
### 7: Project Execute करें
यह जाँचने के लिए कि हमने अब तक जो बनाया है वह काम कर रहा है या नहीं, Remix पर वापस जाएँ और `SimpleCoinConsumer` contract के `doSomethingSmart` function को invoke करें।
थोड़ी देर बाद, आपको अपने Tenderly Dashboard में Execution tab में एक execution दिखाई देगा। आपको एक नया transaction भी दिखाई देगा जो oracle के address से आपकी Web3 Action द्वारा भेजा गया था, `OracleContract` contract के `update` function को कॉल करते हुए। 🎉
**Oracle Wallet Private Key Store करें।** chain पर transactions भेजने के लिए, हमारी Web3 Action को transactions पर हस्ताक्षर करने और उन्हें fund करने के लिए एक private key की आवश्यकता है। `OracleContract` को केवल उन updates को स्वीकार करने के लिए designed किया गया है जो उन्हें deploy करने वाले address द्वारा signed हैं।
यदि आप Metamask का उपयोग कर रहे हैं, तो उस account को चुनें जिसका उपयोग आपने smart contract को deploy करने के लिए किया था और [**इस Metamask गाइड**](https://metamask.zendesk.com/hc/en-us/articles/360015289632-How-to-Export-an-Account-Private-Key) का पालन करते हुए इसकी private key copy करें।
Tenderly Dashboard में, `w3_oracle.oracle_address_private_key` नामक एक नया Secret बनाएँ और private key paste करें।
### 6: अपनी Web3 Action Deploy करें
अपने project के root (जिस folder में `tenderly.yaml` file है) पर जाएँ और निम्न command चलाएँ:
```bash title="example" showLineNumbers theme={"theme":{"light":"catppuccin-latte","dark":"catppuccin-mocha"}}
tenderly actions deploy
```
CLI द्वारा successful deployment दिखाने के बाद, आप Tenderly Dashboard पर जा सकते हैं। वहाँ आपको यह देखना चाहिए कि आपकी Web3 Action deploy हो गई है (या deploy होने के लिए तैयार हो रही है)।
### 7: Project Execute करें
यह जाँचने के लिए कि हमने अब तक जो बनाया है वह काम कर रहा है या नहीं, Remix पर वापस जाएँ और `SimpleCoinConsumer` contract के `doSomethingSmart` function को invoke करें।
थोड़ी देर बाद, आपको अपने Tenderly Dashboard में Execution tab में एक execution दिखाई देगा। आपको एक नया transaction भी दिखाई देगा जो oracle के address से आपकी Web3 Action द्वारा भेजा गया था, `OracleContract` contract के `update` function को कॉल करते हुए। 🎉