> ## Documentation Index
> Fetch the complete documentation index at: https://docs.tenderly.co/llms.txt
> Use this file to discover all available pages before exploring further.
# Token Mint, Approve, और TransferFrom Bundle का Simulation करें
> एक 3-चरण bundle का simulation करें जो DAI mint करता है, एक spender को approve करता है, और tokens transfer करता है, चरणों के बीच साझा state के साथ multi-transaction प्रवाहों के परीक्षण के लिए।
यह गाइड एक 3-चरण simulation bundle बनाता है जो क्लासिक ERC-20 approval प्रवाह का अभ्यास करता है: एक holder को tokens mint करना, एक spender को approve करना, फिर spender को `transferFrom` कॉल करने देना। प्रत्येक चरण उस state पर निर्भर करता है जिसे पिछला चरण बनाता है, यही कारण है कि यहाँ एक bundle सही उपकरण है।
## एक bundle क्यों?
प्रत्येक transaction का isolation में simulation करना असफल हो जाता है:
* **केवल Mint**: आप mint logic को सत्यापित कर सकते हैं, लेकिन holder पते के पास mainnet पर कोई tokens नहीं हैं।
* **केवल Approve**: simulation के लिए holder के पास approve करने के लिए वास्तव में balance होना चाहिए।
* **केवल TransferFrom**: balance और approval दोनों का जगह पर होना आवश्यक है।
एक Sim Bundle तीनों को अनुक्रम में चलाता है, परिणामी state साझा करता है। चरण 2 चरण 1 से minted balance देखता है। चरण 3 चरण 2 से approval देखता है।
## तीन transactions
सभी तीन transactions Ethereum mainnet पर DAI contract (`0x6b175474e89094c44da98b954eedeac495271d0f`) को target करते हैं।
### चरण 1: 2 DAI Mint करें
```bash theme={"theme":{"light":"catppuccin-latte","dark":"catppuccin-mocha"}}
From: 0xe2e2e2e2e2e2e2e2e2e2e2e2e2e2e2e2e2e2e2e2 (fake ward)
To: 0x6b175474e89094c44da98b954eedeac495271d0f (DAI)
Input: 0x40c10f19
000000000000000000000000e58b9ee93700a616b50509c8292977fa7a0f8ce1 (recipient)
0000000000000000000000000000000000000000000000001bc16d674ec80000 (2 DAI)
```
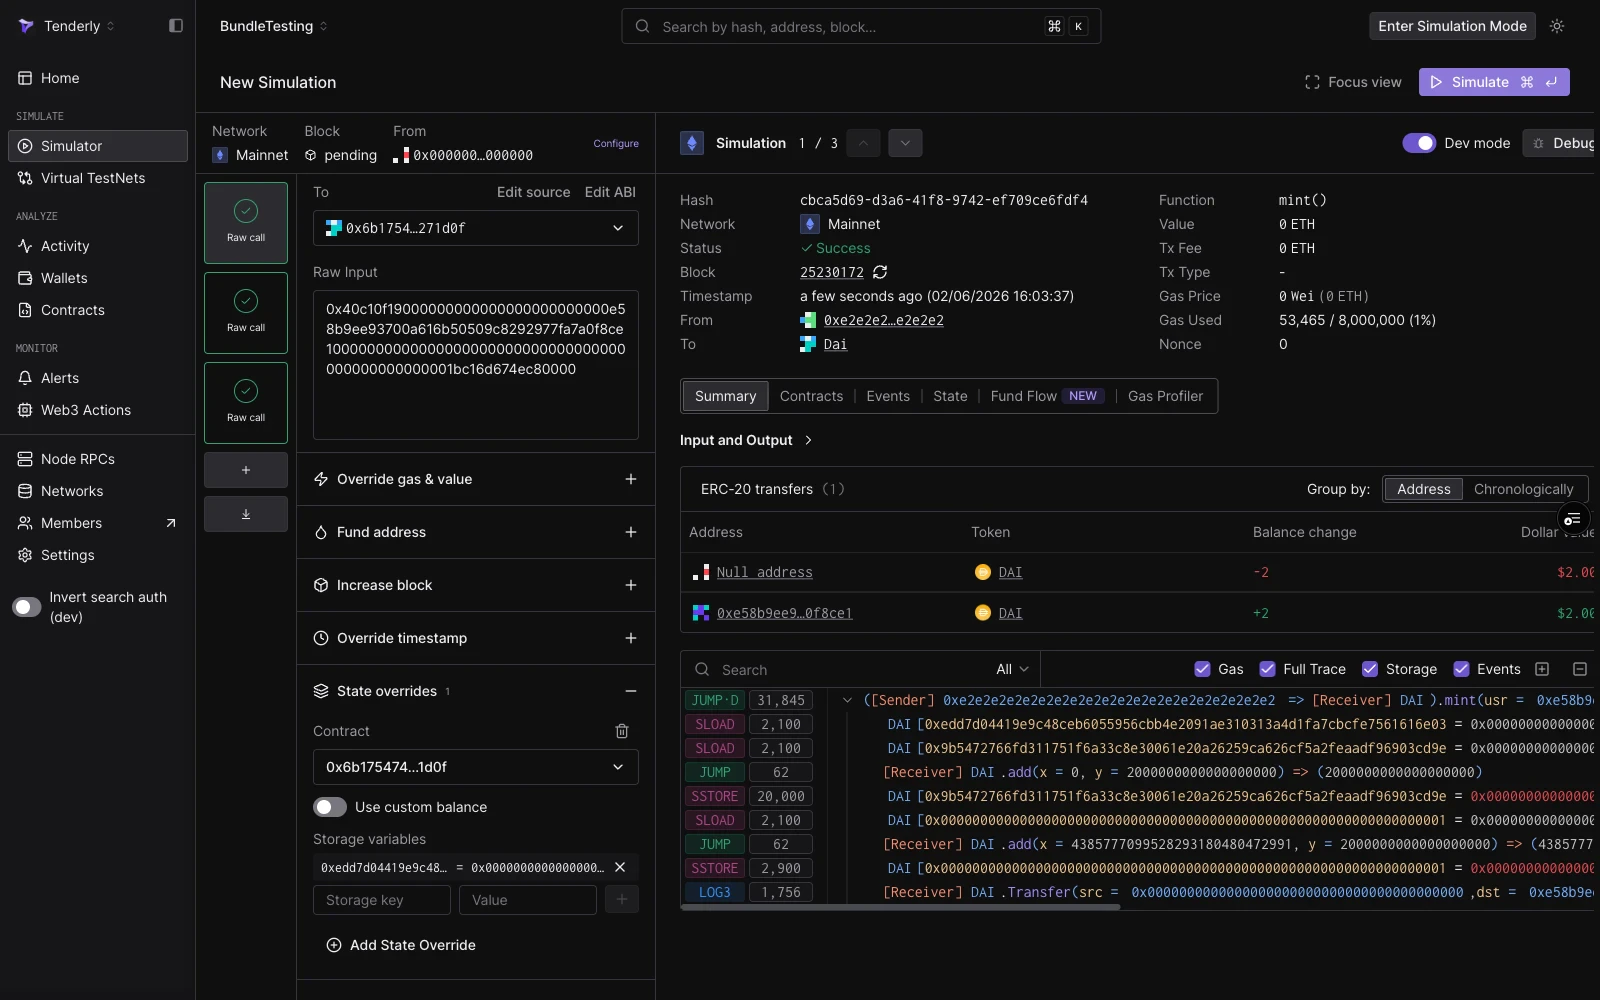
DAI का `mint` function एक `wards` mapping द्वारा संरक्षित है: केवल wards के रूप में पंजीकृत पते ही इसे कॉल कर सकते हैं। Fake ward (`0xe2e2...e2`) mainnet पर ward नहीं है। इस चरण को सफल बनाने के लिए, एक **state override** जोड़ें जो उस पते के लिए ward स्टोरेज स्लॉट को `1` पर सेट करे:
| फ़ील्ड | मान |
| ----------- | -------------------------------------------------------------------- |
| Contract | `0x6b175474e89094c44da98b954eedeac495271d0f` |
| Storage key | `0xedd7d04419e9c48ceb6055956cbb4e2091ae310313a4d1fa7cbcfe7561616e03` |
| मान | `0x0000000000000000000000000000000000000000000000000000000000000001` |
Storage key `keccak256(abi.encode(wardAddress, 0))` है, जो storage स्थिति `0` पर `wards[fakeWardAddress]` के लिए मानक Solidity mapping स्लॉट है।
### चरण 2: 1 DAI Approve करें
```bash theme={"theme":{"light":"catppuccin-latte","dark":"catppuccin-mocha"}}
From: 0xe58b9ee93700a616b50509c8292977fa7a0f8ce1 (token holder from step 1)
To: 0x6b175474e89094c44da98b954eedeac495271d0f (DAI)
Input: 0x095ea7b3
000000000000000000000000f7ddedc66b1d482e5c38e4730b3357d32411e5dd (spender)
0000000000000000000000000000000000000000000000000de0b6b3a7640000 (1 DAI)
```
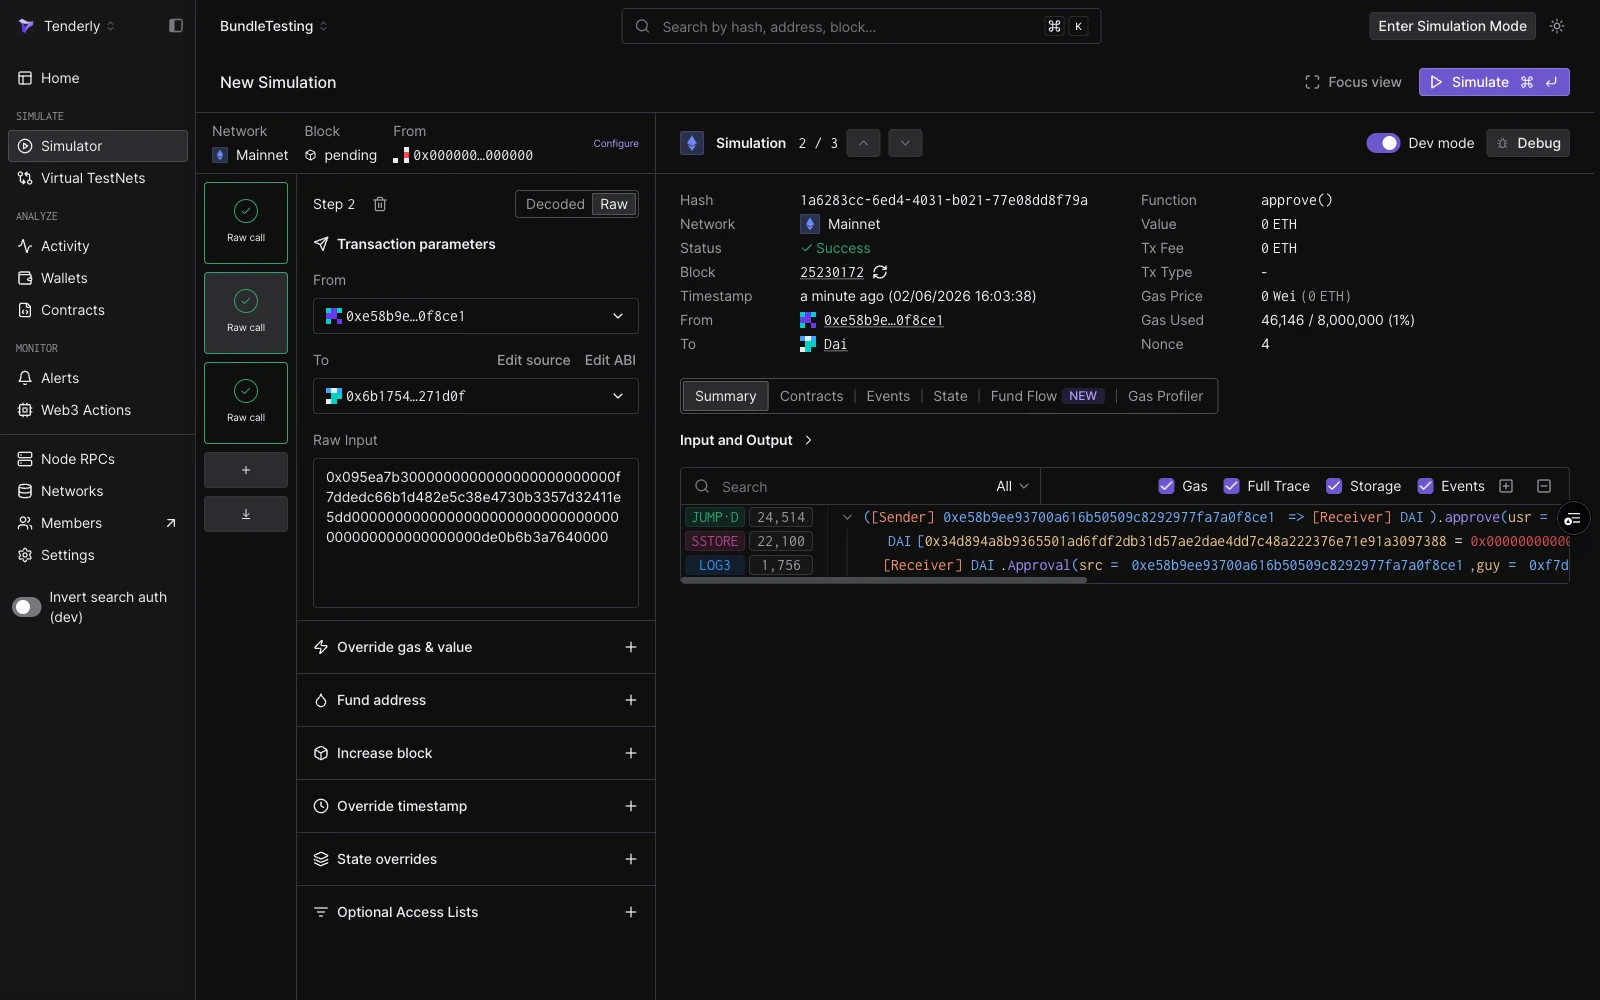
Holder एक spender को 1 DAI तक pull करने के लिए approve करता है। यह चरण काम करता है क्योंकि चरण 1 ने पहले ही साझा state stream में holder के balance में 2 DAI क्रेडिट कर दिए हैं।
### चरण 3: 0.03 DAI TransferFrom
```bash theme={"theme":{"light":"catppuccin-latte","dark":"catppuccin-mocha"}}
From: 0xf7ddedc66b1d482e5c38e4730b3357d32411e5dd (approved spender)
To: 0x6b175474e89094c44da98b954eedeac495271d0f (DAI)
Input: 0x23b872dd
000000000000000000000000e58b9ee93700a616b50509c8292977fa7a0f8ce1 (sender / token holder)
000000000000000000000000bd8daa414fda8a8a129f7035e7496759c5af8570 (recipient)
000000000000000000000000000000000000000000000000006a94d74f430000 (0.03 DAI)
```
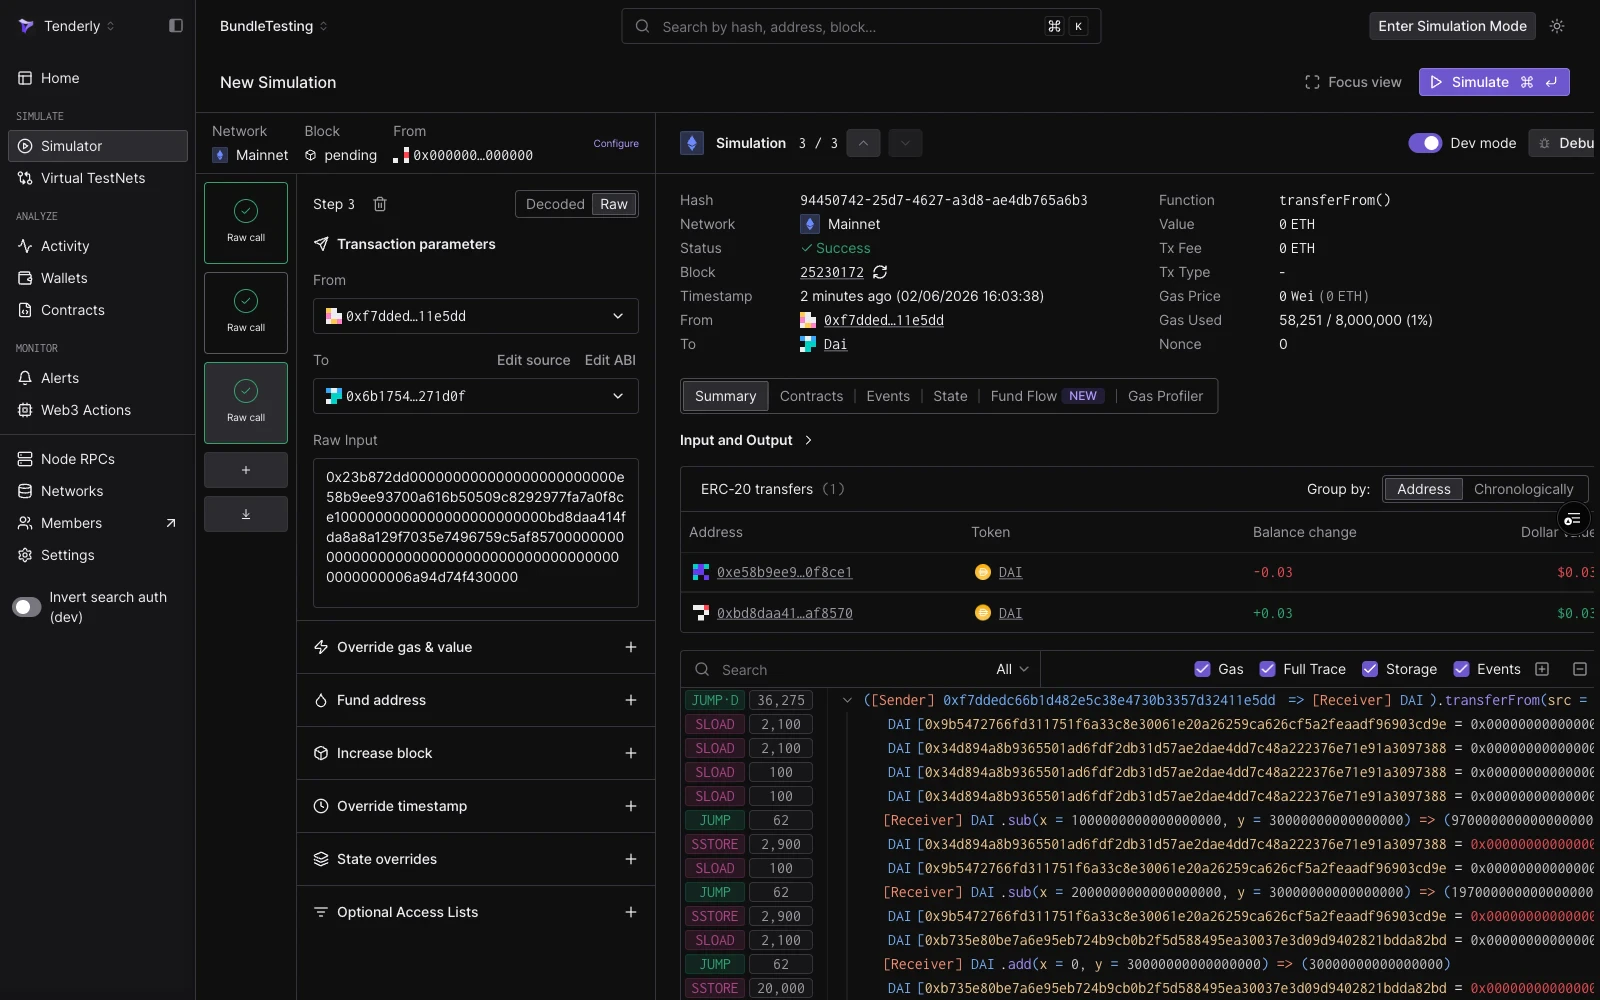
Spender holder से एक recipient को 0.03 DAI ले जाता है। यह काम करता है क्योंकि चरण 2 ने allowance प्रदान किया, जो केवल bundle के state stream के अंदर दिखाई देता है, on-chain नहीं।
## Simulator UI के माध्यम से चलाएँ
बाएँ नेविगेशन में **Simulator** पर जाएँ, फिर **New Simulation** पर क्लिक करें। Bundle builder एक खाली चरण के साथ खुलता है।
Session strip शीर्ष पर चलता है। **Network** को **Mainnet** पर सेट करें और **Block** को **Pending** के रूप में छोड़ दें।
चरण को **Raw** मोड में switch करें। सेट करें:
* **From**: `0xe2e2e2e2e2e2e2e2e2e2e2e2e2e2e2e2e2e2e2e2`
* **To**: `0x6b175474e89094c44da98b954eedeac495271d0f`
* **Calldata**: `0x40c10f19000000000000000000000000e58b9ee93700a616b50509c8292977fa7a0f8ce10000000000000000000000000000000000000000000000001bc16d674ec80000`
फिर **State overrides** का विस्तार करें, DAI contract जोड़ें, और ऊपर दी गई तालिका से ward storage स्लॉट और मान दर्ज करें। स्लॉट commit करने के लिए **Add storage override** पर क्लिक करें।
 Bundle rail में **+ Add function call** पर क्लिक करें। नए चरण को **Raw** मोड में switch करें। सेट करें:
* **From**: `0xe58b9ee93700a616b50509c8292977fa7a0f8ce1`
* **To**: `0x6b175474e89094c44da98b954eedeac495271d0f`
* **Calldata**: `0x095ea7b3000000000000000000000000f7ddedc66b1d482e5c38e4730b3357d32411e5dd0000000000000000000000000000000000000000000000000de0b6b3a7640000`
एक और चरण जोड़ें। **Raw** मोड में switch करें। सेट करें:
* **From**: `0xf7ddedc66b1d482e5c38e4730b3357d32411e5dd`
* **To**: `0x6b175474e89094c44da98b954eedeac495271d0f`
* **Calldata**: `0x23b872dd000000000000000000000000e58b9ee93700a616b50509c8292977fa7a0f8ce1000000000000000000000000bd8daa414fda8a8a129f7035e7496759c5af8570000000000000000000000000000000000000000000000000006a94d74f430000`
**Simulate** पर क्लिक करें (या `⌘↵` दबाएँ)। सभी तीनों चरण अनुक्रम में निष्पादित होते हैं। इसके decoded आउटपुट, उपयोग किए गए gas, events, और token transfers का निरीक्षण करने के लिए rail में प्रत्येक चरण पर क्लिक करें।
Bundle rail में **+ Add function call** पर क्लिक करें। नए चरण को **Raw** मोड में switch करें। सेट करें:
* **From**: `0xe58b9ee93700a616b50509c8292977fa7a0f8ce1`
* **To**: `0x6b175474e89094c44da98b954eedeac495271d0f`
* **Calldata**: `0x095ea7b3000000000000000000000000f7ddedc66b1d482e5c38e4730b3357d32411e5dd0000000000000000000000000000000000000000000000000de0b6b3a7640000`
एक और चरण जोड़ें। **Raw** मोड में switch करें। सेट करें:
* **From**: `0xf7ddedc66b1d482e5c38e4730b3357d32411e5dd`
* **To**: `0x6b175474e89094c44da98b954eedeac495271d0f`
* **Calldata**: `0x23b872dd000000000000000000000000e58b9ee93700a616b50509c8292977fa7a0f8ce1000000000000000000000000bd8daa414fda8a8a129f7035e7496759c5af8570000000000000000000000000000000000000000000000000006a94d74f430000`
**Simulate** पर क्लिक करें (या `⌘↵` दबाएँ)। सभी तीनों चरण अनुक्रम में निष्पादित होते हैं। इसके decoded आउटपुट, उपयोग किए गए gas, events, और token transfers का निरीक्षण करने के लिए rail में प्रत्येक चरण पर क्लिक करें।
 ## Simulation API के माध्यम से चलाएँ
समान अनुक्रम को प्रोग्रामेटिक रूप से चलाने के लिए `simulate-bundle` एंडपॉइंट का उपयोग करें। `{accountSlug}` और `{projectSlug}` को अपने मानों से बदलें।
```bash theme={"theme":{"light":"catppuccin-latte","dark":"catppuccin-mocha"}}
curl --request POST \
--url https://api.tenderly.co/api/v1/account/{accountSlug}/project/{projectSlug}/simulate-bundle \
--header 'Content-Type: application/json' \
--header 'X-Access-Key: ' \
--data '{
"simulations": [
{
"network_id": "1",
"save": true,
"save_if_fails": true,
"simulation_type": "full",
"from": "0xe2e2e2e2e2e2e2e2e2e2e2e2e2e2e2e2e2e2e2e2",
"to": "0x6b175474e89094c44da98b954eedeac495271d0f",
"input": "0x40c10f19000000000000000000000000e58b9ee93700a616b50509c8292977fa7a0f8ce10000000000000000000000000000000000000000000000001bc16d674ec80000",
"state_objects": {
"0x6b175474e89094c44da98b954eedeac495271d0f": {
"storage": {
"0xedd7d04419e9c48ceb6055956cbb4e2091ae310313a4d1fa7cbcfe7561616e03": "0x0000000000000000000000000000000000000000000000000000000000000001"
}
}
}
},
{
"network_id": "1",
"save": true,
"save_if_fails": true,
"simulation_type": "full",
"from": "0xe58b9ee93700a616b50509c8292977fa7a0f8ce1",
"to": "0x6b175474e89094c44da98b954eedeac495271d0f",
"input": "0x095ea7b3000000000000000000000000f7ddedc66b1d482e5c38e4730b3357d32411e5dd0000000000000000000000000000000000000000000000000de0b6b3a7640000"
},
{
"network_id": "1",
"save": true,
"save_if_fails": true,
"simulation_type": "full",
"from": "0xf7ddedc66b1d482e5c38e4730b3357d32411e5dd",
"to": "0x6b175474e89094c44da98b954eedeac495271d0f",
"input": "0x23b872dd000000000000000000000000e58b9ee93700a616b50509c8292977fa7a0f8ce1000000000000000000000000bd8daa414fda8a8a129f7035e7496759c5af8570000000000000000000000000000000000000000000000000006a94d74f430000"
}
]
}'
```
प्रतिक्रिया तीन simulation परिणामों की एक array है, प्रति चरण एक। प्रत्येक entry में `status`, `gasUsed`, decoded `logs`, एक `trace`, `assetChanges`, और `balanceChanges` होता है।
एक सफल रन सभी तीनों चरणों के लिए `"status": true` दिखाता है। यदि कोई चरण revert करता है (उदाहरण के लिए, क्योंकि चरण 1 से state override गायब है), तो API विफल होने वाले चरण तक और उसे सहित सभी परिणाम लौटाता है, और उसके बाद के चरण नहीं चलाए जाते।
## परिणामों में क्या देखें
| चरण | मुख्य संकेत |
| ------------ | ---------------------------------------------------------------------------------------------------------------------------------------------------------------------------------------------------------------------- |
| Mint | `"type": "Mint"` के साथ `assetChanges` entry और holder को क्रेडिट किए गए 2 DAI। zero पते से `Transfer` event। |
| Approve | `logs` में `Approval` event। कोई asset परिवर्तन नहीं (approvals tokens स्थानांतरित नहीं करते)। |
| TransferFrom | `"type": "Transfer"` के साथ `assetChanges` entry और 0.03 DAI holder से recipient तक जा रहा है। `logs` में `Transfer` event। `balanceChanges` holder के लिए नकारात्मक delta और recipient के लिए सकारात्मक दिखा रहे हैं। |
## आगे के चरण
* [Bundled Simulations (API reference)](/simulations/bundled-simulations): पूर्ण endpoint documentation और response schema।
* [State overrides](/simulations/state-overrides): simulations में storage, balance, और bytecode को कैसे override करें।
* [Simulator UI](/simulator-ui/overview): bundle builder के लिए layout reference और keyboard shortcuts।
## Simulation API के माध्यम से चलाएँ
समान अनुक्रम को प्रोग्रामेटिक रूप से चलाने के लिए `simulate-bundle` एंडपॉइंट का उपयोग करें। `{accountSlug}` और `{projectSlug}` को अपने मानों से बदलें।
```bash theme={"theme":{"light":"catppuccin-latte","dark":"catppuccin-mocha"}}
curl --request POST \
--url https://api.tenderly.co/api/v1/account/{accountSlug}/project/{projectSlug}/simulate-bundle \
--header 'Content-Type: application/json' \
--header 'X-Access-Key: ' \
--data '{
"simulations": [
{
"network_id": "1",
"save": true,
"save_if_fails": true,
"simulation_type": "full",
"from": "0xe2e2e2e2e2e2e2e2e2e2e2e2e2e2e2e2e2e2e2e2",
"to": "0x6b175474e89094c44da98b954eedeac495271d0f",
"input": "0x40c10f19000000000000000000000000e58b9ee93700a616b50509c8292977fa7a0f8ce10000000000000000000000000000000000000000000000001bc16d674ec80000",
"state_objects": {
"0x6b175474e89094c44da98b954eedeac495271d0f": {
"storage": {
"0xedd7d04419e9c48ceb6055956cbb4e2091ae310313a4d1fa7cbcfe7561616e03": "0x0000000000000000000000000000000000000000000000000000000000000001"
}
}
}
},
{
"network_id": "1",
"save": true,
"save_if_fails": true,
"simulation_type": "full",
"from": "0xe58b9ee93700a616b50509c8292977fa7a0f8ce1",
"to": "0x6b175474e89094c44da98b954eedeac495271d0f",
"input": "0x095ea7b3000000000000000000000000f7ddedc66b1d482e5c38e4730b3357d32411e5dd0000000000000000000000000000000000000000000000000de0b6b3a7640000"
},
{
"network_id": "1",
"save": true,
"save_if_fails": true,
"simulation_type": "full",
"from": "0xf7ddedc66b1d482e5c38e4730b3357d32411e5dd",
"to": "0x6b175474e89094c44da98b954eedeac495271d0f",
"input": "0x23b872dd000000000000000000000000e58b9ee93700a616b50509c8292977fa7a0f8ce1000000000000000000000000bd8daa414fda8a8a129f7035e7496759c5af8570000000000000000000000000000000000000000000000000006a94d74f430000"
}
]
}'
```
प्रतिक्रिया तीन simulation परिणामों की एक array है, प्रति चरण एक। प्रत्येक entry में `status`, `gasUsed`, decoded `logs`, एक `trace`, `assetChanges`, और `balanceChanges` होता है।
एक सफल रन सभी तीनों चरणों के लिए `"status": true` दिखाता है। यदि कोई चरण revert करता है (उदाहरण के लिए, क्योंकि चरण 1 से state override गायब है), तो API विफल होने वाले चरण तक और उसे सहित सभी परिणाम लौटाता है, और उसके बाद के चरण नहीं चलाए जाते।
## परिणामों में क्या देखें
| चरण | मुख्य संकेत |
| ------------ | ---------------------------------------------------------------------------------------------------------------------------------------------------------------------------------------------------------------------- |
| Mint | `"type": "Mint"` के साथ `assetChanges` entry और holder को क्रेडिट किए गए 2 DAI। zero पते से `Transfer` event। |
| Approve | `logs` में `Approval` event। कोई asset परिवर्तन नहीं (approvals tokens स्थानांतरित नहीं करते)। |
| TransferFrom | `"type": "Transfer"` के साथ `assetChanges` entry और 0.03 DAI holder से recipient तक जा रहा है। `logs` में `Transfer` event। `balanceChanges` holder के लिए नकारात्मक delta और recipient के लिए सकारात्मक दिखा रहे हैं। |
## आगे के चरण
* [Bundled Simulations (API reference)](/simulations/bundled-simulations): पूर्ण endpoint documentation और response schema।
* [State overrides](/simulations/state-overrides): simulations में storage, balance, और bytecode को कैसे override करें।
* [Simulator UI](/simulator-ui/overview): bundle builder के लिए layout reference और keyboard shortcuts।