> ## Documentation Index
> Fetch the complete documentation index at: https://docs.tenderly.co/llms.txt
> Use this file to discover all available pages before exploring further.

# Rabby Wallet Transaction Preview

> Tenderly Simulation API का उपयोग करके Rabby Wallet में transaction preview जोड़ें ताकि उपयोगकर्ता on-chain भेजने से पहले परिणामों का पूर्वावलोकन कर सकें।

यह ट्यूटोरियल दिखाता है कि [Tenderly Simulation API](/api-reference) का उपयोग करके एक Rabby Wallet उदाहरण में "transaction preview" सुविधा कैसे एकीकृत करें।

[Transaction Preview](/simulations/transaction-preview) wallet उपयोगकर्ताओं को transaction execution का simulation करने और transactions को on-chain भेजे बिना सटीक परिणामों का पूर्वावलोकन करने में सक्षम बनाता है। इस तरह, उपयोगकर्ता अपने transactions के वित्तीय निहितार्थों को बेहतर ढंग से समझ सकते हैं और उन्हें विश्वास के साथ भेज सकते हैं। इसके अतिरिक्त, आप उपयोगकर्ताओं के funds की रक्षा करने, अनावश्यक gas लागतों को समाप्त करने, और अपने उत्पाद के समग्र उपयोगकर्ता अनुभव और सुरक्षा में सुधार करने में मदद करते हैं।

यहाँ इस ओपन-सोर्स उदाहरण का GitHub repository है:

<Card title="Tenderly Transaction Simulations को Rabby Wallet में एकीकृत करें" href="" />

<iframe src="https://youtube.com/embed/6Dqd_1EANfY" style={{ aspectRatio: 16 / 9, width: '100%' }} />

Tenderly Rabby Transaction Preview Demo

<Warning>
  यह ट्यूटोरियल केवल दृष्टांत उद्देश्यों के लिए है, यह दिखाते हुए कि Transaction Preview को Rabby Wallet
  में कैसे एकीकृत किया जाए। यह किसी अन्य उपयोग के लिए न तो उद्देशित है और न ही अनुशंसित है।
</Warning>

## प्रोजेक्ट ओवरव्यू

इस ट्यूटोरियल में, आप सीखेंगे कि Tenderly Simulation API को [Rabby Wallet Chrome extension](https://github.com/RabbyHub/Rabby/blob/develop/README.md) में कैसे एकीकृत करें। पहले, आप सीखेंगे कि API के साथ कैसे interact करें और transaction simulation logic को कैसे implement करें। फिर, आप simulation डेटा को group करेंगे और इसे उपयोगकर्ता को उजागर करेंगे। इस तरह, आप नई कार्यक्षमताओं को जोड़कर इस Rabby Wallet उदाहरण में उपयोगकर्ता अनुभव में सुधार करेंगे।

### आवश्यकताएँ

इस ट्यूटोरियल के लिए, आपको चाहिए:

* [Node.js](https://nodejs.org) (संस्करण 14 या बाद का)
* [Yarn](https://classic.yarnpkg.com/lang/en/docs/install)
* React.js, TypeScript, और [Tailwind CSS](https://tailwindcss.com) का ज्ञान

चलिए बनाना शुरू करते हैं! 👷‍♂️

## चरण 1: Rabby Wallet प्रोजेक्ट को Clone करें

पहले, आधिकारिक Rabby Wallet GitHub repository को fork या clone करें। ऐसा करने के लिए, चलाएँ:

```bash title="example" showLineNumbers theme={"theme":{"light":"catppuccin-latte","dark":"catppuccin-mocha"}}
git clone https://github.com/RabbyHub/Rabby.git
```

इसके बाद, प्रोजेक्ट root पर navigate करें और Yarn package manager का उपयोग करके dependencies install करें:

```bash title="example" showLineNumbers theme={"theme":{"light":"catppuccin-latte","dark":"catppuccin-mocha"}}
yarn install
```

फिर, स्थानीय रूप से repo चलाने के लिए निम्नलिखित command का उपयोग करें:

```bash title="example" showLineNumbers theme={"theme":{"light":"catppuccin-latte","dark":"catppuccin-mocha"}}
yarn build:dev
```

`dist` फ़ोल्डर उत्पन्न होगा। आप इसका उपयोग अपने Chrome extension को load करने के लिए कर सकते हैं।

`chrome://extensions` पर जाएँ और **Developer mode** enable करें। फिर, "**Load unpacked**" बटन पर क्लिक करें, अपनी Rabby directory पर navigate करें, और `dist` फ़ोल्डर चुनें। Unpacked extension screen पर दिखाई देगा, और आप Rabby Wallet का उपयोग शुरू कर सकते हैं।

अब, आप अपना मौजूदा wallet आयात कर सकते हैं या एक नया बना सकते हैं।

<Note>
  शुरू करने से पहले, यदि आपके पास Rabby Wallet Chrome Extension का production संस्करण installed है तो उसे disable करना सुनिश्चित करें।

  यदि आप कोई connection समस्या का सामना करते हैं तो कृपया Rabby टीम से [official guidelines](https://github.com/RabbyHub/Rabby) का पालन करें।
</Note>

<Frame caption="Enabled unpacked version of the Rabby Wallet">
  <img src="https://mintcdn.com/tenderly/XsEZlaGXYskrtN68/images/image%20(110).webp?fit=max&auto=format&n=XsEZlaGXYskrtN68&q=85&s=520d02bca5404aca64622e997566e6f3" alt="Enabled unpacked version of the Rabby Wallet" width="854" height="462" data-path="images/image (110).webp" />
</Frame>

<Frame caption="Disabled production version of the Rabby Wallet">
  <img src="https://mintcdn.com/tenderly/XsEZlaGXYskrtN68/images/image%20(112).webp?fit=max&auto=format&n=XsEZlaGXYskrtN68&q=85&s=6e4fd241cbd2ebf214eb5e55f3335748" alt="Disabled production version of the Rabby Wallet" width="840" height="454" data-path="images/image (112).webp" />
</Frame>

## चरण 2: एक Tenderly एक्सेस टोकन उत्पन्न करें

Tenderly Simulation API का उपयोग करने के लिए, आपको एक एक्सेस टोकन उत्पन्न करना होगा। इन चरणों का पालन करें:

1. [एक निःशुल्क Tenderly account बनाएँ](https://dashboard.tenderly.co/register) या अपने मौजूदा में लॉग इन करें।
2. [Authorization page](https://dashboard.tenderly.co/account/authorization) पर जाएँ और **Generate Access Token** बटन पर क्लिक करें।
3. टोकन secret केवल एक बार प्रदर्शित होता है। इसे कहीं सुरक्षित रूप से copy और store करना सुनिश्चित करें क्योंकि आप इसे बाद में पुनः प्राप्त नहीं कर पाएँगे।

<figure>
  !\[Tenderly Docs]\(/images/image (113).webp)

  <figcaption />
</figure>

यदि आपको API प्रमाणीकरण प्रक्रिया में किसी सहायता की आवश्यकता है तो नीचे दी गई गाइड का पालन करें:

<Card title="API एक्सेस टोकन कैसे उत्पन्न करें" href="" />

## चरण 3: Simulation logic बनाएँ

इसके बाद, हम निम्नलिखित चरणों को कवर करेंगे:

* Tenderly credentials के लिए एक सुरक्षित storage सिस्टम सेटअप करें।
* Tenderly Simulation API से जुड़ने के लिए आवश्यक code बनाएँ।
* API के साथ interact करने के लिए private और public दोनों endpoints का उपयोग करें।
* इन endpoints के लिए एक उचित payload construct करें।

### Tenderly Credentials संभालना

पहले, आपको Tenderly credentials retrieve करने की आवश्यकता है। एक फ़ाइल `/_raw/tenderly.json` बनाएँ और Tenderly credentials अपडेट करें:

```json title="example.json" showLineNumbers theme={"theme":{"light":"catppuccin-latte","dark":"catppuccin-mocha"}}
{
  "tenderlyAccount": "YOUR_ACCOUNT_NAME",
  "tenderlyProject": "YOUR_PROJECT_NAME",
  "tenderlyAccessToken": "YOUR_ACCESS_TOKEN"
}
```

अपने प्रोजेक्ट में Tenderly credentials तक पहुँचने के लिए, आपको `build/webpack.common.config.js` को निम्नलिखित के साथ अपडेट करने की आवश्यकता है:

```javascript title="example.js" showLineNumbers theme={"theme":{"light":"catppuccin-latte","dark":"catppuccin-mocha"}}
const { tenderlyAccount, tenderlyProject, tenderlyAccessToken } = require('../_raw/tenderly.json');

// other code...

const config = {
  plugins: [
    // abbreviated
    new webpack.DefinePlugin({
      'process.env.version': JSON.stringify(`version: ${version}`),
      'process.env.release': JSON.stringify(version),
      // Tenderly Credentials
      'process.env.TENDERLY_ACCOUNT_SLUG': JSON.stringify(tenderlyAccount),
      'process.env.TENDERLY_PROJECT_SLUG': JSON.stringify(tenderlyProject),
      'process.env.TENDERLY_ACCESS_TOKEN': JSON.stringify(tenderlyAccessToken),
    }),
  ],
  resolve: {
    // abbreviated
  },
};
```

आप [implementation यहाँ पा सकते हैं](https://github.com/Tenderly/tenderly-rabby-transaction-preview/blob/develop/build/webpack.common.config.js#L221)।

### Transaction simulation logic implement करना

इसके बाद, एक `src/ui/utils/tenderly.ts` फ़ाइल बनाएँ और Tenderly Simulation API का उपयोग करके logic implement करें। [यहाँ पूर्ण source code प्राप्त करें](https://github.com/Tenderly/tenderly-rabby-transaction-preview/blob/develop/src/ui/utils/tenderly.ts)।

```tsx title="example.tsx" showLineNumbers theme={"theme":{"light":"catppuccin-latte","dark":"catppuccin-mocha"}}

export const simulateTransaction = async (tx: Tx): Promise<Record<string, any> | null> => {
  const TENDERLY_ACCOUNT_SLUG = process.env.TENDERLY_ACCOUNT_SLUG;
  const TENDERLY_PROJECT_SLUG = process.env.TENDERLY_PROJECT_SLUG;
  const TENDERLY_ACCESS_TOKEN = process.env.TENDERLY_ACCESS_TOKEN;

  if (!TENDERLY_ACCOUNT_SLUG || !TENDERLY_PROJECT_SLUG || !TENDERLY_ACCESS_TOKEN) {
    throw new Error('Tenderly credentials are not set up correctly.');
  }

  const txPayload: any = {
    ...tx,
    save: true,
    save_if_fails: true,
    simulation_type: 'full',
    source: 'rabby-wallet',
    network_id: tx.chainId.toString(),
    gas: parseInt(tx.gas as string, 16) || null,
    gas_price: parseInt(tx.gasPrice as string, 16) || null,
    value: parseInt(tx.value, 16) || null,
    input: tx.data,
  };

  try {
    const simulationResponse = await axios.post(
      `https://api.tenderly.co/api/v1/account/${TENDERLY_ACCOUNT_SLUG}/project/${TENDERLY_PROJECT_SLUG}/simulate`,
      txPayload,
      {
        headers: {
          'Content-Type': 'application/json',
          'X-Access-Key': TENDERLY_ACCESS_TOKEN as string,
        },
      },
    );

    // Make the simulation publicly accessible
    if (simulationResponse?.data?.simulation?.id) {
      await axios.post(
        `https://api.tenderly.co/api/v1/account/${TENDERLY_ACCOUNT_SLUG}/project/${TENDERLY_PROJECT_SLUG}/simulations/${simulationResponse.data.simulation.id}/share`,
        {},
        {
          headers: {
            'Content-Type': 'application/json',
            'X-Access-Key': TENDERLY_ACCESS_TOKEN as string,
          },
        },
      );
    }

    return simulationResponse?.data;
  } catch (e) {
    console.error({ e });
    return null;
  }
};
```

यहाँ, हमने दो endpoints का उपयोग किया।

पहला endpoint आपको Tenderly द्वारा समर्थित [104 नेटवर्क](/platform/supported-networks) में से किसी पर भी विभिन्न पैरामीटर्स के साथ एक transaction का simulation करने की अनुमति देता है। इस endpoint के लिए सभी आवश्यक और वैकल्पिक फ़ील्ड देखने के लिए हमारे [Simulation API reference](/api-reference) पर जाएँ।

```bash title="example" showLineNumbers theme={"theme":{"light":"catppuccin-latte","dark":"catppuccin-mocha"}}
https://api.tenderly.co/api/v1/account/{accountId}/project/{projectId}/simulate
```

दूसरा endpoint आपको एक simulated transaction को सार्वजनिक रूप से सुलभ बनाने में सक्षम बनाता है। इस तरह, आप अतिरिक्त अंतर्दृष्टि या त्वरित समस्या समाधान के लिए इसे अपने टीम के सदस्यों या सहयोगियों के साथ साझा कर सकते हैं।

```bash title="example" showLineNumbers theme={"theme":{"light":"catppuccin-latte","dark":"catppuccin-mocha"}}
https://api.tenderly.co/api/v1/account/{accountId}/project/{projectId}/simulations/{simulationID}/share
```

अंतिम चरण `SignTx.tx` component के भीतर `simulateTransaction` function को `explainTx` function के अंदर रखकर call करना है, जिसे transaction पर हस्ताक्षर करने से पहले invoke किया जाता है। Code विवरण के लिए, इस [लिंक](https://github.com/Tenderly/tenderly-rabby-transaction-preview/blob/develop/src/ui/views/Approval/components/SignTx.tsx#L911) को देखें।

## चरण 4: एक simulated transaction preview प्रदर्शित करें

Transactions भेजते समय क्या होगा यह समझने में उपयोगकर्ताओं की मदद करने के लिए, आप UI में मानव-पठनीय simulation डेटा दिखा सकते हैं। उदाहरण के लिए, एक बार जब wallet उपयोगकर्ता transactions का simulation कर लेते हैं, तो आप प्रदर्शित कर सकते हैं कि कौन से assets स्थानांतरित किए गए हैं।

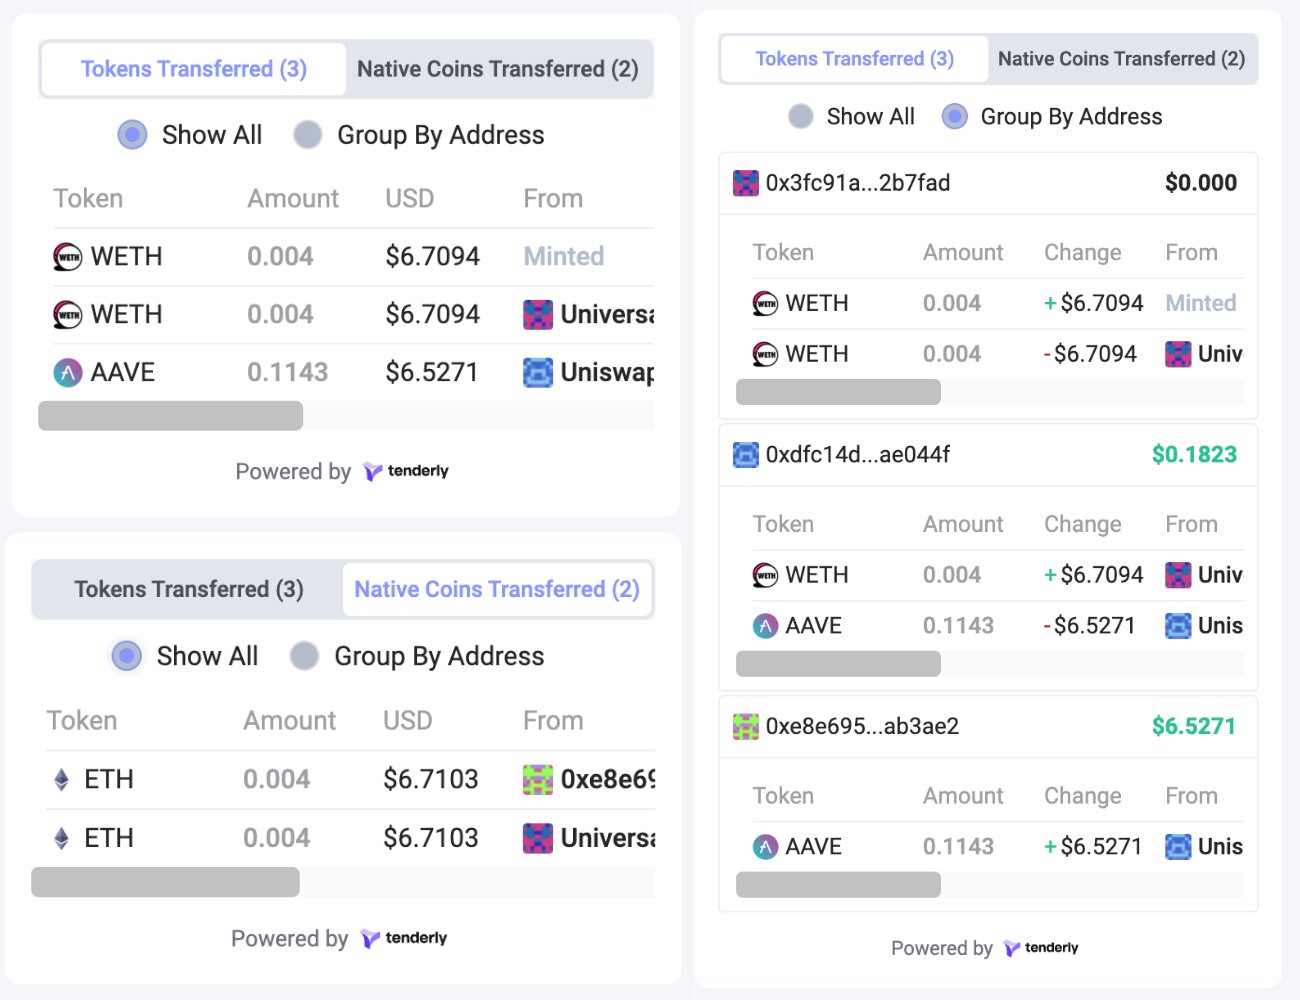
Rabby Wallet उदाहरण में, हमने तीन आसानी से समझ में आने वाले sections बनाए:

1. **`Tenderly Simulation Summary`**: इसे एक transaction report card के रूप में सोचें। यह आपको आपके transaction के बारे में मूल जानकारी देता है, Tenderly Dashboard में एक विस्तृत simulation ओवरव्यू के लिए एक direct link के साथ।
2. **`Assets In & Assets Out`**: आपके wallet द्वारा interact करने वाले सभी assets (चाहे ERC20 या NFT tokens) की एक स्पष्ट सूची प्राप्त करें।
3. **`Tokens Transferred`**: एक transaction के भीतर होने वाले प्रत्येक token transfer को देखें। अतिरिक्त स्पष्टता के लिए, सभी transfers को पते के अनुसार group करें और native coin transfers को highlight करें।

<Frame caption="Transaction preview for ERC20 token swap on Uniswap">
  <img src="https://mintcdn.com/tenderly/XsEZlaGXYskrtN68/images/image%20(114).webp?fit=max&auto=format&n=XsEZlaGXYskrtN68&q=85&s=5d41e85766b24da2a541d8c60ea31565" alt="Transaction preview for ERC20 token swap on Uniswap" width="491" height="1255" data-path="images/image (114).webp" />
</Frame>

<Frame caption="Transaction preview for NFT token purchase on Joepegs">
  <img src="https://mintcdn.com/tenderly/XsEZlaGXYskrtN68/images/image%20(115).webp?fit=max&auto=format&n=XsEZlaGXYskrtN68&q=85&s=cfdd30d3b489394ff18d90d9f7304b5c" alt="Transaction preview for NFT token purchase on Joepegs" width="443" height="1265" data-path="images/image (115).webp" />
</Frame>

### Tenderly Simulation Summary

पहले, चलिए Tenderly Simulation Summary section बनाएँ। यहाँ, हम simulation status, वह नेटवर्क जहाँ transaction निष्पादित हुआ है, और gas मान दिखाते हैं।

<figure>
  !\[Tenderly Docs]\(/images/image (116).webp)

  <figcaption />
</figure>

इस section को बनाने के लिए, आपको [Tenderly Simulation API प्रतिक्रिया](/api-reference) के साथ interact करने की आवश्यकता है। एक `TenderlySimulationSummary.tsx` फ़ाइल बनाकर शुरू करें। आप संपूर्ण code implementation नीचे या [GitHub repo यहाँ](https://github.com/Tenderly/tenderly-rabby-transaction-preview/blob/develop/src/ui/views/Approval/components/TxComponents/Tenderly/TenderlySimulationSummary/TenderlySimulationSummary.tsx) में पा सकते हैं।

```tsx title="example.tsx" showLineNumbers theme={"theme":{"light":"catppuccin-latte","dark":"catppuccin-mocha"}}


const TenderlySimulationSummary = ({ simulation }: { simulation: Record<string, any> | null }) => {
  const isSuccess = !!simulation?.status;
  const simulationUrl = `https://dashboard.tenderly.co/${process.env.TENDERLY_ACCOUNT_SLUG}/${process.env.TENDERLY_PROJECT_SLUG}/simulator/${simulation?.id}`;
  const sharedSimulationUrl = `https://tdly.co/shared/simulation/${simulation?.id}`;

  return (
    <div className="tenderly-simulation-summary container">
      <p className="text-16 text-gray-title font-medium mb-12">Tenderly Simulation Summary</p>
      {!simulation && <div>Something went wrong.</div>}
      {simulation && (
        <div className="flex flex-col gap-8">
          <div className="flex items-center justify-between gap-2">
            <div>Status</div>
            <div className={isSuccess ? 'text-green' : 'text-red'}>
              {isSuccess ? 'Success' : 'Failed'}
            </div>
          </div>
          <div className="flex items-center justify-between gap-2">
            <div>Network</div>
            <div className="flex items-center gap-4">
              <div className="flex items-center rounded-full">
                <img
                  src={TenderlyNetwork[simulation.network_id]?.image}
                  className="h-16 rounded-full"
                  alt="Tenderly"
                />
              </div>
              <div>{TenderlyNetwork[simulation.network_id]?.name}</div>
            </div>
          </div>
          <div className="flex items-center justify-between gap-2">
            <div>Gas</div>
            <div>{simulation.gas}</div>
          </div>
          <Button
            className="tenderly-simulation-summary-button flex items-center justify-between gap-2 pb-0"
            href={simulationUrl}
            target="_blank"
            rel="noreferrer"
            size="large"
            block
          >
            <div>View details</div>
            <div className="flex items-center gap-2">
              <img src={TenderlySvg} className="h-32" alt="Tenderly" />
              <IconRightArrow />
            </div>
          </Button>
          <Button
            className="text-[#6E56CF] bg-white flex items-center justify-center gap-2 pb-0"
            href={sharedSimulationUrl}
            target="_blank"
            rel="noreferrer"
            type="link"
            size="middle"
            block
          >
            <div>Share simulation ✨</div>
          </Button>
        </div>
      )}
    </div>
  );
};

export default TenderlySimulationSummary;
```

ध्यान दें कि हमने उन links को कैसे उत्पन्न किया जो उपयोगकर्ताओं को Tenderly Dashboard पर ले जाते हैं। पहला link authenticated उपयोगकर्ताओं के लिए है और दूसरा एक shareable transaction simulation link है:

```tsx title="example.tsx" showLineNumbers theme={"theme":{"light":"catppuccin-latte","dark":"catppuccin-mocha"}}
const simulationUrl = `https://dashboard.tenderly.co/${process.env.TENDERLY_ACCOUNT_SLUG}/${process.env.TENDERLY_PROJECT_SLUG}/simulator/${simulation?.id}`;
const sharedSimulationUrl = `https://tdly.co/shared/simulation/${simulation?.id}`;
```

एक simulated transaction से डेटा retrieve करने के लिए, Tenderly Simulation API reference देखें:

<Card title="Tenderly Simulation API" href="" />

### Assets In & Assets Out

दूसरा section Rabby Wallet उदाहरण के भीतर assets के प्रवाह के प्रबंधन और निगरानी में अंतर्दृष्टि प्रदान करता है। यह आने वाले और जाने वाले दोनों assets को दिखाता है ताकि आपको wallet गतिविधि का बेहतर दृश्य मिल सके।

<figure>
  !\[Tenderly Docs]\(/images/image (117).webp)

  <figcaption />
</figure>

इसे प्राप्त करने के लिए, एक `TenderlyWalletChanges.tsx` फ़ाइल बनाकर शुरू करें:

```tsx title="example.tsx" showLineNumbers theme={"theme":{"light":"catppuccin-latte","dark":"catppuccin-mocha"}}


const TenderlyWalletChanges = ({
  account,
  assetChanges,
}: {
  account?: Account;
  assetChanges: any;
}) => {
  const { assetsInList, assetsOutList } = React.useMemo(() => {
    const assetsInList = assetChanges.filter(asset => asset.to === account?.address) || [];
    const assetsOutList = assetChanges.filter(asset => asset.from === account?.address) || [];

    return {
      assetsInList,
      assetsOutList,
    };
  }, [account, assetChanges]);

  return (
    <div className="TenderlyWalletChanges">
      <div className="TenderlyWalletChanges__Content">
        {/* Assets Out */}
        {assetsOutList?.length > 0 && (
          <>
            <p className="text-16 text-gray-title font-medium mb-4">Assets Out</p>
            <div className="flex flex-col gap-4 border border-gray-divider rounded-sm">
              {assetsOutList.map((token, index) => (
                <div
                  key={index}
                  className={clsx('flex gap-4 p-4', {
                    'border-t-[1px] border-gray-divider': index !== 0,
                  })}
                >
                  <div className="flex items-center justify-center p-4">
                    <img src={token.token_info.logo} className="w-60 rounded" alt="Tenderly" />
                  </div>
                  <div className="flex flex-col gap-4">
                    <div className="flex flex-col gap-1">
                      <div className="font-semibold">
                        {token.token_info.symbol.toUpperCase()}
                        {token.token_id && <span className="ml-2">#{Number(token.token_id)}</span>}
                      </div>
                      <div className="text-12 text-gray-content">{token.token_info.name}</div>
                    </div>
                    <div className="flex flex-wrap items-center gap-4">
                      <div className="font-semibold">{token.type}:</div>
                      <div className="text-red-forbidden">- {formatAmount(token.amount)}</div>
                      <div className="text-12 text-gray-content">
                        (≈ {formatUsdValue(new BigNumber(token.dollar_value).toFixed())})
                      </div>
                    </div>
                  </div>
                </div>
              ))}
            </div>
          </>
        )}

        {/* Assets In */}
        {assetsInList?.length > 0 && (
          <>
            <p className="text-16 text-gray-title font-medium mt-4 mb-4">Assets In</p>
            <div className="flex flex-col gap-4 border border-gray-divider rounded-sm">
              {assetsInList.map((token, index) => (
                <div
                  key={index}
                  className={clsx('flex gap-4 p-4', {
                    'border-t-[1px] border-gray-divider': index !== 0,
                  })}
                >
                  <div className="flex items-center justify-center p-4">
                    <img src={token.token_info.logo} className="w-60 rounded" alt="Tenderly" />
                  </div>
                  <div className="flex flex-col gap-4">
                    <div className="flex flex-col gap-1">
                      <div className="font-semibold">
                        {token.token_info.symbol.toUpperCase()}
                        {token.token_id && <span className="ml-2">#{Number(token.token_id)}</span>}
                      </div>
                      <div className="text-12 text-gray-content">{token.token_info.name}</div>
                    </div>
                    <div className="flex flex-wrap items-center gap-4">
                      <div className="font-semibold">{token.type}:</div>
                      <div className="text-green">+ {formatAmount(token.amount)}</div>
                      <div className="text-12 text-gray-content">
                        (≈ {formatUsdValue(new BigNumber(token.dollar_value).toFixed())})
                      </div>
                    </div>
                  </div>
                </div>
              ))}
            </div>
          </>
        )}
      </div>
      <TenderlyCredits classname="mt-12" />
    </div>
  );
};

export default TenderlyWalletChanges;
```

यहाँ, हमने asset changes array को filter किया और दो सूचियाँ बनाईं:

1. Wallet में आने वाले Assets
2. Wallet से बाहर जाने वाले Assets

फिर, हमने डेटा का पूर्वावलोकन और format करने के लिए helper functions का उपयोग किया।

हालाँकि, आप महत्वपूर्ण asset जानकारी दिखाने के लिए अपना स्वयं का UI layout भी बना सकते हैं।

Simulation asset परिवर्तनों के बारे में यहाँ अधिक जानें:

<Card title="Asset और Balance परिवर्तन" href="" />

### Tokens Transferred

Token Transfers section एक अधिक जटिल component है। यह फ़ाइल मुख्य रूप से layout का प्रबंधन करती है, इसलिए चलिए पहले sorting logic पर चर्चा करें। आप [इस section का implementation यहाँ](https://github.com/Tenderly/tenderly-rabby-transaction-preview/blob/a6b8059eeae4c856f32b328632a8cd8aa274f757/src/ui/views/Approval/components/TxComponents/Tenderly/AssetChanges/TenderlyAssetChanges.tsx) पा सकते हैं।

एक `TenderlyAssetChanges.tsx` फ़ाइल बनाकर शुरू करें। इसमें दो tabs प्रस्तुत करने के लिए logic है: **Tokens Transferred** और **Native Coins Transferred**। ऐसा करने के लिए, आपको sorting, tabs के बीच switching, और डेटा को पते के अनुसार grouping के लिए logic जोड़ना होगा।

<Frame caption="Tokens Transferred UI">
  <img src="https://mintcdn.com/tenderly/XsEZlaGXYskrtN68/images/Rabby%20Wallet.webp?fit=max&auto=format&n=XsEZlaGXYskrtN68&q=85&s=8963a07f3dd1bdd1f3ab1eeca41d86f4" alt="Tokens Transferred UI" width="1300" height="1000" data-path="images/Rabby Wallet.webp" />
</Frame>

पहले, चलिए डेटा को group करें और दो arrays बनाएँ: tokens transferred और native coins transferred:

```tsx title="example.tsx" showLineNumbers theme={"theme":{"light":"catppuccin-latte","dark":"catppuccin-mocha"}}
const assetChangesMappedByType = React.useMemo<
  Record<AssetChangesTabs, TransactionAssetChangeData[]>
>(
  () =>
    transactionAssetChanges.reduce(
      (
        acc: {
          nativeCoinsTransferred: TransactionAssetChangeData[];
          tokensTransferred: TransactionAssetChangeData[];
        },
        assetChange: TransactionAssetChangeData,
      ) => {
        const { type } = assetChange.tokenInfo;
        if (type === TokenType.NATIVE) {
          return {
            ...acc,
            [AssetChangesTabs.nativeCoins]: [...(acc?.nativeCoinsTransferred ?? []), assetChange],
          };
        }
        return {
          ...acc,
          [AssetChangesTabs.tokens]: [...(acc?.tokensTransferred ?? []), assetChange],
        };
      },
      { [AssetChangesTabs.nativeCoins]: [], [AssetChangesTabs.tokens]: [] },
    ),
  [assetChanges],
);
```

इसके बाद, चलिए sorting types को दो तरीकों से संभालने के लिए logic लिखें: chronologically और per address। यहाँ, हमें दो components की आवश्यकता है: **ChronologicalContent.tsx** और **PerAddressContent.tsx**।

आप GitHub repository में implementation पा सकते हैं:

* [ChronologicalContent.tsx](https://github.com/Tenderly/tenderly-rabby-transaction-preview/blob/develop/src/ui/views/Approval/components/TxComponents/Tenderly/AssetChanges/ChronologicalContent.tsx)
* [PerAddressContent.tsx](https://github.com/Tenderly/tenderly-rabby-transaction-preview/blob/develop/src/ui/views/Approval/components/TxComponents/Tenderly/AssetChanges/PerAddressContent.tsx)

### सभी components को Group और preview करना

अंत में, चलिए सभी components को एक साथ रखें। ऐसा करने के लिए, आपको एक `TenderlySimulationResult.tsx` फ़ाइल बनाने की आवश्यकता है। आपको connected wallet पते के साथ interact करने के लिए Rabby टीम द्वारा प्रदान किए गए `useWallet()` hook का उपयोग करने की भी आवश्यकता है।

यहाँ code का ओवरव्यू है:

```tsx title="example.tsx" showLineNumbers theme={"theme":{"light":"catppuccin-latte","dark":"catppuccin-mocha"}}

const TenderlySimulationResult = ({ data }: { data: Record<string, any> | null }) => {
  const [account, setAccount] = React.useState<Account>();
  const wallet = useWallet();

  const init = async () => {
    const currentAccount = await wallet.syncGetCurrentAccount();

    if (currentAccount) {
      setAccount(currentAccount);
    }
  };

  React.useEffect(() => {
    init();
  }, []);

  return (
    <div className="tenderly-simulation-result mt-16">
      <ActionWrapper>
        {!data && <div className="bg-[#f5f6fa] sticky top-[64px] z-10">Something went wrong.</div>}
        {data && <TenderlySimulationSummary simulation={data.simulation} />}
      </ActionWrapper>
      {data?.transaction?.transaction_info.asset_changes && (
        <>
          <ActionWrapper>
            <TenderlyWalletChanges
              account={account}
              assetChanges={data.transaction.transaction_info.asset_changes}
            />
          </ActionWrapper>
          <ActionWrapper>
            <TenderlyAssetChanges
              assetChanges={data.transaction.transaction_info.asset_changes}
              contracts={data.contracts}
            />
          </ActionWrapper>
        </>
      )}
    </div>
  );
};

export default TenderlySimulationResult;
```

## आगे क्या?

बधाई हो! आपने Tenderly Simulation API का उपयोग करके एक Rabby Wallet उदाहरण में Transaction Preview सुविधा जोड़ी। 🎉

Logic में गहराई से जाने के लिए, [GitHub पर पूर्ण source code](https://github.com/Tenderly/tenderly-rabby-transaction-preview) देखें।

इसके अतिरिक्त, आप अपनी प्रोजेक्ट आवश्यकताओं के आधार पर तीन अलग-अलग तरीकों का उपयोग करके Tenderly transaction simulations शुरू कर सकते हैं। अपने wallet या dapp में transaction simulations को एकीकृत करने के अन्य तरीकों के बारे में जानने के लिए, निम्नलिखित संसाधनों पर एक नज़र डालें:

<Card title="Simulation API" href="" />

<Card title="Transactions का Simulation" href="" />

<Card title="Simulation RPC" href="" />
