> ## Documentation Index
> Fetch the complete documentation index at: https://docs.tenderly.co/llms.txt
> Use this file to discover all available pages before exploring further.
# अपने Tenderly प्रोजेक्ट में Safe{Wallet} simulation करें
> Safe Wallet की Environment variables settings में Tenderly API URL और access token सेट करें और अपने Tenderly प्रोजेक्ट में Safe transactions simulate करें।
Safe\{Wallet} [Tenderly Simulation API](/simulations/single-simulations#simulate-via-api) से transactions simulate करता है। Built-in simulation Safe Pro का हिस्सा है। अन्य Safe प्लान पर, Safe Shield में **Transaction simulation** check परिणाम के बजाय **Set** लिंक दिखाता है, और queued transactions **Set up simulation** दिखाते हैं। किसी भी Safe प्लान पर simulate करने के लिए, Safe की **Environment variables** settings में अपना Tenderly प्रोजेक्ट जोड़ें। इसके बाद Safe हर simulation request आपके प्रोजेक्ट को भेजता है, और हर simulation अपने पूरे call trace के साथ वहाँ सेव होता है।
API access tokens उत्पन्न करना और Tenderly API का उपयोग करना paid प्लान पर उपलब्ध है। अपने अकाउंट के लिए इन्हें सक्षम करने के लिए, कॉल शेड्यूल करने और अपने प्लान को अपग्रेड करने पर चर्चा करने के लिए [हमारी sales टीम से संपर्क करें](https://tenderly.co/contact-us)।
## पूर्वापेक्षाएँ
* एक Tenderly प्रोजेक्ट।
* एक [access token](/platform/account/projects/api-tokens) जिसकी प्रोजेक्ट तक पहुँच हो। Project token (**One project** scope) पर्याप्त है।
* एक Safe अकाउंट जिसमें आपका connected wallet owner हो।
## Tenderly API URL बनाएँ
**Tenderly API URL** field में `/simulate` path सहित पूरा Simulation API endpoint चाहिए:
```bash title="Tenderly API URL" theme={"theme":{"light":"catppuccin-latte","dark":"catppuccin-mocha"}}
https://api.tenderly.co/api/v1/account/{account_slug}/project/{project_slug}/simulate
```
इसे बनाने के लिए, Tenderly में अपना प्रोजेक्ट खोलें, **Settings** पर जाएँ, **Project Access Tokens** के पास **Copy API URL** पर क्लिक करें, और कॉपी किए गए URL के अंत में `simulate` जोड़ें। अकाउंट `my-org` और प्रोजेक्ट `treasury` के लिए परिणाम `https://api.tenderly.co/api/v1/account/my-org/project/treasury/simulate` है।
**Copy API URL** base project URL कॉपी करता है, जो `/project/{project_slug}/` पर खत्म होता है। Safe request ठीक उसी URL पर भेजता है जो आप दर्ज करते हैं, इसलिए `simulate` के बिना base URL से हर simulation fail होता है।
## Safe\{Wallet} settings में अपना Tenderly प्रोजेक्ट जोड़ें
1. Safe\{Wallet} में **Settings** खोलें और **Environment variables** टैब चुनें। **Set** और **Set up simulation** लिंक भी यही पेज खोलते हैं।
2. **Tenderly** के अंतर्गत, पिछले सेक्शन का URL **Tenderly API URL** में पेस्ट करें।
3. अपना access token **Tenderly access token** में पेस्ट करें।
4. **Save** पर क्लिक करें। Safe पेज reload करता है और settings लागू करता है।
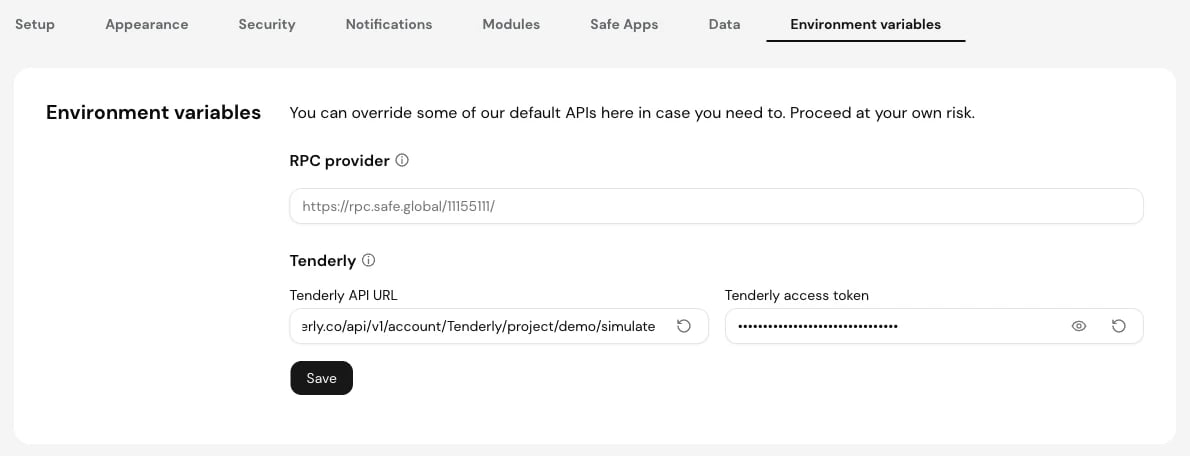 दोनों fields भरें। Safe आपके प्रोजेक्ट का उपयोग तभी करता है जब URL और access token दोनों सेट हों।
Safe ये values आपके browser के local storage में रखता है। ये उस browser में खोले गए हर Safe और network पर लागू होती हैं, इसलिए जिस भी browser का आप उपयोग करते हैं उसमें setup दोहराएँ। Defaults पर लौटने के लिए, हर field में reset icon पर क्लिक करें और फिर **Save** पर क्लिक करें।
## Safe transaction simulation चलाएँ
1. Safe\{Wallet} में **New transaction** पर क्लिक करें, transaction सेट करें, और **Next** पर क्लिक करें। **Confirm transaction** स्क्रीन दाईं ओर Safe Shield पैनल के साथ खुलती है।
2. **Transaction simulation** के पास **Run** पर क्लिक करें।
3. Check **Simulation successful** या **Simulation failed** में बदल जाता है। अपने Tenderly प्रोजेक्ट में simulation खोलने के लिए **View** पर क्लिक करें।
दोनों fields भरें। Safe आपके प्रोजेक्ट का उपयोग तभी करता है जब URL और access token दोनों सेट हों।
Safe ये values आपके browser के local storage में रखता है। ये उस browser में खोले गए हर Safe और network पर लागू होती हैं, इसलिए जिस भी browser का आप उपयोग करते हैं उसमें setup दोहराएँ। Defaults पर लौटने के लिए, हर field में reset icon पर क्लिक करें और फिर **Save** पर क्लिक करें।
## Safe transaction simulation चलाएँ
1. Safe\{Wallet} में **New transaction** पर क्लिक करें, transaction सेट करें, और **Next** पर क्लिक करें। **Confirm transaction** स्क्रीन दाईं ओर Safe Shield पैनल के साथ खुलती है।
2. **Transaction simulation** के पास **Run** पर क्लिक करें।
3. Check **Simulation successful** या **Simulation failed** में बदल जाता है। अपने Tenderly प्रोजेक्ट में simulation खोलने के लिए **View** पर क्लिक करें।
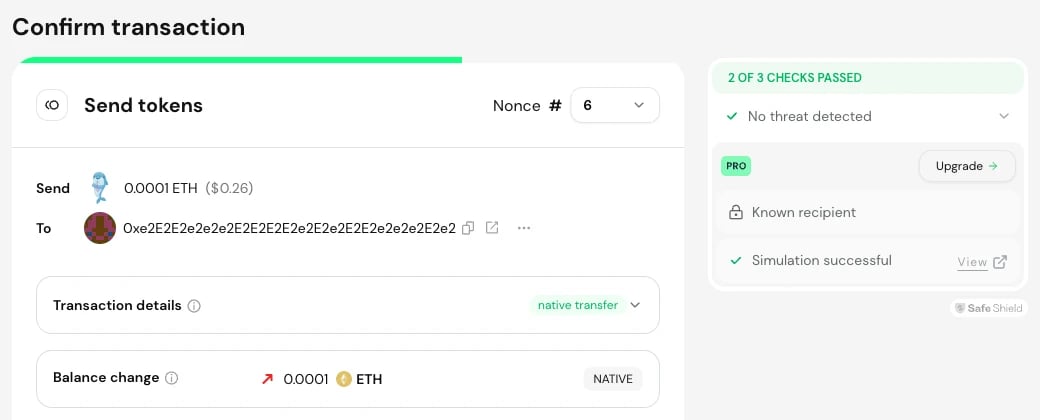 पहले से queued transaction को simulate करने के लिए, **Transactions** खोलें, **Queue** टैब में transaction expand करें, और **Simulate** पर क्लिक करें।
**View** लिंक `https://dashboard.tenderly.co/{account_slug}/{project_slug}/simulator/{simulation_id}` खोलता है, जहाँ आप simulated `execTransaction` call का [call trace, state changes और events](/simulator-ui/overview) देख सकते हैं।
## Safe Simulation API को क्या भेजता है
Safe, `X-Access-Key` header में access token के साथ Tenderly API URL पर `POST` request भेजता है। Request body, Safe के `execTransaction` call (या batches के लिए `multiSend` call) का [single simulation](/simulations/single-simulations) है, इन settings के साथ:
| Field | Value |
| - | - |
| `from` | आपका connected wallet यदि वह owner है, अन्यथा Safe का पहला owner |
| `gas_price` | `0`, इसलिए sender को gas के लिए balance की ज़रूरत नहीं होती |
| `save`, `save_if_fails` | `true`: हर simulation आपके प्रोजेक्ट में सेव होता है, failed simulations सहित |
| `state_objects` | Safe contract पर [state overrides](/simulations/state-overrides): signatures कम होने पर threshold `1` पर सेट होता है, transaction queue में अगला न होने पर nonce उस transaction के nonce पर सेट होता है, और transaction guard सेट होने पर हटा दिया जाता है |
## समस्या निवारण: Error while simulating
जब Simulation API error लौटाता है, तो Safe transaction queue में **Error while simulating** और Safe Shield में **Simulation failed** दिखाता है, error details के बिना। असली response देखने के लिए:
1. अपने browser के developer tools खोलें और **Network** टैब चुनें।
2. Simulation फिर से चलाएँ।
3. `api.tenderly.co` को भेजा गया request चुनें और उसका status code और response body पढ़ें।
| Response | कारण | समाधान |
| - | - | - |
| `400` `validation`: `at least one of name, options, restricted or members must be provided` | URL, `simulate` के बिना base project URL है | [Tenderly API URL बनाएँ](#tenderly-api-url-बनाएँ) के अनुसार URL के अंत में `simulate` जोड़ें |
| `401` `unauthorized` या `403` `insufficient_permissions` | Access token revoke हो चुका है, expire हो चुका है, या गलत टाइप हुआ है | [नया access token बनाएँ](/platform/account/projects/api-tokens) और उसे Safe में पेस्ट करें |
| `404` `Project not found` | Project slug गलत है, या token की प्रोजेक्ट तक पहुँच नहीं है | **Copy API URL** से URL फिर से कॉपी करें और token का scope जाँचें |
| `404` `Platform Account not found` | Account slug गलत है | **Copy API URL** से URL फिर से कॉपी करें |
| CORS error | URL, `api.tenderly.co` के बजाय `dashboard.tenderly.co` की ओर इशारा करता है | [Tenderly API URL बनाएँ](#tenderly-api-url-बनाएँ) वाला API URL इस्तेमाल करें |
| `200` के साथ `simulation.status: false` | Simulation चला, और transaction revert होता है | **View** पर क्लिक करें और [Debugger](/debugger/overview) में revert देखें |
अगर कोई request `api.tenderly.co` तक नहीं पहुँचता, तो जाँचें कि दोनों fields सेव हैं: जब तक URL और access token दोनों सेट नहीं होते, Safe **Set** लिंक दिखाता है।
This documentation is built and hosted on [Mintlify](https://mintlify.com), a developer documentation platform.
पहले से queued transaction को simulate करने के लिए, **Transactions** खोलें, **Queue** टैब में transaction expand करें, और **Simulate** पर क्लिक करें।
**View** लिंक `https://dashboard.tenderly.co/{account_slug}/{project_slug}/simulator/{simulation_id}` खोलता है, जहाँ आप simulated `execTransaction` call का [call trace, state changes और events](/simulator-ui/overview) देख सकते हैं।
## Safe Simulation API को क्या भेजता है
Safe, `X-Access-Key` header में access token के साथ Tenderly API URL पर `POST` request भेजता है। Request body, Safe के `execTransaction` call (या batches के लिए `multiSend` call) का [single simulation](/simulations/single-simulations) है, इन settings के साथ:
| Field | Value |
| - | - |
| `from` | आपका connected wallet यदि वह owner है, अन्यथा Safe का पहला owner |
| `gas_price` | `0`, इसलिए sender को gas के लिए balance की ज़रूरत नहीं होती |
| `save`, `save_if_fails` | `true`: हर simulation आपके प्रोजेक्ट में सेव होता है, failed simulations सहित |
| `state_objects` | Safe contract पर [state overrides](/simulations/state-overrides): signatures कम होने पर threshold `1` पर सेट होता है, transaction queue में अगला न होने पर nonce उस transaction के nonce पर सेट होता है, और transaction guard सेट होने पर हटा दिया जाता है |
## समस्या निवारण: Error while simulating
जब Simulation API error लौटाता है, तो Safe transaction queue में **Error while simulating** और Safe Shield में **Simulation failed** दिखाता है, error details के बिना। असली response देखने के लिए:
1. अपने browser के developer tools खोलें और **Network** टैब चुनें।
2. Simulation फिर से चलाएँ।
3. `api.tenderly.co` को भेजा गया request चुनें और उसका status code और response body पढ़ें।
| Response | कारण | समाधान |
| - | - | - |
| `400` `validation`: `at least one of name, options, restricted or members must be provided` | URL, `simulate` के बिना base project URL है | [Tenderly API URL बनाएँ](#tenderly-api-url-बनाएँ) के अनुसार URL के अंत में `simulate` जोड़ें |
| `401` `unauthorized` या `403` `insufficient_permissions` | Access token revoke हो चुका है, expire हो चुका है, या गलत टाइप हुआ है | [नया access token बनाएँ](/platform/account/projects/api-tokens) और उसे Safe में पेस्ट करें |
| `404` `Project not found` | Project slug गलत है, या token की प्रोजेक्ट तक पहुँच नहीं है | **Copy API URL** से URL फिर से कॉपी करें और token का scope जाँचें |
| `404` `Platform Account not found` | Account slug गलत है | **Copy API URL** से URL फिर से कॉपी करें |
| CORS error | URL, `api.tenderly.co` के बजाय `dashboard.tenderly.co` की ओर इशारा करता है | [Tenderly API URL बनाएँ](#tenderly-api-url-बनाएँ) वाला API URL इस्तेमाल करें |
| `200` के साथ `simulation.status: false` | Simulation चला, और transaction revert होता है | **View** पर क्लिक करें और [Debugger](/debugger/overview) में revert देखें |
अगर कोई request `api.tenderly.co` तक नहीं पहुँचता, तो जाँचें कि दोनों fields सेव हैं: जब तक URL और access token दोनों सेट नहीं होते, Safe **Set** लिंक दिखाता है।
This documentation is built and hosted on [Mintlify](https://mintlify.com), a developer documentation platform.