> ## Documentation Index
> Fetch the complete documentation index at: https://docs.tenderly.co/llms.txt
> Use this file to discover all available pages before exploring further.
# Foundry और Github Actions
> Foundry का उपयोग करके Solidity smart contracts को test और stage करने के लिए Tenderly GitHub Action के साथ Virtual Environments पर CI/CD pipeline सेट करें।
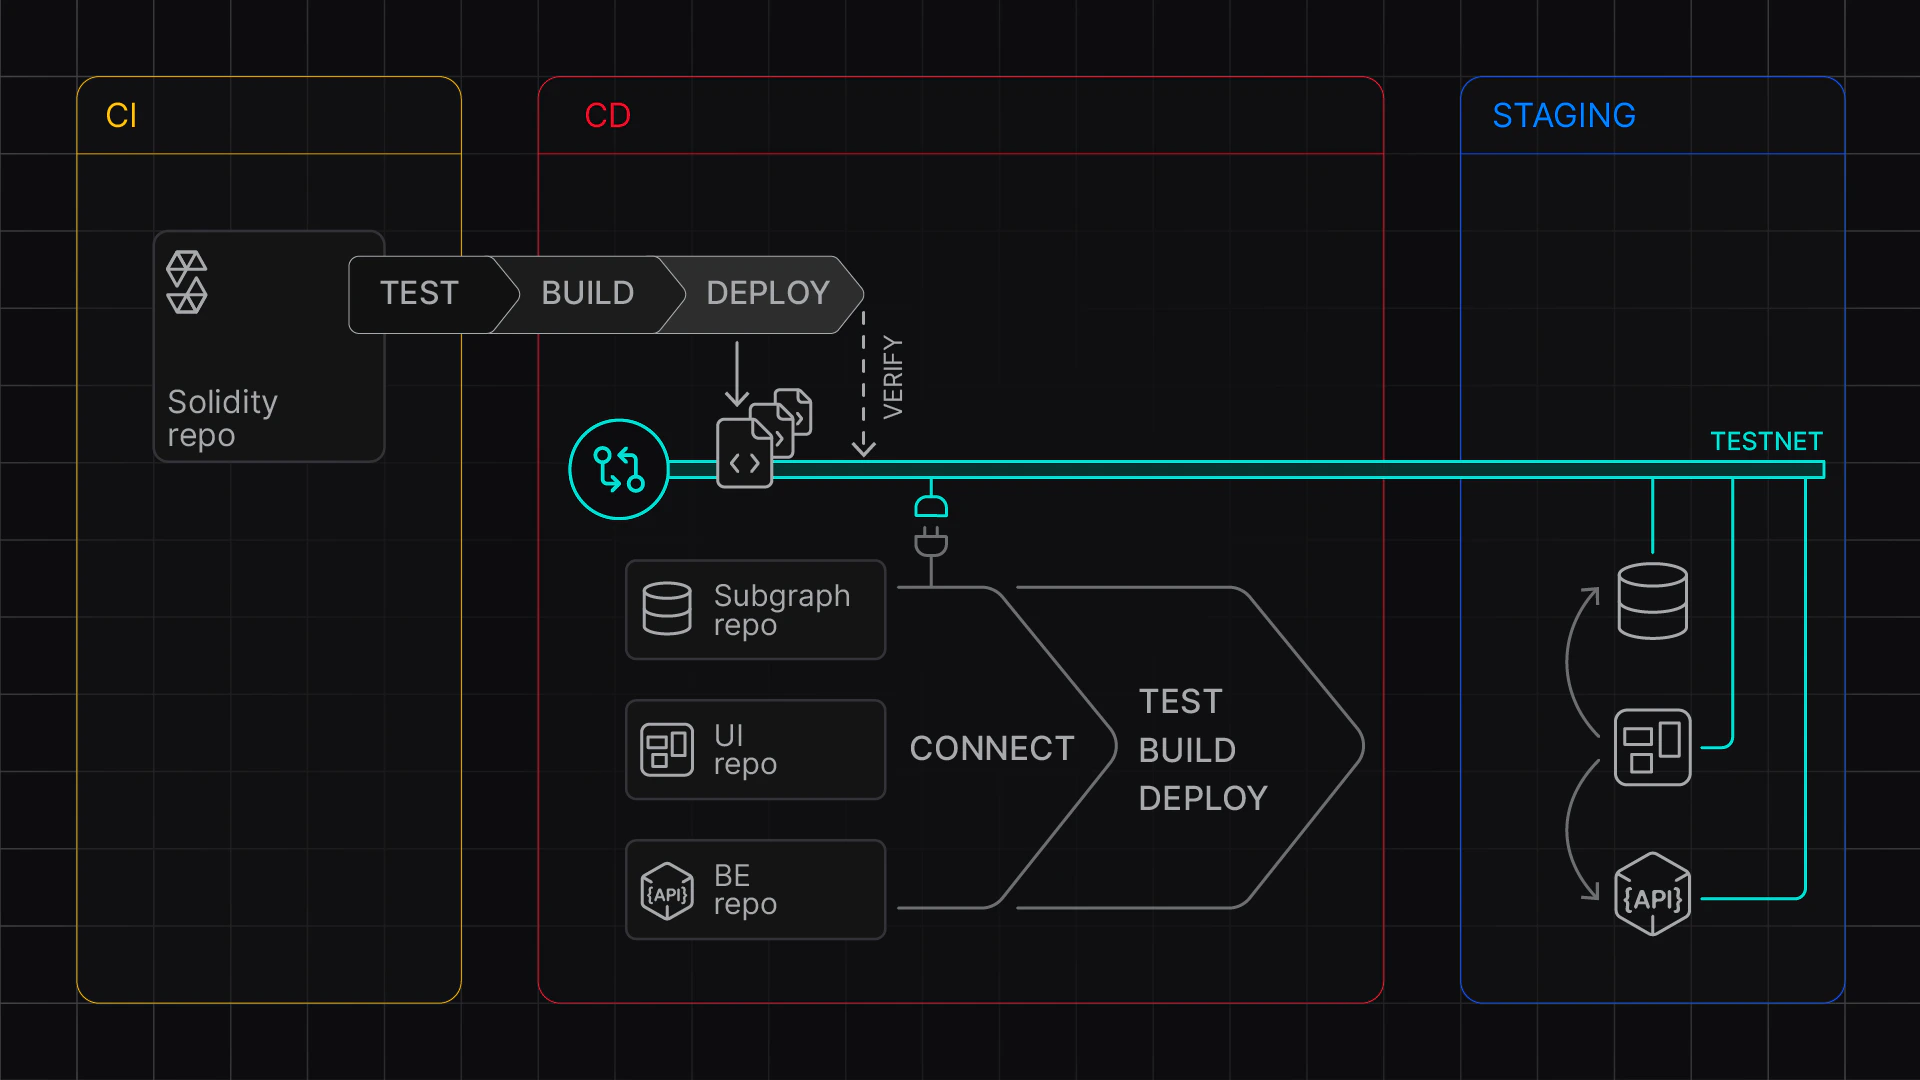
Tenderly [Virtual Environments](/virtual-environments/overview) पर Foundry के साथ continuous integration और continuous deployment pipeline (CI/CD) सेट करने के लिए GitHub Action को कॉन्फ़िगर करना सीखें।
अपने contracts को test और stage करने के लिए स्वचालित builds सक्षम करने के लिए [Tenderly Virtual Environment Setup](https://github.com/marketplace/actions/tenderly-virtual-testnet-setup) action का उपयोग करें। यह दृष्टिकोण सक्षम करता है:
* **CI/CD Integration**: forked networks के विरुद्ध tests चलाएं और staging environments सेट करें
* **Multi-Network Testing**: एक ही step में कई networks प्रोविज़न करें
* **Automated Deployments**: पूर्ण deployment logs के साथ contracts deploy और verify करें
* **Artifact Collection**: संरचित logs के साथ networks में deployments को ट्रैक करें
इस गाइड में, आपको दो चरण पूरे करने होंगे:
1. Local setup: workflow file बनाने और testing के लिए Foundry सेट करें
2. GitHub setup: GitHub Action सेट करें, GitHub secrets और variables कॉन्फ़िगर करें, और build को test करें
संदर्भ के लिए, इस उदाहरण प्रोजेक्ट का उपयोग करें:
 ## Stage 1: Local Setup
पहले, आवश्यक settings के साथ एक workflow file बनाएं।
### Workflow File बनाएं
अपने foundry प्रोजेक्ट में, एक नई `workflows` directory और `ci-cd.yaml` बनाएं:
```bash theme={"theme":{"light":"catppuccin-latte","dark":"catppuccin-mocha"}}
mkdir -p .github/workflows
touch .github/workflows/ci-cd.yaml
```
इसके बाद, `ci-cd.yaml` में निम्नलिखित configuration पेस्ट करें जो दो jobs सेट करता है:
* Foundry tests चलाने के लिए **`test`** job
* staging Virtual Environment पर contracts deploy करने के लिए **`deploy`** job
यह नमूना workflow file:
* दिए गए `network_id` (Mainnet और Base) के आधार पर, custom `chain_id` के साथ, Virtual Environments को प्रोविज़न करने के लिए `tenderly/vnet-github-action` का उपयोग करता है
* सही chain ID (यदि आप एक custom `chain_id` का उपयोग कर रहे हैं तो विशेष रूप से महत्वपूर्ण) के साथ `foundry.toml` को संशोधित करने के लिए `update_foundry_config_and_build` का उपयोग करता है, और verification जानकारी पास करता है।
* `set_wallet_balance` का उपयोग करके `DEPLOYER_WALLET_ADDRESS` EOA को 100 ETH से fund करता है
* Virtual Environment पर contracts deploy करता है
* foundry के `--json` विकल्प का उपयोग करके क्रमशः `$BUILD_OUTPUT_FILE_1` और `$BUILD_OUTPUT_FILE_8453` में deployment जानकारी एकत्र करता है
* कैप्चर की गई deployment जानकारी को repository में पुश करता है
`Tenderly/vnet-github-action` के लिए `mode` argument `CI` और `CD` मान लेता है।
* `CD` mode Virtual Environment को सक्रिय रखता है और आप deployed contracts के साथ काम कर सकते हैं।
* `CI` mode step पूरा होने के बाद Virtual Environment को रोक देता है। आप transactions का निरीक्षण कर सकेंगे लेकिन आगे RPC requests नहीं भेज पाएंगे।
```yaml title='ci-cd.yaml' showLineNumbers lines={24-25, 32-34, 38, 43, 49, 69} theme={"theme":{"light":"catppuccin-latte","dark":"catppuccin-mocha"}}
name: Foundry CI/CD
on:
push:
pull_request:
env:
TENDERLY_ACCESS_KEY: ${{ secrets.TENDERLY_ACCESS_KEY }}
DEPLOYER_WALLET_ADDRESS: ${{ vars.DEPLOYER_WALLET_ADDRESS }}
DEBUG: tenderly/vnet-github-action@v1.0.14
jobs:
deploy:
runs-on: ubuntu-latest
defaults:
run:
working-directory: ./examples/foundry
permissions:
contents: write
steps:
- uses: actions/checkout@v4
with:
submodules: recursive
- name: Setup Virtual Environment
uses: tenderly/vnet-github-action@v1.0.14
with:
mode: CD
access_key: ${{ secrets.TENDERLY_ACCESS_KEY }}
project_name: ${{ vars.TENDERLY_PROJECT_NAME }}
account_name: ${{ vars.TENDERLY_ACCOUNT_NAME }}
testnet_name: "Staging"
network_id: |
1
8453
chain_id_prefix: 7357
public_explorer: true
verification_visibility: 'src'
push_on_complete: true
- name: Install Foundry
uses: foundry-rs/foundry-toolchain@v1
- name: Fund Deployer Account on Mainnet
run: |
source ../../fixtures/load-fixtures.sh
update_foundry_config_and_build $TENDERLY_ACCESS_KEY $TENDERLY_FOUNDRY_VERIFICATION_URL_1 $TENDERLY_CHAIN_ID_1
set_wallet_balance $TENDERLY_ADMIN_RPC_URL_1 ${{ vars.DEPLOYER_WALLET_ADDRESS }} $HUNDRED_ETH
- name: Deploy Contracts Mainnet
run: |
forge build --sizes
forge script script/Counter.s.sol \
--private-key ${{ secrets.DEPLOYER_PRIVATE_KEY }} \
--rpc-url ${{ env.TENDERLY_PUBLIC_RPC_URL_1 }} \
--verifier-url ${{ env.TENDERLY_FOUNDRY_VERIFICATION_URL_1 }} \
--etherscan-api-key $TENDERLY_ACCESS_KEY \
--slow \
--broadcast \
--verify \
--json > $BUILD_OUTPUT_FILE_1
- name: Fund Deployer Account on Base
run: |
source ../../fixtures/load-fixtures.sh
update_foundry_config_and_build $TENDERLY_ACCESS_KEY $TENDERLY_FOUNDRY_VERIFICATION_URL_8453 $TENDERLY_CHAIN_ID_8453
set_wallet_balance $TENDERLY_ADMIN_RPC_URL_8453 ${{ vars.DEPLOYER_WALLET_ADDRESS }} $HUNDRED_ETH
- name: Deploy Contracts Base
working-directory: ./examples/foundry
run: |
forge script script/Counter.s.sol \
--private-key ${{ secrets.DEPLOYER_PRIVATE_KEY }} \
--rpc-url ${{ env.TENDERLY_PUBLIC_RPC_URL_8453 }} \
--verifier-url ${{ env.TENDERLY_FOUNDRY_VERIFICATION_URL_8453 }} \
--etherscan-api-key $TENDERLY_ACCESS_KEY \
--slow \
--broadcast \
--verify \
--json > $BUILD_OUTPUT_FILE_8453
```
### Foundry कॉन्फ़िगर करें
अपनी `foundry.toml` configuration file बनाएं या अपडेट करें। स्वचालित कॉन्ट्रैक्ट verification का उपयोग करने के लिए, आपके पास `key`, `chain`, और `url` के साथ `unknown_chain` entry होनी चाहिए।
अपनी local machine से Virtual Environments का उपयोग करते समय, `chain \= 0` को उस Virtual Environment के chain ID से बदलें जिससे आप कनेक्ट हुए हैं।
```toml showLineNumbers title="foundry.toml" lines={8-11} theme={"theme":{"light":"catppuccin-latte","dark":"catppuccin-mocha"}}
[profile.default]
src = "src"
out = "out"
libs = ["lib"]
cbor_metadata = true
# See more config options https://github.com/foundry-rs/foundry/blob/master/crates/config/README.md#all-options
[etherscan]
## placeholders must be replaced with key ("string"), chain_id (number, non-quoted), and tenderly_foundry_verification_url ("string")
unknown_chain = { key = "$TENDERLY_ACCESS_KEY", chain = 0, url = "$TENDERLY_FOUNDRY_VERIFICATION_URL" }
```
### Environment Variables तैयार करें
Local testing के लिए, निम्न variables के साथ एक `.env` file सेट करें:
```dotenv showLineNumbers theme={"theme":{"light":"catppuccin-latte","dark":"catppuccin-mocha"}}
# Access parameters
TENDERLY_ACCESS_KEY=...
TENDERLY_PROJECT_NAME=...
TENDERLY_ACCOUNT_NAME=...
# Deployment parameters
DEPLOYER_PRIVATE_KEY=...
DEPLOYER_WALLET_ADDRESS=...
```
आवश्यक variables:
* `TENDERLY_ACCESS_KEY`: आपकी [Tenderly access key](/platform/account/projects/api-tokens)
* `TENDERLY_ACCOUNT_NAME` और `TENDERLY_PROJECT_NAME`: आपके [account और project नाम](/platform/account/projects/api-tokens)
* `DEPLOYER_PRIVATE_KEY`: deployment wallet के लिए private key
* `DEPLOYER_WALLET_ADDRESS`: private key के अनुरूप address
### fixtures script जोड़ें
accounts को fund करने और `foundry.toml` को आसानी से अनुकूलित करने में सक्षम होने के लिए अपनी repository में निम्नलिखित `fixtures.sh` जोड़ें।
यह file उजागर करती है:
* balance को टॉप-अप करने के लिए `set_wallet_balance` function (RPC\_URL WALLET\_ADDRESS BALANCE\_HEX)
* `foundry.toml` में placeholders को replace करने के लिए `update_foundry_config_and_build` function
* `HUNDRED_ETH` जो 100 ETH के अनुरूप wei मान है
```bash theme={"theme":{"light":"catppuccin-latte","dark":"catppuccin-mocha"}}
#!/bin/bash
set_wallet_balance() {
if [ "$#" -ne 3 ]; then
echo "Usage: set_wallet_balance RPC_URL WALLET_ADDRESS BALANCE_HEX"
return 1
fi
local rpc_url="$1"
local wallet_address="$2"
local balance_hex="$3"
curl --location "$rpc_url" \
--header 'Content-Type: application/json' \
--data "{
\"jsonrpc\": \"2.0\",
\"method\": \"tenderly_setBalance\",
\"params\": [\"$wallet_address\", \"$balance_hex\"],
\"id\": \"1\"
}"
}
update_foundry_config_and_build() {
if [ "$#" -ne 3 ]; then
echo "Usage: update_foundry_config_and_build ACCESS_KEY VERIFICATION_URL CHAIN_ID"
return 1
fi
local access_key="$1"
local verification_url="$2"
local chain_id="$3"
# Create temporary file and update foundry.toml
sed -e "s|\${TENDERLY_ACCESS_KEY}|$access_key|g" \
-e "s|\${TENDERLY_FOUNDRY_VERIFICATION_URL}|$verification_url|g" \
-e "s/\(unknown_chain[[:space:]]*=[[:space:]]*{[^}]*chain[[:space:]]*=[[:space:]]*\)[0-9][0-9]*/\1$chain_id/g" \
foundry.toml > foundry.toml.tmp && mv foundry.toml.tmp foundry.toml
}
# Export constant
HUNDRED_ETH="0xDE0B6B3A7640000"
export HUNDRED_ETH
```
github action विभिन्न environment variables के माध्यम से RPC लिंक और verification URLs को उजागर करती है:
| Variable | विवरण |
| ------------------------------------------------ | --------------------------------------------------------------------------- |
| `TENDERLY_TESTNET_ID_{network_id}` | Virtual Environment UUID, जो इसे Tenderly के अंदर विशिष्ट रूप से पहचानता है |
| `TENDERLY_ADMIN_RPC_URL_{network_id}` | चीटकोड मेथड्स के साथ [Admin RPC](/virtual-environments/admin-rpc) endpoint |
| `TENDERLY_PUBLIC_RPC_URL_{network_id}` | Public RPC endpoint |
| `TENDERLY_CHAIN_ID_{network_id}` | Chain ID |
| `TENDERLY_TESTNET_SLUG_{network_id}` | अद्वितीय Virtual Environment slug |
| `TENDERLY_FOUNDRY_VERIFICATION_URL_{network_id}` | [Foundry verification](/contract-verification/foundry#verifier-url) URL |
| `BUILD_OUTPUT_FILE_{network_id}` | Build output file पथ |
### Github Action को Locally टेस्ट करें
आप GitHub पर पुश किए बिना [Act](https://github.com/nektos/act) का उपयोग करके अपने GitHub Action को locally टेस्ट कर सकते हैं।
**`.env`** file का उपयोग करके GitHub secrets और environment variables को इस प्रकार पॉप्युलेट करें:
```bash theme={"theme":{"light":"catppuccin-latte","dark":"catppuccin-mocha"}}
act --secret-file .env --var-file .env
```
## Stage 2: Github Setup
यह पुष्टि करने के बाद कि आपका local setup काम करता है, निम्न चरणों का उपयोग करके अपनी GitHub repository को कॉन्फ़िगर करें।
### Secrets और Variables कॉन्फ़िगर करें
निम्न GitHub secrets और variables सेट करें:
**Secrets:**
* `TENDERLY_ACCESS_KEY`: Tenderly Access Key
* `DEPLOYER_PRIVATE_KEY`: deployer EOA के लिए private key
**Variables:**
* `TENDERLY_PROJECT_NAME`: Tenderly project नाम
* `TENDERLY_ACCOUNT_NAME`: प्रोजेक्ट के मालिक का नाम
* `DEPLOYER_WALLET_ADDRESS`: deployer EOA
आप इसे [GitHub UI](https://docs.github.com/en/actions/how-tos/write-workflows/choose-what-workflows-do/use-variables#creating-configuration-variables-for-a-repository) के माध्यम से या `gh` command line का उपयोग करके प्राप्त कर सकते हैं:
```bash theme={"theme":{"light":"catppuccin-latte","dark":"catppuccin-mocha"}}
# Load environment variables
source .env
# Set variables
gh variable set TENDERLY_PROJECT_NAME --body ${TENDERLY_PROJECT_NAME}
gh variable set TENDERLY_ACCOUNT_NAME --body ${TENDERLY_ACCOUNT_NAME}
gh variable set DEPLOYER_WALLET_ADDRESS --body ${DEPLOYER_WALLET_ADDRESS}
# Set secrets
gh secret set TENDERLY_ACCESS_KEY --body ${TENDERLY_ACCESS_KEY}
gh secret set DEPLOYER_PRIVATE_KEY --body ${DEPLOYER_PRIVATE_KEY}
```
### अपडेट पुश करें
अंत में, अपने बदलावों को commit और push करें:
```bash theme={"theme":{"light":"catppuccin-latte","dark":"catppuccin-mocha"}}
git add .
git commit -m "Add CI/CD workflow for Foundry"
git push
```
### अपना action जाँचें
अपनी Github repository पर जाएं और Actions tab जाँचें। बधाई हो, आपने Virtual Environments और Foundry के साथ अपना CI/CD workflow चलाया।
### RPC लिंक प्राप्त करें
RPC लिंक प्राप्त करने के लिए, **Tenderly dashboard > Virtual Environments** पर जाएं और अपना CD Virtual Environment खोजें।
## अगले कदम
* Github पर [Foundry example](https://github.com/Tenderly/vnet-github-action/tree/main/examples/foundry) explore करें।
* Github पर [Hardhat example](https://github.com/Tenderly/vnet-github-action/tree/main/examples/hardhat-ignition) explore करें।
* [balance fixtures](https://github.com/Tenderly/vnet-github-action/blob/main/fixtures/load-fixtures.sh) का उपयोग करें।
## Stage 1: Local Setup
पहले, आवश्यक settings के साथ एक workflow file बनाएं।
### Workflow File बनाएं
अपने foundry प्रोजेक्ट में, एक नई `workflows` directory और `ci-cd.yaml` बनाएं:
```bash theme={"theme":{"light":"catppuccin-latte","dark":"catppuccin-mocha"}}
mkdir -p .github/workflows
touch .github/workflows/ci-cd.yaml
```
इसके बाद, `ci-cd.yaml` में निम्नलिखित configuration पेस्ट करें जो दो jobs सेट करता है:
* Foundry tests चलाने के लिए **`test`** job
* staging Virtual Environment पर contracts deploy करने के लिए **`deploy`** job
यह नमूना workflow file:
* दिए गए `network_id` (Mainnet और Base) के आधार पर, custom `chain_id` के साथ, Virtual Environments को प्रोविज़न करने के लिए `tenderly/vnet-github-action` का उपयोग करता है
* सही chain ID (यदि आप एक custom `chain_id` का उपयोग कर रहे हैं तो विशेष रूप से महत्वपूर्ण) के साथ `foundry.toml` को संशोधित करने के लिए `update_foundry_config_and_build` का उपयोग करता है, और verification जानकारी पास करता है।
* `set_wallet_balance` का उपयोग करके `DEPLOYER_WALLET_ADDRESS` EOA को 100 ETH से fund करता है
* Virtual Environment पर contracts deploy करता है
* foundry के `--json` विकल्प का उपयोग करके क्रमशः `$BUILD_OUTPUT_FILE_1` और `$BUILD_OUTPUT_FILE_8453` में deployment जानकारी एकत्र करता है
* कैप्चर की गई deployment जानकारी को repository में पुश करता है
`Tenderly/vnet-github-action` के लिए `mode` argument `CI` और `CD` मान लेता है।
* `CD` mode Virtual Environment को सक्रिय रखता है और आप deployed contracts के साथ काम कर सकते हैं।
* `CI` mode step पूरा होने के बाद Virtual Environment को रोक देता है। आप transactions का निरीक्षण कर सकेंगे लेकिन आगे RPC requests नहीं भेज पाएंगे।
```yaml title='ci-cd.yaml' showLineNumbers lines={24-25, 32-34, 38, 43, 49, 69} theme={"theme":{"light":"catppuccin-latte","dark":"catppuccin-mocha"}}
name: Foundry CI/CD
on:
push:
pull_request:
env:
TENDERLY_ACCESS_KEY: ${{ secrets.TENDERLY_ACCESS_KEY }}
DEPLOYER_WALLET_ADDRESS: ${{ vars.DEPLOYER_WALLET_ADDRESS }}
DEBUG: tenderly/vnet-github-action@v1.0.14
jobs:
deploy:
runs-on: ubuntu-latest
defaults:
run:
working-directory: ./examples/foundry
permissions:
contents: write
steps:
- uses: actions/checkout@v4
with:
submodules: recursive
- name: Setup Virtual Environment
uses: tenderly/vnet-github-action@v1.0.14
with:
mode: CD
access_key: ${{ secrets.TENDERLY_ACCESS_KEY }}
project_name: ${{ vars.TENDERLY_PROJECT_NAME }}
account_name: ${{ vars.TENDERLY_ACCOUNT_NAME }}
testnet_name: "Staging"
network_id: |
1
8453
chain_id_prefix: 7357
public_explorer: true
verification_visibility: 'src'
push_on_complete: true
- name: Install Foundry
uses: foundry-rs/foundry-toolchain@v1
- name: Fund Deployer Account on Mainnet
run: |
source ../../fixtures/load-fixtures.sh
update_foundry_config_and_build $TENDERLY_ACCESS_KEY $TENDERLY_FOUNDRY_VERIFICATION_URL_1 $TENDERLY_CHAIN_ID_1
set_wallet_balance $TENDERLY_ADMIN_RPC_URL_1 ${{ vars.DEPLOYER_WALLET_ADDRESS }} $HUNDRED_ETH
- name: Deploy Contracts Mainnet
run: |
forge build --sizes
forge script script/Counter.s.sol \
--private-key ${{ secrets.DEPLOYER_PRIVATE_KEY }} \
--rpc-url ${{ env.TENDERLY_PUBLIC_RPC_URL_1 }} \
--verifier-url ${{ env.TENDERLY_FOUNDRY_VERIFICATION_URL_1 }} \
--etherscan-api-key $TENDERLY_ACCESS_KEY \
--slow \
--broadcast \
--verify \
--json > $BUILD_OUTPUT_FILE_1
- name: Fund Deployer Account on Base
run: |
source ../../fixtures/load-fixtures.sh
update_foundry_config_and_build $TENDERLY_ACCESS_KEY $TENDERLY_FOUNDRY_VERIFICATION_URL_8453 $TENDERLY_CHAIN_ID_8453
set_wallet_balance $TENDERLY_ADMIN_RPC_URL_8453 ${{ vars.DEPLOYER_WALLET_ADDRESS }} $HUNDRED_ETH
- name: Deploy Contracts Base
working-directory: ./examples/foundry
run: |
forge script script/Counter.s.sol \
--private-key ${{ secrets.DEPLOYER_PRIVATE_KEY }} \
--rpc-url ${{ env.TENDERLY_PUBLIC_RPC_URL_8453 }} \
--verifier-url ${{ env.TENDERLY_FOUNDRY_VERIFICATION_URL_8453 }} \
--etherscan-api-key $TENDERLY_ACCESS_KEY \
--slow \
--broadcast \
--verify \
--json > $BUILD_OUTPUT_FILE_8453
```
### Foundry कॉन्फ़िगर करें
अपनी `foundry.toml` configuration file बनाएं या अपडेट करें। स्वचालित कॉन्ट्रैक्ट verification का उपयोग करने के लिए, आपके पास `key`, `chain`, और `url` के साथ `unknown_chain` entry होनी चाहिए।
अपनी local machine से Virtual Environments का उपयोग करते समय, `chain \= 0` को उस Virtual Environment के chain ID से बदलें जिससे आप कनेक्ट हुए हैं।
```toml showLineNumbers title="foundry.toml" lines={8-11} theme={"theme":{"light":"catppuccin-latte","dark":"catppuccin-mocha"}}
[profile.default]
src = "src"
out = "out"
libs = ["lib"]
cbor_metadata = true
# See more config options https://github.com/foundry-rs/foundry/blob/master/crates/config/README.md#all-options
[etherscan]
## placeholders must be replaced with key ("string"), chain_id (number, non-quoted), and tenderly_foundry_verification_url ("string")
unknown_chain = { key = "$TENDERLY_ACCESS_KEY", chain = 0, url = "$TENDERLY_FOUNDRY_VERIFICATION_URL" }
```
### Environment Variables तैयार करें
Local testing के लिए, निम्न variables के साथ एक `.env` file सेट करें:
```dotenv showLineNumbers theme={"theme":{"light":"catppuccin-latte","dark":"catppuccin-mocha"}}
# Access parameters
TENDERLY_ACCESS_KEY=...
TENDERLY_PROJECT_NAME=...
TENDERLY_ACCOUNT_NAME=...
# Deployment parameters
DEPLOYER_PRIVATE_KEY=...
DEPLOYER_WALLET_ADDRESS=...
```
आवश्यक variables:
* `TENDERLY_ACCESS_KEY`: आपकी [Tenderly access key](/platform/account/projects/api-tokens)
* `TENDERLY_ACCOUNT_NAME` और `TENDERLY_PROJECT_NAME`: आपके [account और project नाम](/platform/account/projects/api-tokens)
* `DEPLOYER_PRIVATE_KEY`: deployment wallet के लिए private key
* `DEPLOYER_WALLET_ADDRESS`: private key के अनुरूप address
### fixtures script जोड़ें
accounts को fund करने और `foundry.toml` को आसानी से अनुकूलित करने में सक्षम होने के लिए अपनी repository में निम्नलिखित `fixtures.sh` जोड़ें।
यह file उजागर करती है:
* balance को टॉप-अप करने के लिए `set_wallet_balance` function (RPC\_URL WALLET\_ADDRESS BALANCE\_HEX)
* `foundry.toml` में placeholders को replace करने के लिए `update_foundry_config_and_build` function
* `HUNDRED_ETH` जो 100 ETH के अनुरूप wei मान है
```bash theme={"theme":{"light":"catppuccin-latte","dark":"catppuccin-mocha"}}
#!/bin/bash
set_wallet_balance() {
if [ "$#" -ne 3 ]; then
echo "Usage: set_wallet_balance RPC_URL WALLET_ADDRESS BALANCE_HEX"
return 1
fi
local rpc_url="$1"
local wallet_address="$2"
local balance_hex="$3"
curl --location "$rpc_url" \
--header 'Content-Type: application/json' \
--data "{
\"jsonrpc\": \"2.0\",
\"method\": \"tenderly_setBalance\",
\"params\": [\"$wallet_address\", \"$balance_hex\"],
\"id\": \"1\"
}"
}
update_foundry_config_and_build() {
if [ "$#" -ne 3 ]; then
echo "Usage: update_foundry_config_and_build ACCESS_KEY VERIFICATION_URL CHAIN_ID"
return 1
fi
local access_key="$1"
local verification_url="$2"
local chain_id="$3"
# Create temporary file and update foundry.toml
sed -e "s|\${TENDERLY_ACCESS_KEY}|$access_key|g" \
-e "s|\${TENDERLY_FOUNDRY_VERIFICATION_URL}|$verification_url|g" \
-e "s/\(unknown_chain[[:space:]]*=[[:space:]]*{[^}]*chain[[:space:]]*=[[:space:]]*\)[0-9][0-9]*/\1$chain_id/g" \
foundry.toml > foundry.toml.tmp && mv foundry.toml.tmp foundry.toml
}
# Export constant
HUNDRED_ETH="0xDE0B6B3A7640000"
export HUNDRED_ETH
```
github action विभिन्न environment variables के माध्यम से RPC लिंक और verification URLs को उजागर करती है:
| Variable | विवरण |
| ------------------------------------------------ | --------------------------------------------------------------------------- |
| `TENDERLY_TESTNET_ID_{network_id}` | Virtual Environment UUID, जो इसे Tenderly के अंदर विशिष्ट रूप से पहचानता है |
| `TENDERLY_ADMIN_RPC_URL_{network_id}` | चीटकोड मेथड्स के साथ [Admin RPC](/virtual-environments/admin-rpc) endpoint |
| `TENDERLY_PUBLIC_RPC_URL_{network_id}` | Public RPC endpoint |
| `TENDERLY_CHAIN_ID_{network_id}` | Chain ID |
| `TENDERLY_TESTNET_SLUG_{network_id}` | अद्वितीय Virtual Environment slug |
| `TENDERLY_FOUNDRY_VERIFICATION_URL_{network_id}` | [Foundry verification](/contract-verification/foundry#verifier-url) URL |
| `BUILD_OUTPUT_FILE_{network_id}` | Build output file पथ |
### Github Action को Locally टेस्ट करें
आप GitHub पर पुश किए बिना [Act](https://github.com/nektos/act) का उपयोग करके अपने GitHub Action को locally टेस्ट कर सकते हैं।
**`.env`** file का उपयोग करके GitHub secrets और environment variables को इस प्रकार पॉप्युलेट करें:
```bash theme={"theme":{"light":"catppuccin-latte","dark":"catppuccin-mocha"}}
act --secret-file .env --var-file .env
```
## Stage 2: Github Setup
यह पुष्टि करने के बाद कि आपका local setup काम करता है, निम्न चरणों का उपयोग करके अपनी GitHub repository को कॉन्फ़िगर करें।
### Secrets और Variables कॉन्फ़िगर करें
निम्न GitHub secrets और variables सेट करें:
**Secrets:**
* `TENDERLY_ACCESS_KEY`: Tenderly Access Key
* `DEPLOYER_PRIVATE_KEY`: deployer EOA के लिए private key
**Variables:**
* `TENDERLY_PROJECT_NAME`: Tenderly project नाम
* `TENDERLY_ACCOUNT_NAME`: प्रोजेक्ट के मालिक का नाम
* `DEPLOYER_WALLET_ADDRESS`: deployer EOA
आप इसे [GitHub UI](https://docs.github.com/en/actions/how-tos/write-workflows/choose-what-workflows-do/use-variables#creating-configuration-variables-for-a-repository) के माध्यम से या `gh` command line का उपयोग करके प्राप्त कर सकते हैं:
```bash theme={"theme":{"light":"catppuccin-latte","dark":"catppuccin-mocha"}}
# Load environment variables
source .env
# Set variables
gh variable set TENDERLY_PROJECT_NAME --body ${TENDERLY_PROJECT_NAME}
gh variable set TENDERLY_ACCOUNT_NAME --body ${TENDERLY_ACCOUNT_NAME}
gh variable set DEPLOYER_WALLET_ADDRESS --body ${DEPLOYER_WALLET_ADDRESS}
# Set secrets
gh secret set TENDERLY_ACCESS_KEY --body ${TENDERLY_ACCESS_KEY}
gh secret set DEPLOYER_PRIVATE_KEY --body ${DEPLOYER_PRIVATE_KEY}
```
### अपडेट पुश करें
अंत में, अपने बदलावों को commit और push करें:
```bash theme={"theme":{"light":"catppuccin-latte","dark":"catppuccin-mocha"}}
git add .
git commit -m "Add CI/CD workflow for Foundry"
git push
```
### अपना action जाँचें
अपनी Github repository पर जाएं और Actions tab जाँचें। बधाई हो, आपने Virtual Environments और Foundry के साथ अपना CI/CD workflow चलाया।
### RPC लिंक प्राप्त करें
RPC लिंक प्राप्त करने के लिए, **Tenderly dashboard > Virtual Environments** पर जाएं और अपना CD Virtual Environment खोजें।
## अगले कदम
* Github पर [Foundry example](https://github.com/Tenderly/vnet-github-action/tree/main/examples/foundry) explore करें।
* Github पर [Hardhat example](https://github.com/Tenderly/vnet-github-action/tree/main/examples/hardhat-ignition) explore करें।
* [balance fixtures](https://github.com/Tenderly/vnet-github-action/blob/main/fixtures/load-fixtures.sh) का उपयोग करें।