> ## Documentation Index
> Fetch the complete documentation index at: https://docs.tenderly.co/llms.txt
> Use this file to discover all available pages before exploring further.
# Hardhat और Github Actions
> Hardhat के साथ Solidity smart contracts को test और stage करने के लिए Continuous Integration और Continuous Deployment (CI/CD) सेट करने हेतु Tenderly Github action का उपयोग करें
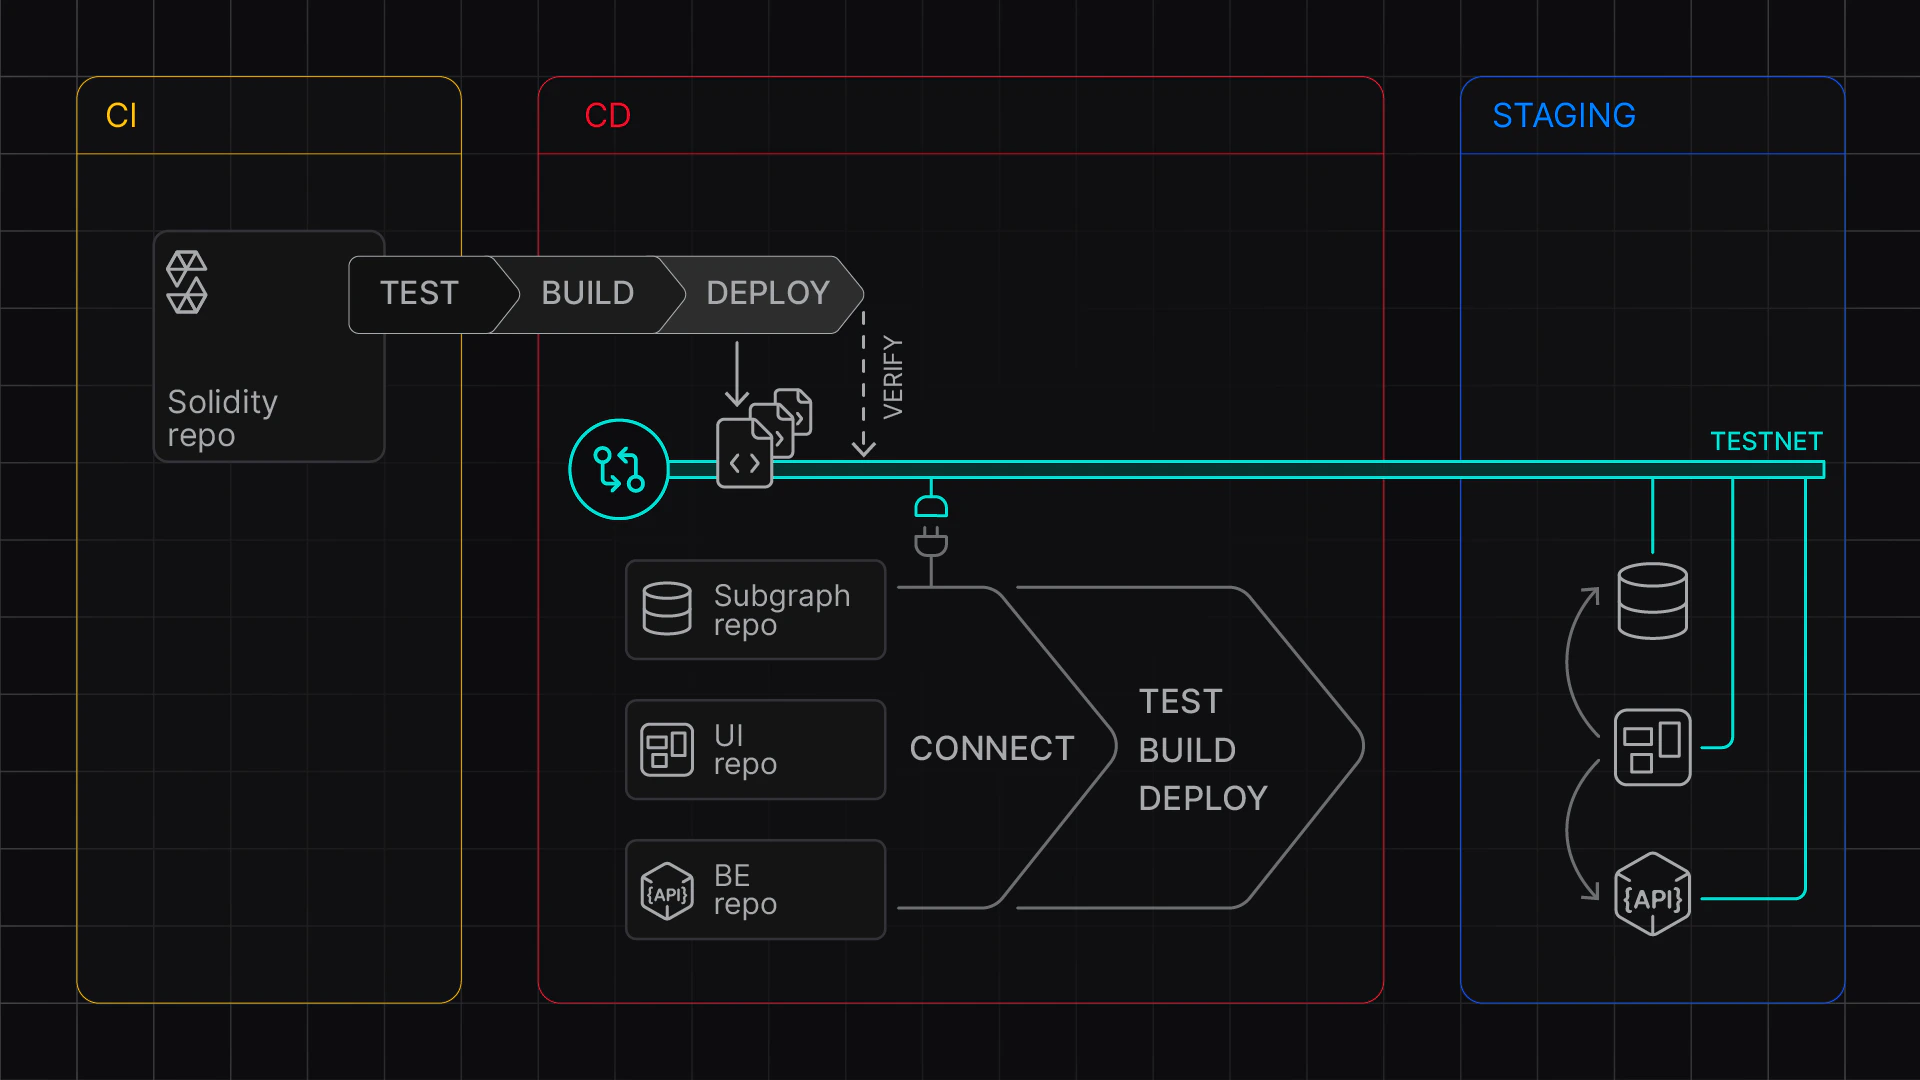
Tenderly Virtual Environments पर Hardhat के साथ Continuous Integration और Continuous Deployment pipeline (CI/CD) सेट करने के लिए GitHub Action को कॉन्फ़िगर करना सीखें।
कई networks में अपने contracts को test और deploy करने वाले स्वचालित builds को सक्षम करने के लिए [Tenderly Virtual Environment Setup](https://github.com/marketplace/actions/tenderly-virtual-testnet-setup) का उपयोग करें। सफल testing के बाद, आप उन्हें प्रोविज़न किए गए Virtual Environments पर deploy करके अपनी बाकी team के लिए stage कर सकते हैं।
इस गाइड में, आपको दो चरण पूरे करने होंगे:
1. Local setup: Hardhat सेट करें और workflow file बनाएं और उसका परीक्षण करें।
2. Github setup: GitHub Action सेट करें, GitHub secrets और variables कॉन्फ़िगर करें, और build को टेस्ट करें।
संदर्भ के लिए, इस उदाहरण प्रोजेक्ट का उपयोग करें:
यह गाइड Hardhat-ignition पर निर्भर एक CI setup प्रदर्शित करती है। `hardhat-verify` setup के लिए, प्रक्रिया और configuration समान हैं।
 ## Stage 1: Local setup
पहले, हम आवश्यक dependencies स्थापित करेंगे और एक workflow file बनाएंगे।
### Dependencies स्थापित करें
सुनिश्चित करें कि आपके पास निम्न packages स्थापित हैं:
```bash theme={"theme":{"light":"catppuccin-latte","dark":"catppuccin-mocha"}}
npm install --save-dev @tenderly/hardhat-tenderly @nomicfoundation/hardhat-ignition
```
### Workflow file बनाएं
GitHub Action सेट करने के लिए, एक नया workflow बनाएं:
```bash theme={"theme":{"light":"catppuccin-latte","dark":"catppuccin-mocha"}}
mkdir -p .github/workflows
touch ci-cd.yaml
```
इसके बाद, निम्नलिखित yaml file पेस्ट करें जो दो jobs कॉन्फ़िगर करती है:
* testing के लिए एकल network का उपयोग करके hardhat tests चलाने के लिए **`test`** job
* सफल testing के बाद कई networks (Mainnet और Base) पर contracts deploy करने के लिए **`deploy`** job
`mode` argument `CI` और `CD` मान लेता है।
* `CD` mode Virtual Environment को सक्रिय रखता है और आप deployed contracts के साथ काम कर सकते हैं।
* `CI` mode step पूरा होने के बाद Virtual Environment को रोक देता है। आप transactions का निरीक्षण कर सकेंगे लेकिन आगे RPC requests नहीं भेज पाएंगे।
```yaml showLineNumbers title="ci-cd.yaml" theme={"theme":{"light":"catppuccin-latte","dark":"catppuccin-mocha"}}
name: Hardhat CI/CD Multichain
on: [push, pull_request]
env:
## Needed available as env variables for hardhat.config.js
TENDERLY_PROJECT_NAME: ${{ vars.TENDERLY_PROJECT_NAME }}
TENDERLY_ACCOUNT_NAME: ${{ vars.TENDERLY_ACCOUNT_NAME }}
jobs:
test:
runs-on: ubuntu-latest
steps:
- uses: actions/checkout@v4
- name: Setup Node.js
uses: actions/setup-node@v4
with:
node-version: '20'
cache: 'npm'
- name: Setup Virtual Environment
uses: tenderly/vnet-github-action@v1.0.14
with:
mode: CI # pauses the Virtual Environment after deployment
access_key: ${{ secrets.TENDERLY_ACCESS_KEY }}
project_name: ${{ vars.TENDERLY_PROJECT_NAME }}
account_name: ${{ vars.TENDERLY_ACCOUNT_NAME }}
testnet_name: "Testing"
network_id: 1
chain_id_prefix: 7357
public_explorer: true
verification_visibility: 'src'
push_on_complete: true
- name: Install dependencies
run: npm install
working-directory: examples/hardhat-ignition
- name: Run Tests
run: npm run test:1
working-directory: examples/hardhat-ignition
deploy:
needs: test
runs-on: ubuntu-latest
permissions:
contents: write
steps:
- uses: actions/checkout@v4
- name: Setup Node.js
uses: actions/setup-node@v4
with:
node-version: '20'
cache: 'npm'
- name: Setup Virtual Environment
uses: tenderly/vnet-github-action@v1.0.14
with:
mode: CD
access_key: ${{ secrets.TENDERLY_ACCESS_KEY }}
project_name: ${{ vars.TENDERLY_PROJECT_NAME }}
account_name: ${{ vars.TENDERLY_ACCOUNT_NAME }}
testnet_name: "Staging"
network_id: |
1
8453
chain_id_prefix: ""
public_explorer: true
verification_visibility: 'src'
push_on_complete: true
- name: Install dependencies
run: npm install
working-directory: examples/hardhat-ignition
- name: Deploy Contracts Mainnet
run: npm run deploy:1 -- --deployment-id deploy-1-${BUILD_SLUG}
working-directory: examples/hardhat-ignition
- name: Deploy Contracts Base
run: npm run deploy:8453 -- --deployment-id deploy-8453-${BUILD_SLUG}
working-directory: examples/hardhat-ignition
```
### Environment variables तैयार करें
Local testing के लिए, इस template का उपयोग करके एक `.env` file सेट करें:
```dotenv theme={"theme":{"light":"catppuccin-latte","dark":"catppuccin-mocha"}}
## Access parameters
TENDERLY_ACCESS_KEY=...
TENDERLY_PROJECT_NAME=...
TENDERLY_ACCOUNT_NAME=...
## Network-specific parameters (populated by the action in CI/CD)
TENDERLY_ADMIN_RPC_URL_1=... # Mainnet RPC
TENDERLY_ADMIN_RPC_URL_8453=... # Base RPC
TENDERLY_CHAIN_ID_1=... # Mainnet chain ID
TENDERLY_CHAIN_ID_8453=... # Base chain ID
```
आवश्यक variables:
* `TENDERLY_ACCESS_KEY`: जानें कि [अपनी access key कैसे प्राप्त करें](/platform/account/projects/api-tokens)
* `TENDERLY_ACCOUNT_NAME` और `TENDERLY_PROJECT_NAME`: [अपने account और project नाम प्राप्त करने](/platform/account/projects/api-tokens) के चरणों का पालन करें
### Hardhat कॉन्फ़िगर करें
`hardhat.config.ts` में Virtual Environment configuration जोड़ें:
```typescript title='hardhat.config.ts' showLineNumbers theme={"theme":{"light":"catppuccin-latte","dark":"catppuccin-mocha"}}
dotenv.config();
const config: HardhatUserConfig = {
solidity: "0.8.27",
networks: {
mainnet: {
url: process.env.TENDERLY_ADMIN_RPC_URL_1,
chainId: parseInt(process.env.TENDERLY_CHAIN_ID_1 || "1")
},
base: {
url: process.env.TENDERLY_ADMIN_RPC_URL_8453,
chainId: parseInt(process.env.TENDERLY_CHAIN_ID_8453 || "8453")
}
},
etherscan: {
apiKey: {
mainnet: process.env.TENDERLY_ACCESS_KEY!,
base: process.env.TENDERLY_ACCESS_KEY!
},
customChains: [
{
network: "mainnet",
chainId: parseInt(process.env.TENDERLY_CHAIN_ID_1!),
urls: {
apiURL: `${process.env.TENDERLY_ADMIN_RPC_URL_1}/verify`,
browserURL: process.env.TENDERLY_ADMIN_RPC_URL_1!
}
},
{
network: "base",
chainId: parseInt(process.env.TENDERLY_CHAIN_ID_8453!),
urls: {
apiURL: `${process.env.TENDERLY_ADMIN_RPC_URL_8453}/verify`,
browserURL: process.env.TENDERLY_ADMIN_RPC_URL_8453!
}
}
]
},
tenderly: {
project: process.env.TENDERLY_PROJECT_NAME!,
username: process.env.TENDERLY_ACCOUNT_NAME!,
accessKey: process.env.TENDERLY_ACCESS_KEY!
},
sourcify: {
enabled: false
}
};
export default config;
```
### test और deploy scripts जोड़ें
multi-network testing और deployment के लिए अपनी `package.json` में निम्न scripts जोड़ें:
```json theme={"theme":{"light":"catppuccin-latte","dark":"catppuccin-mocha"}}
{
"scripts": {
"deploy:1": "npx hardhat ignition deploy ./ignition/modules/Counter.js --network mainnet",
"deploy:8453": "npx hardhat ignition deploy ./ignition/modules/Counter.js --network base",
"test:1": "npx hardhat test --network mainnet"
}
}
```
deploy commands अद्वितीय deployment identifiers बनाने के लिए BUILD\_SLUG environment variable (action द्वारा प्रदान) का उपयोग करते हैं।
### Build को locally टेस्ट करें
Build को locally test करने के लिए, निम्न commands चलाएं:
```bash theme={"theme":{"light":"catppuccin-latte","dark":"catppuccin-mocha"}}
# Test on mainnet fork
npx hardhat test:1
# Deploy to mainnet fork
npx hardhat deploy:1
# Deploy to Base fork
npx hardhat deploy:8453
```
### Github Action को locally टेस्ट करें
अपने action को locally टेस्ट करने के लिए, आप [Act](https://github.com/nektos/act) का उपयोग कर सकते हैं:
```bash theme={"theme":{"light":"catppuccin-latte","dark":"catppuccin-mocha"}}
act --secret-file .env --var-file .env
```
## Stage 2: Github Setup
सफल local setup के बाद, environment variables और आवश्यक secrets के साथ Github कॉन्फ़िगर करके आगे बढ़ें।
### GitHub में secrets और environment variables कॉन्फ़िगर करें
आपको निम्न Github variables और secret कॉन्फ़िगर करने होंगे:
**Variables:**
* `TENDERLY_PROJECT_NAME`
* `TENDERLY_ACCOUNT_NAME`
**Secrets:**
* `TENDERLY_ACCESS_KEY`
आप इन्हें [GitHub UI](https://docs.github.com/en/actions/how-tos/write-workflows/choose-what-workflows-do/use-variables#creating-configuration-variables-for-a-repository) के माध्यम से या `gh` command line का उपयोग करके कॉन्फ़िगर कर सकते हैं:
```bash theme={"theme":{"light":"catppuccin-latte","dark":"catppuccin-mocha"}}
source .env
gh variable set TENDERLY_PROJECT_NAME --body ${TENDERLY_PROJECT_NAME}
gh variable set TENDERLY_ACCOUNT_NAME --body ${TENDERLY_ACCOUNT_NAME}
gh secret set TENDERLY_ACCESS_KEY --body ${TENDERLY_ACCESS_KEY}
```
### अपडेट पुश करें
GitHub Action को ट्रिगर करने के लिए, अपने बदलावों को पुश करें:
```bash theme={"theme":{"light":"catppuccin-latte","dark":"catppuccin-mocha"}}
git add .
git commit -m "Add CI/CD workflow for multichain deployment"
git push
```
### अपना action जाँचें
अपनी Github repository पर जाएं और Actions tab जाँचें। आपको देखना चाहिए:
1. Test job mainnet fork के विरुद्ध चल रहा है
2. Deploy job दो Virtual Environments (mainnet और Base) बना रहा है
3. Deployment artifacts repository में पुश किए जा रहे हैं
### RPC लिंक प्राप्त करें
अपने deployed contracts के लिए RPC लिंक प्राप्त करने के लिए:
1. **Tenderly dashboard > Virtual Environments** पर जाएं
2. अपने CD Virtual Environments खोजें (एक mainnet fork के लिए, एक Base fork के लिए)
3. उनके संबंधित RPC URLs प्राप्त करने के लिए प्रत्येक पर क्लिक करें
## Environment Variables Reference
GitHub Action निम्न network-specific variables को उजागर करती है:
| Variable | विवरण |
| -------------------------------------- | ---------------------------------------- |
| `TENDERLY_TESTNET_ID_{network_id}` | Virtual Environment UUID |
| `TENDERLY_ADMIN_RPC_URL_{network_id}` | चीटकोड मेथड्स के साथ Admin RPC endpoint |
| `TENDERLY_PUBLIC_RPC_URL_{network_id}` | Public RPC endpoint |
| `TENDERLY_CHAIN_ID_{network_id}` | Chain ID |
| `TENDERLY_TESTNET_SLUG_{network_id}` | अद्वितीय Virtual Environment slug |
| `BUILD_SLUG` | वर्तमान build के लिए अद्वितीय identifier |
## अगले कदम
अन्य उदाहरण explore करें:
* [Hardhat with ethers-v6](https://github.com/Tenderly/vnet-github-action/tree/main/examples/hardhat)
* [Foundry setup](https://github.com/Tenderly/vnet-github-action/tree/main/examples/foundry)
* [Advanced deployment patterns](https://github.com/Tenderly/vnet-github-action/tree/main/examples/advanced)
## Stage 1: Local setup
पहले, हम आवश्यक dependencies स्थापित करेंगे और एक workflow file बनाएंगे।
### Dependencies स्थापित करें
सुनिश्चित करें कि आपके पास निम्न packages स्थापित हैं:
```bash theme={"theme":{"light":"catppuccin-latte","dark":"catppuccin-mocha"}}
npm install --save-dev @tenderly/hardhat-tenderly @nomicfoundation/hardhat-ignition
```
### Workflow file बनाएं
GitHub Action सेट करने के लिए, एक नया workflow बनाएं:
```bash theme={"theme":{"light":"catppuccin-latte","dark":"catppuccin-mocha"}}
mkdir -p .github/workflows
touch ci-cd.yaml
```
इसके बाद, निम्नलिखित yaml file पेस्ट करें जो दो jobs कॉन्फ़िगर करती है:
* testing के लिए एकल network का उपयोग करके hardhat tests चलाने के लिए **`test`** job
* सफल testing के बाद कई networks (Mainnet और Base) पर contracts deploy करने के लिए **`deploy`** job
`mode` argument `CI` और `CD` मान लेता है।
* `CD` mode Virtual Environment को सक्रिय रखता है और आप deployed contracts के साथ काम कर सकते हैं।
* `CI` mode step पूरा होने के बाद Virtual Environment को रोक देता है। आप transactions का निरीक्षण कर सकेंगे लेकिन आगे RPC requests नहीं भेज पाएंगे।
```yaml showLineNumbers title="ci-cd.yaml" theme={"theme":{"light":"catppuccin-latte","dark":"catppuccin-mocha"}}
name: Hardhat CI/CD Multichain
on: [push, pull_request]
env:
## Needed available as env variables for hardhat.config.js
TENDERLY_PROJECT_NAME: ${{ vars.TENDERLY_PROJECT_NAME }}
TENDERLY_ACCOUNT_NAME: ${{ vars.TENDERLY_ACCOUNT_NAME }}
jobs:
test:
runs-on: ubuntu-latest
steps:
- uses: actions/checkout@v4
- name: Setup Node.js
uses: actions/setup-node@v4
with:
node-version: '20'
cache: 'npm'
- name: Setup Virtual Environment
uses: tenderly/vnet-github-action@v1.0.14
with:
mode: CI # pauses the Virtual Environment after deployment
access_key: ${{ secrets.TENDERLY_ACCESS_KEY }}
project_name: ${{ vars.TENDERLY_PROJECT_NAME }}
account_name: ${{ vars.TENDERLY_ACCOUNT_NAME }}
testnet_name: "Testing"
network_id: 1
chain_id_prefix: 7357
public_explorer: true
verification_visibility: 'src'
push_on_complete: true
- name: Install dependencies
run: npm install
working-directory: examples/hardhat-ignition
- name: Run Tests
run: npm run test:1
working-directory: examples/hardhat-ignition
deploy:
needs: test
runs-on: ubuntu-latest
permissions:
contents: write
steps:
- uses: actions/checkout@v4
- name: Setup Node.js
uses: actions/setup-node@v4
with:
node-version: '20'
cache: 'npm'
- name: Setup Virtual Environment
uses: tenderly/vnet-github-action@v1.0.14
with:
mode: CD
access_key: ${{ secrets.TENDERLY_ACCESS_KEY }}
project_name: ${{ vars.TENDERLY_PROJECT_NAME }}
account_name: ${{ vars.TENDERLY_ACCOUNT_NAME }}
testnet_name: "Staging"
network_id: |
1
8453
chain_id_prefix: ""
public_explorer: true
verification_visibility: 'src'
push_on_complete: true
- name: Install dependencies
run: npm install
working-directory: examples/hardhat-ignition
- name: Deploy Contracts Mainnet
run: npm run deploy:1 -- --deployment-id deploy-1-${BUILD_SLUG}
working-directory: examples/hardhat-ignition
- name: Deploy Contracts Base
run: npm run deploy:8453 -- --deployment-id deploy-8453-${BUILD_SLUG}
working-directory: examples/hardhat-ignition
```
### Environment variables तैयार करें
Local testing के लिए, इस template का उपयोग करके एक `.env` file सेट करें:
```dotenv theme={"theme":{"light":"catppuccin-latte","dark":"catppuccin-mocha"}}
## Access parameters
TENDERLY_ACCESS_KEY=...
TENDERLY_PROJECT_NAME=...
TENDERLY_ACCOUNT_NAME=...
## Network-specific parameters (populated by the action in CI/CD)
TENDERLY_ADMIN_RPC_URL_1=... # Mainnet RPC
TENDERLY_ADMIN_RPC_URL_8453=... # Base RPC
TENDERLY_CHAIN_ID_1=... # Mainnet chain ID
TENDERLY_CHAIN_ID_8453=... # Base chain ID
```
आवश्यक variables:
* `TENDERLY_ACCESS_KEY`: जानें कि [अपनी access key कैसे प्राप्त करें](/platform/account/projects/api-tokens)
* `TENDERLY_ACCOUNT_NAME` और `TENDERLY_PROJECT_NAME`: [अपने account और project नाम प्राप्त करने](/platform/account/projects/api-tokens) के चरणों का पालन करें
### Hardhat कॉन्फ़िगर करें
`hardhat.config.ts` में Virtual Environment configuration जोड़ें:
```typescript title='hardhat.config.ts' showLineNumbers theme={"theme":{"light":"catppuccin-latte","dark":"catppuccin-mocha"}}
dotenv.config();
const config: HardhatUserConfig = {
solidity: "0.8.27",
networks: {
mainnet: {
url: process.env.TENDERLY_ADMIN_RPC_URL_1,
chainId: parseInt(process.env.TENDERLY_CHAIN_ID_1 || "1")
},
base: {
url: process.env.TENDERLY_ADMIN_RPC_URL_8453,
chainId: parseInt(process.env.TENDERLY_CHAIN_ID_8453 || "8453")
}
},
etherscan: {
apiKey: {
mainnet: process.env.TENDERLY_ACCESS_KEY!,
base: process.env.TENDERLY_ACCESS_KEY!
},
customChains: [
{
network: "mainnet",
chainId: parseInt(process.env.TENDERLY_CHAIN_ID_1!),
urls: {
apiURL: `${process.env.TENDERLY_ADMIN_RPC_URL_1}/verify`,
browserURL: process.env.TENDERLY_ADMIN_RPC_URL_1!
}
},
{
network: "base",
chainId: parseInt(process.env.TENDERLY_CHAIN_ID_8453!),
urls: {
apiURL: `${process.env.TENDERLY_ADMIN_RPC_URL_8453}/verify`,
browserURL: process.env.TENDERLY_ADMIN_RPC_URL_8453!
}
}
]
},
tenderly: {
project: process.env.TENDERLY_PROJECT_NAME!,
username: process.env.TENDERLY_ACCOUNT_NAME!,
accessKey: process.env.TENDERLY_ACCESS_KEY!
},
sourcify: {
enabled: false
}
};
export default config;
```
### test और deploy scripts जोड़ें
multi-network testing और deployment के लिए अपनी `package.json` में निम्न scripts जोड़ें:
```json theme={"theme":{"light":"catppuccin-latte","dark":"catppuccin-mocha"}}
{
"scripts": {
"deploy:1": "npx hardhat ignition deploy ./ignition/modules/Counter.js --network mainnet",
"deploy:8453": "npx hardhat ignition deploy ./ignition/modules/Counter.js --network base",
"test:1": "npx hardhat test --network mainnet"
}
}
```
deploy commands अद्वितीय deployment identifiers बनाने के लिए BUILD\_SLUG environment variable (action द्वारा प्रदान) का उपयोग करते हैं।
### Build को locally टेस्ट करें
Build को locally test करने के लिए, निम्न commands चलाएं:
```bash theme={"theme":{"light":"catppuccin-latte","dark":"catppuccin-mocha"}}
# Test on mainnet fork
npx hardhat test:1
# Deploy to mainnet fork
npx hardhat deploy:1
# Deploy to Base fork
npx hardhat deploy:8453
```
### Github Action को locally टेस्ट करें
अपने action को locally टेस्ट करने के लिए, आप [Act](https://github.com/nektos/act) का उपयोग कर सकते हैं:
```bash theme={"theme":{"light":"catppuccin-latte","dark":"catppuccin-mocha"}}
act --secret-file .env --var-file .env
```
## Stage 2: Github Setup
सफल local setup के बाद, environment variables और आवश्यक secrets के साथ Github कॉन्फ़िगर करके आगे बढ़ें।
### GitHub में secrets और environment variables कॉन्फ़िगर करें
आपको निम्न Github variables और secret कॉन्फ़िगर करने होंगे:
**Variables:**
* `TENDERLY_PROJECT_NAME`
* `TENDERLY_ACCOUNT_NAME`
**Secrets:**
* `TENDERLY_ACCESS_KEY`
आप इन्हें [GitHub UI](https://docs.github.com/en/actions/how-tos/write-workflows/choose-what-workflows-do/use-variables#creating-configuration-variables-for-a-repository) के माध्यम से या `gh` command line का उपयोग करके कॉन्फ़िगर कर सकते हैं:
```bash theme={"theme":{"light":"catppuccin-latte","dark":"catppuccin-mocha"}}
source .env
gh variable set TENDERLY_PROJECT_NAME --body ${TENDERLY_PROJECT_NAME}
gh variable set TENDERLY_ACCOUNT_NAME --body ${TENDERLY_ACCOUNT_NAME}
gh secret set TENDERLY_ACCESS_KEY --body ${TENDERLY_ACCESS_KEY}
```
### अपडेट पुश करें
GitHub Action को ट्रिगर करने के लिए, अपने बदलावों को पुश करें:
```bash theme={"theme":{"light":"catppuccin-latte","dark":"catppuccin-mocha"}}
git add .
git commit -m "Add CI/CD workflow for multichain deployment"
git push
```
### अपना action जाँचें
अपनी Github repository पर जाएं और Actions tab जाँचें। आपको देखना चाहिए:
1. Test job mainnet fork के विरुद्ध चल रहा है
2. Deploy job दो Virtual Environments (mainnet और Base) बना रहा है
3. Deployment artifacts repository में पुश किए जा रहे हैं
### RPC लिंक प्राप्त करें
अपने deployed contracts के लिए RPC लिंक प्राप्त करने के लिए:
1. **Tenderly dashboard > Virtual Environments** पर जाएं
2. अपने CD Virtual Environments खोजें (एक mainnet fork के लिए, एक Base fork के लिए)
3. उनके संबंधित RPC URLs प्राप्त करने के लिए प्रत्येक पर क्लिक करें
## Environment Variables Reference
GitHub Action निम्न network-specific variables को उजागर करती है:
| Variable | विवरण |
| -------------------------------------- | ---------------------------------------- |
| `TENDERLY_TESTNET_ID_{network_id}` | Virtual Environment UUID |
| `TENDERLY_ADMIN_RPC_URL_{network_id}` | चीटकोड मेथड्स के साथ Admin RPC endpoint |
| `TENDERLY_PUBLIC_RPC_URL_{network_id}` | Public RPC endpoint |
| `TENDERLY_CHAIN_ID_{network_id}` | Chain ID |
| `TENDERLY_TESTNET_SLUG_{network_id}` | अद्वितीय Virtual Environment slug |
| `BUILD_SLUG` | वर्तमान build के लिए अद्वितीय identifier |
## अगले कदम
अन्य उदाहरण explore करें:
* [Hardhat with ethers-v6](https://github.com/Tenderly/vnet-github-action/tree/main/examples/hardhat)
* [Foundry setup](https://github.com/Tenderly/vnet-github-action/tree/main/examples/foundry)
* [Advanced deployment patterns](https://github.com/Tenderly/vnet-github-action/tree/main/examples/advanced)