> ## Documentation Index
> Fetch the complete documentation index at: https://docs.tenderly.co/llms.txt
> Use this file to discover all available pages before exploring further.
# Staging Contracts
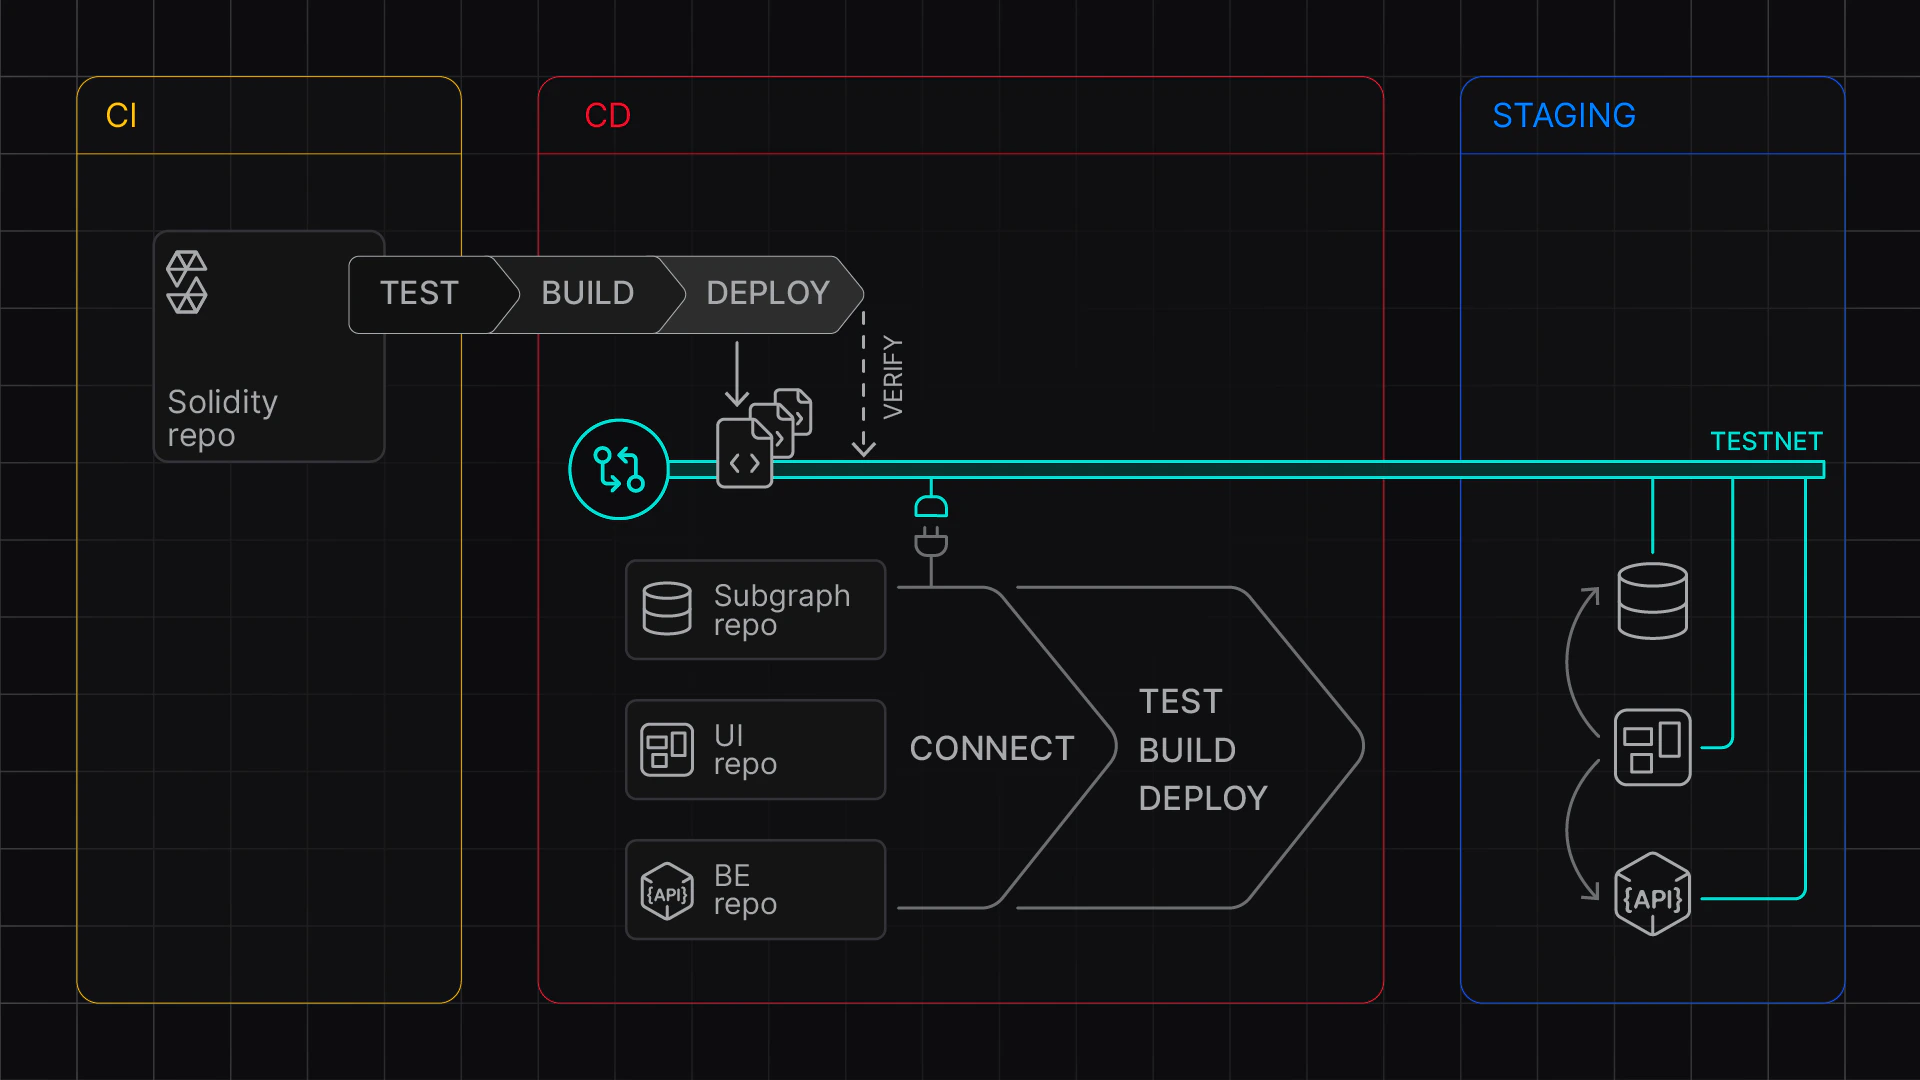
> Foundry के साथ Virtual Environment पर deploy करके CI/CD में contracts को stage करें, फिर RPC URL और contract addresses को अपनी team के साथ साझा करें।
Virtual Environments पर नवीनतम code को deploy करें और RPC लिंक और contract addresses साझा करके इसे अपनी team के लिए उपलब्ध कराएं।
 ### Virtual Environment बनाएं
अपने contracts को stage करने के लिए एक नया Virtual Environment बनाएं, इनमें से किसी एक तरीके से:
* [Virtual Environments dashboard](/virtual-environments/quickstart#configure-your-virtual-environment) का उपयोग करके
* [REST API](/virtual-environments/develop/create-virtual-environment-via-api) का उपयोग करके
### Environment variables सेट करें
Virtual Environment बनाने और फिर contracts deploy और verify करने के लिए, निम्न environment variables सेट करें:
* **`TENDERLY_ACCOUNT_ID`** आपके [account ID](/platform/account/projects/slug) के साथ
* **`TENDERLY_PROJECT`** आपके [project (slug)](/platform/account/projects/slug) के साथ
* **`TENDERLY_ACCESS_KEY`** [उत्पन्न की गई access key](/platform/account/projects/api-tokens) के साथ
* **`ORIGINAL_NETWORK_ID`** उस [network के ID](/platform/supported-networks) के साथ जिस पर आप Virtual Environment आधारित करना चाहते हैं
* **`FOUNDRY_REPO`** Foundry repo के पथ के साथ
* **`DEPLOYER_ADDRESS`** उस account के साथ जिससे आप deploy कर रहे हैं
* deployment scripts के लिए आवश्यक अन्य environment variables जोड़ें
```bash showLineNumbers title='.env' theme={"theme":{"light":"catppuccin-latte","dark":"catppuccin-mocha"}}
export TENDERLY_ACCOUNT_ID=
export TENDERLY_PROJECT=
export TENDERLY_ACCESS_KEY=
## TestNet Configuration
export TENDERLY_TESTNET_NAME=staging
export PURPOSE=development
export ORIGINAL_NETWORK_ID=1
export BLOCK_NUMBER=latest
## Custom Chain ID (Prefixed with 7357 - test)
export CHAIN_ID=7357$ORIGINAL_NETWORK_ID
## Public explorer verification visibility
## abi | full | none
export VERIFICATION_VISIBILITY=abi
# Foundry Repo (Absolute path only!)
export FOUNDRY_REPO=
## Deployer address
export DEPLOYER_ADDRESS=...
## Custom stuff needed for deployment scripts
## Add your custom stuff here
export ADMIN_ADDRESS=...
```
### अपनी deployment commands लिखें
`deploy-command.sh` को संपादित करें और अपने contracts को deploy करने के लिए commands जोड़ें। ध्यान दें कि आपको अपने Foundry या Hardhat प्रोजेक्ट में verification जोड़नी होगी; देखें [Deploy and verify contracts](/virtual-environments/develop/deploy-contracts)।
उदाहरण के लिए:
```bash showLineNumbers title='deploy-command.sh' theme={"theme":{"light":"catppuccin-latte","dark":"catppuccin-mocha"}}
#!/bin/bash
cd $FOUNDRY_REPO
## TODO: Your deployment command here:
MAX_SEGMENT_COUNT=3
FOUNDRY_PROFILE=optimized \
forge script script/DeployCore.s.sol \
--broadcast \
--rpc-url $TENDERLY_VIRTUAL_TESTNET_RPC \
--sig "run(address)" \
--verify \
--verifier-url $VERIFICATION_URL \
$ADMIN_ADDRESS
```
### Contracts को stage करें
निम्न commands चलाएं जो:
* एक नया Virtual Environment बनाएंगे
* Infinite faucet का उपयोग करके **`$DEPLOYER_ADDRESS`** को test ETH से fund करेंगे
* आपके custom chain पर verification के लिए Foundry के **`foundry.toml`** को कॉन्फ़िगर करेंगे
* आपके contracts deploy करेंगे
* और अंत में `foundry.toml` को साफ़ करेंगे
```bash showLineNumbers title='stage.sh' theme={"theme":{"light":"catppuccin-latte","dark":"catppuccin-mocha"}}
# create a testnet - or paste the Unlocked TestNet RPC URL
source src/contracts-staging/.env
cd src/contracts-staging
## Create a fresh testnet
export VIRTUAL_NETWORK_RPC_URL=$(./create-testnet.sh)
echo "Created a Virtual Environment at ${VIRTUAL_NETWORK_RPC_URL}"
### run the deployment
./deploy-to-testnet.sh
```
RPC लिंक output में दिखाया गया है, और आपके contracts Virtual Environment पर deploy और verify हो गए हैं।
### Addresses साझा करें
deployed contracts के ABIs और addresses को इकट्ठा करें और उन्हें Virtual Environment RPC के साथ अपनी team में वितरित करें।
### Virtual Environment बनाएं
अपने contracts को stage करने के लिए एक नया Virtual Environment बनाएं, इनमें से किसी एक तरीके से:
* [Virtual Environments dashboard](/virtual-environments/quickstart#configure-your-virtual-environment) का उपयोग करके
* [REST API](/virtual-environments/develop/create-virtual-environment-via-api) का उपयोग करके
### Environment variables सेट करें
Virtual Environment बनाने और फिर contracts deploy और verify करने के लिए, निम्न environment variables सेट करें:
* **`TENDERLY_ACCOUNT_ID`** आपके [account ID](/platform/account/projects/slug) के साथ
* **`TENDERLY_PROJECT`** आपके [project (slug)](/platform/account/projects/slug) के साथ
* **`TENDERLY_ACCESS_KEY`** [उत्पन्न की गई access key](/platform/account/projects/api-tokens) के साथ
* **`ORIGINAL_NETWORK_ID`** उस [network के ID](/platform/supported-networks) के साथ जिस पर आप Virtual Environment आधारित करना चाहते हैं
* **`FOUNDRY_REPO`** Foundry repo के पथ के साथ
* **`DEPLOYER_ADDRESS`** उस account के साथ जिससे आप deploy कर रहे हैं
* deployment scripts के लिए आवश्यक अन्य environment variables जोड़ें
```bash showLineNumbers title='.env' theme={"theme":{"light":"catppuccin-latte","dark":"catppuccin-mocha"}}
export TENDERLY_ACCOUNT_ID=
export TENDERLY_PROJECT=
export TENDERLY_ACCESS_KEY=
## TestNet Configuration
export TENDERLY_TESTNET_NAME=staging
export PURPOSE=development
export ORIGINAL_NETWORK_ID=1
export BLOCK_NUMBER=latest
## Custom Chain ID (Prefixed with 7357 - test)
export CHAIN_ID=7357$ORIGINAL_NETWORK_ID
## Public explorer verification visibility
## abi | full | none
export VERIFICATION_VISIBILITY=abi
# Foundry Repo (Absolute path only!)
export FOUNDRY_REPO=
## Deployer address
export DEPLOYER_ADDRESS=...
## Custom stuff needed for deployment scripts
## Add your custom stuff here
export ADMIN_ADDRESS=...
```
### अपनी deployment commands लिखें
`deploy-command.sh` को संपादित करें और अपने contracts को deploy करने के लिए commands जोड़ें। ध्यान दें कि आपको अपने Foundry या Hardhat प्रोजेक्ट में verification जोड़नी होगी; देखें [Deploy and verify contracts](/virtual-environments/develop/deploy-contracts)।
उदाहरण के लिए:
```bash showLineNumbers title='deploy-command.sh' theme={"theme":{"light":"catppuccin-latte","dark":"catppuccin-mocha"}}
#!/bin/bash
cd $FOUNDRY_REPO
## TODO: Your deployment command here:
MAX_SEGMENT_COUNT=3
FOUNDRY_PROFILE=optimized \
forge script script/DeployCore.s.sol \
--broadcast \
--rpc-url $TENDERLY_VIRTUAL_TESTNET_RPC \
--sig "run(address)" \
--verify \
--verifier-url $VERIFICATION_URL \
$ADMIN_ADDRESS
```
### Contracts को stage करें
निम्न commands चलाएं जो:
* एक नया Virtual Environment बनाएंगे
* Infinite faucet का उपयोग करके **`$DEPLOYER_ADDRESS`** को test ETH से fund करेंगे
* आपके custom chain पर verification के लिए Foundry के **`foundry.toml`** को कॉन्फ़िगर करेंगे
* आपके contracts deploy करेंगे
* और अंत में `foundry.toml` को साफ़ करेंगे
```bash showLineNumbers title='stage.sh' theme={"theme":{"light":"catppuccin-latte","dark":"catppuccin-mocha"}}
# create a testnet - or paste the Unlocked TestNet RPC URL
source src/contracts-staging/.env
cd src/contracts-staging
## Create a fresh testnet
export VIRTUAL_NETWORK_RPC_URL=$(./create-testnet.sh)
echo "Created a Virtual Environment at ${VIRTUAL_NETWORK_RPC_URL}"
### run the deployment
./deploy-to-testnet.sh
```
RPC लिंक output में दिखाया गया है, और आपके contracts Virtual Environment पर deploy और verify हो गए हैं।
### Addresses साझा करें
deployed contracts के ABIs और addresses को इकट्ठा करें और उन्हें Virtual Environment RPC के साथ अपनी team में वितरित करें।