> ## Documentation Index
> Fetch the complete documentation index at: https://docs.tenderly.co/llms.txt
> Use this file to discover all available pages before exploring further.
# Named RPC URLs
> Virtual Environment के RPC URL से एक fixed, human-readable नाम जोड़ें ताकि CI/CD और local configs re-forks के बीच कभी न बदलें।
डिफ़ॉल्ट रूप से, एक Virtual Environment के RPC URL में एक randomly generated identifier होता है जो हर बार जब आप environment बनाते या re-fork करते हैं तो बदल जाता है। एक Named RPC URL उस identifier को आपके द्वारा चुने गए नाम से बदल देता है, इसलिए URL re-forks के बीच स्थिर रहता है। यह हर बार pull request, local dev loop, या staging deployment के लिए एक ताज़ा environment स्पिन अप करते समय CI secrets, `.env` files, या hardcoded RPC URLs को अपडेट करने की आवश्यकता को हटा देता है।
## RPC URL format
 नाम के बिना, RPC URL का identifier segment auto-generated होता है, उदाहरण के लिए `https://virtual.mainnet.eu.rpc.tenderly.co/tenderly/demo/89e9b3-4bcd00`, और हर बार जब आप re-fork करते हैं तो एक नया उत्पन्न होता है।
एक नाम जुड़ने के साथ, Public और Admin RPC URLs इसके बजाय यह रूप लेते हैं:
| Endpoint | URL format | Notes |
| ---------- | -------------------------------------------------------------------------------------------- | --------------------------------------------------------------------------------------------------------------------------------------------------------------- |
| Public RPC | `https://virtual.[NETWORK].[REGION].rpc.tenderly.co/[ACCOUNT]/[PROJECT]/[RPC_NAME]` | केवल Standard JSON-RPC, बाहरी परीक्षकों के साथ साझा करने या dapp UI में embed करने के लिए सुरक्षित। |
| Admin RPC | `https://virtual.[NETWORK].[REGION].rpc.tenderly.co/[ACCOUNT]/[PROJECT]/[RPC_NAME]-[SUFFIX]` | `[SUFFIX]` एक random string है जिसे Tenderly append करता है ताकि [चीटकोड-सक्षम](/virtual-environments/admin-rpc) endpoint unguessable रहे भले ही नाम public हो। |
`[REGION]` `eu` या `us-east` है, जो भी आप नाम assign करते समय चुनते हैं। `[RPC_NAME]` आपके project के भीतर अद्वितीय होना चाहिए। एक बार जब एक नाम जुड़ जाता है, तो यह, न कि auto-generated identifier, वह है जो re-forks के बीच fixed रहता है।
## Virtual Environment बनाते समय एक नाम assign करें
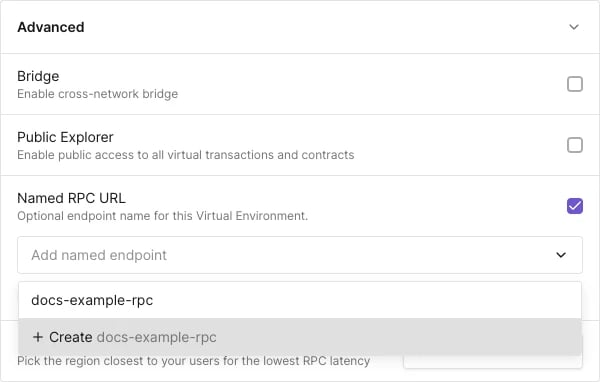
1. [Virtual Environment बनाना](/virtual-environments/quickstart) शुरू करें और **Advanced** section का विस्तार करें।
2. **Named RPC URL** सक्षम करें।
3. **Add named endpoint** में, एक नया नाम टाइप करें और **Create ``** चुनें, या सूची से मौजूदा नाम चुनें।
4. **Create Virtual Environment** पर क्लिक करें।
नए environment के लिए Admin और Public RPC URLs इसके **Home** page पर, **Integrate Virtual RPC** के तहत उपलब्ध हैं।
नाम के बिना, RPC URL का identifier segment auto-generated होता है, उदाहरण के लिए `https://virtual.mainnet.eu.rpc.tenderly.co/tenderly/demo/89e9b3-4bcd00`, और हर बार जब आप re-fork करते हैं तो एक नया उत्पन्न होता है।
एक नाम जुड़ने के साथ, Public और Admin RPC URLs इसके बजाय यह रूप लेते हैं:
| Endpoint | URL format | Notes |
| ---------- | -------------------------------------------------------------------------------------------- | --------------------------------------------------------------------------------------------------------------------------------------------------------------- |
| Public RPC | `https://virtual.[NETWORK].[REGION].rpc.tenderly.co/[ACCOUNT]/[PROJECT]/[RPC_NAME]` | केवल Standard JSON-RPC, बाहरी परीक्षकों के साथ साझा करने या dapp UI में embed करने के लिए सुरक्षित। |
| Admin RPC | `https://virtual.[NETWORK].[REGION].rpc.tenderly.co/[ACCOUNT]/[PROJECT]/[RPC_NAME]-[SUFFIX]` | `[SUFFIX]` एक random string है जिसे Tenderly append करता है ताकि [चीटकोड-सक्षम](/virtual-environments/admin-rpc) endpoint unguessable रहे भले ही नाम public हो। |
`[REGION]` `eu` या `us-east` है, जो भी आप नाम assign करते समय चुनते हैं। `[RPC_NAME]` आपके project के भीतर अद्वितीय होना चाहिए। एक बार जब एक नाम जुड़ जाता है, तो यह, न कि auto-generated identifier, वह है जो re-forks के बीच fixed रहता है।
## Virtual Environment बनाते समय एक नाम assign करें
1. [Virtual Environment बनाना](/virtual-environments/quickstart) शुरू करें और **Advanced** section का विस्तार करें।
2. **Named RPC URL** सक्षम करें।
3. **Add named endpoint** में, एक नया नाम टाइप करें और **Create ``** चुनें, या सूची से मौजूदा नाम चुनें।
4. **Create Virtual Environment** पर क्लिक करें।
नए environment के लिए Admin और Public RPC URLs इसके **Home** page पर, **Integrate Virtual RPC** के तहत उपलब्ध हैं।
 ## निर्माण के बाद एक नाम बदलें या हटाएँ
Virtual Environment के **Settings** page को खोलें। वहाँ **Named RPC URL** section निर्माण dialog के section को दर्शाता है:
* environment को एक अलग नाम पर पुनः असाइन करने के लिए, name picker खोलें और दूसरी entry चुनें, या एक नया नाम टाइप करें और **Create ``** चुनें।
* इस environment से नाम को detach करने के लिए, **Named RPC URL** को अक्षम करें और save करें। नाम स्वयं हटाया नहीं जाता, यह बस कहीं और attach करने के लिए मुक्त हो जाता है।
## एक नाम एक समय में एक environment से map होता है
एक Virtual Environment से नाम जोड़ना one-to-one संबंध है। name picker में, मौजूदा नाम जो project में कहीं और पहले से assigned हैं, उन्हें **In use on another environment** लेबल किया जाता है। उनमें से किसी एक को select करने से यह current environment से जुड़ जाता है और उस environment से detach हो जाता है जो पहले इसे धारण कर रहा था, इसलिए वहाँ उस environment का named RPC URL resolve नहीं होता और इसके बजाय current environment पर routes करता है।
यह एक fixed RPC URL के target को swap करने को एक ही action बनाता है: replacement environment बनाएं, इसे उसी नाम से assign करें जिसे आप retiring कर रहे हैं, और उस URL पर पॉइंट किए गए हर script, CI pipeline, या dapp config अब बिना उनके किसी बदलाव के नए environment पर resolve हो जाता है।
## REST API के माध्यम से एक नाम सेट करें
environment creation endpoint के माध्यम से एक environment बनाते समय `rpcName` पास करें:
```bash title="environment-create-named.sh" theme={"theme":{"light":"catppuccin-latte","dark":"catppuccin-mocha"}}
curl --request POST \
--url https://api.tenderly.co/api/v1/account/me/project/project/environments \
--header 'Accept: application/json' \
--header 'Content-Type: application/json' \
--header "X-Access-Key: ${TENDERLY_ACCESS_KEY}" \
--data '{
"displayName": "My Staging Environment",
"rpcName": "my-staging-rpc",
"networkConfigs": [
{
"networkId": "1",
"chainConfigOverrides": { "chainId": "1" },
"blockNumber": "latest",
"region": "eu",
"explorerConfig": { "enabled": false, "contractVerificationVisibility": "bytecode" }
}
]
}'
```
resolved RPC URLs प्राप्त करने के लिए [REST API reference](/virtual-environments/rest-api#get-an-environment) के माध्यम से environment को वापस पढ़ें:
```bash theme={"theme":{"light":"catppuccin-latte","dark":"catppuccin-mocha"}}
curl --request GET \
--url https://api.tenderly.co/api/public/v1/account/me/project/project/environments/{environmentId} \
--header "X-Access-Key: ${TENDERLY_ACCESS_KEY}"
```
`active_instance.vnets[].rpcs` array में named Admin और Public RPC URLs होते हैं:
```json theme={"theme":{"light":"catppuccin-latte","dark":"catppuccin-mocha"}}
{
"rpcs": [
{ "name": "Admin RPC", "url": "https://virtual.mainnet.eu.rpc.tenderly.co/tenderly/project/my-staging-rpc-800896" },
{ "name": "Public RPC", "url": "https://virtual.mainnet.eu.rpc.tenderly.co/tenderly/project/my-staging-rpc" }
]
}
```
## यह भी देखें
* पूर्ण Virtual Environment creation flow के लिए [Quickstart](/virtual-environments/quickstart)।
* Admin RPC पर उपलब्ध चीटकोड्स के लिए [Admin RPC](/virtual-environments/admin-rpc)।
* प्रति pull request environments बनाने और नष्ट करने वाली pipelines के लिए [GitHub Actions के साथ CI/CD](/virtual-environments/ci-cd/github-actions-foundry)।
## निर्माण के बाद एक नाम बदलें या हटाएँ
Virtual Environment के **Settings** page को खोलें। वहाँ **Named RPC URL** section निर्माण dialog के section को दर्शाता है:
* environment को एक अलग नाम पर पुनः असाइन करने के लिए, name picker खोलें और दूसरी entry चुनें, या एक नया नाम टाइप करें और **Create ``** चुनें।
* इस environment से नाम को detach करने के लिए, **Named RPC URL** को अक्षम करें और save करें। नाम स्वयं हटाया नहीं जाता, यह बस कहीं और attach करने के लिए मुक्त हो जाता है।
## एक नाम एक समय में एक environment से map होता है
एक Virtual Environment से नाम जोड़ना one-to-one संबंध है। name picker में, मौजूदा नाम जो project में कहीं और पहले से assigned हैं, उन्हें **In use on another environment** लेबल किया जाता है। उनमें से किसी एक को select करने से यह current environment से जुड़ जाता है और उस environment से detach हो जाता है जो पहले इसे धारण कर रहा था, इसलिए वहाँ उस environment का named RPC URL resolve नहीं होता और इसके बजाय current environment पर routes करता है।
यह एक fixed RPC URL के target को swap करने को एक ही action बनाता है: replacement environment बनाएं, इसे उसी नाम से assign करें जिसे आप retiring कर रहे हैं, और उस URL पर पॉइंट किए गए हर script, CI pipeline, या dapp config अब बिना उनके किसी बदलाव के नए environment पर resolve हो जाता है।
## REST API के माध्यम से एक नाम सेट करें
environment creation endpoint के माध्यम से एक environment बनाते समय `rpcName` पास करें:
```bash title="environment-create-named.sh" theme={"theme":{"light":"catppuccin-latte","dark":"catppuccin-mocha"}}
curl --request POST \
--url https://api.tenderly.co/api/v1/account/me/project/project/environments \
--header 'Accept: application/json' \
--header 'Content-Type: application/json' \
--header "X-Access-Key: ${TENDERLY_ACCESS_KEY}" \
--data '{
"displayName": "My Staging Environment",
"rpcName": "my-staging-rpc",
"networkConfigs": [
{
"networkId": "1",
"chainConfigOverrides": { "chainId": "1" },
"blockNumber": "latest",
"region": "eu",
"explorerConfig": { "enabled": false, "contractVerificationVisibility": "bytecode" }
}
]
}'
```
resolved RPC URLs प्राप्त करने के लिए [REST API reference](/virtual-environments/rest-api#get-an-environment) के माध्यम से environment को वापस पढ़ें:
```bash theme={"theme":{"light":"catppuccin-latte","dark":"catppuccin-mocha"}}
curl --request GET \
--url https://api.tenderly.co/api/public/v1/account/me/project/project/environments/{environmentId} \
--header "X-Access-Key: ${TENDERLY_ACCESS_KEY}"
```
`active_instance.vnets[].rpcs` array में named Admin और Public RPC URLs होते हैं:
```json theme={"theme":{"light":"catppuccin-latte","dark":"catppuccin-mocha"}}
{
"rpcs": [
{ "name": "Admin RPC", "url": "https://virtual.mainnet.eu.rpc.tenderly.co/tenderly/project/my-staging-rpc-800896" },
{ "name": "Public RPC", "url": "https://virtual.mainnet.eu.rpc.tenderly.co/tenderly/project/my-staging-rpc" }
]
}
```
## यह भी देखें
* पूर्ण Virtual Environment creation flow के लिए [Quickstart](/virtual-environments/quickstart)।
* Admin RPC पर उपलब्ध चीटकोड्स के लिए [Admin RPC](/virtual-environments/admin-rpc)।
* प्रति pull request environments बनाने और नष्ट करने वाली pipelines के लिए [GitHub Actions के साथ CI/CD](/virtual-environments/ci-cd/github-actions-foundry)।