> ## Documentation Index
> Fetch the complete documentation index at: https://docs.tenderly.co/llms.txt
> Use this file to discover all available pages before exploring further.
# How to Build a Custom Oracle
> Learn how to use Web3 Actions to build a custom oracle for gathering data from real-world systems.
In this tutorial, we’ll show you how to **build a custom Web3 oracle using Tenderly Web3 Actions**. An oracle gathers data from real-world systems and sends it to the blockchain. It acts as an entry point for streaming data from Web2 applications toward smart contracts.
Using oracles, we can access data from sources outside the blockchain (e.g., exchanges, traffic and weather data, gas rates, oil prices, etc) from within our smart contracts.
The entire code is available in [**this Github
repo**](https://github.com/Tenderly/examples-web3-actions/).
## Project Overview
The purpose of this project is to teach you how to build a Web3 Action that fetches data from a Web2 API whenever a smart contract makes a data request through an on-chain event. This data will then be sent to the contract that requested it.
Here’s a quick breakdown of the project’s flow.
* Create a Consumer – a smart contract that requests the ETH price from an Oracle Contract.
* The Oracle Contract requests a new coin price from the CoinGecko API with the `RequestCoinPrice` event.
* Once the price request has been observed, the Web3 Action is called to fetch the value.
* The price value is pushed back to the Oracle Contract.
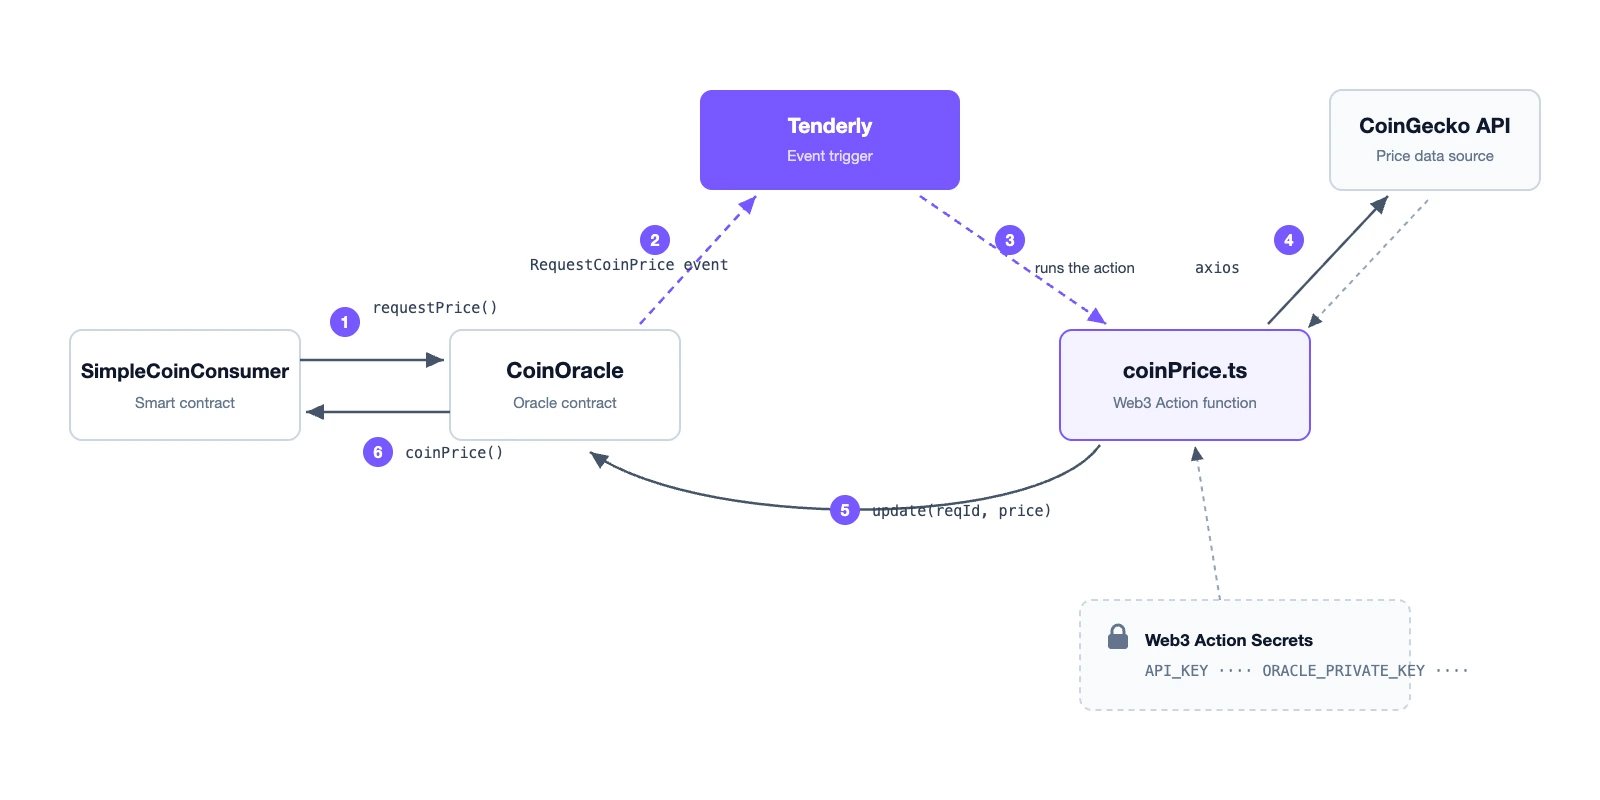 We use a pre-made smart contract for this project. Feel free to explore the code and adapt it to your own use case.
Note that the `SimpleCoinConsumer` contract accepts the `coinPrice` coming in only from the `CoinOracle` it was assigned when it got deployed. Additionally, `CoinOracle` accepts updates only if it is signed by the same Wallet that deployed it (`owner`).
## The Plan
Here’s a list of steps we’ll need to take to build our oracle:
* Deploy the `CoinOracle` and `SimpleCoinConsumer` smart contracts.
* Get the API key and other information needed to use one of the Ethereum providers. We’ll store this data in the Web3 Actions Secrets (*needed for interaction 5*).
* Get the Private Key of the account that deployed the Oracle Contract (`owner`) and store it in the Web3 Actions Secrets (*needed to sign transactions in interaction 5*).
* Initialize Tenderly’s Web3 Actions directory on your dev environment and add npm dependencies.
* Create a Web3 Action that will send price updates to the oracle.
### 1: Deploy the Smart Contracts
Both `CoinOracle` and `SimpleCoinConsumer` contracts are stored in the same file: `CoinOracle.sol`. Check out the source code [**in our GitHub repo**](https://github.com/Tenderly/examples-web3-actions/blob/main/simple-coin-oracle/CoinOracle.sol).
The `CoinOracle` contact must be deployed first, before the `SimpleCoinConsumer` contract, preferably using a different Wallet. Make sure to pass the `CoinOracle` address as the constructor parameter.
For the purpose of this tutorial, we’ll deploy to the Ropsten test network (ID is 3) but you’re free to use a different one.
### 2: Initialize Web3 Actions
For this tutorial, you’ll need access to the **Tenderly Dashboard**. If you don’t have an account,
[**sign up here for free**](https://dashboard.tenderly.co/register?utm_source=homepage) (no cc
required as well).
**Install the Tenderly CLI (follow** [**this installation guide**](https://github.com/Tenderly/tenderly-cli#installation)**)**. With the Tenderly CLI installed on your machine, create a new directory `tdly-actions` and `cd` into it to initialize your Web3 Actions using the `tenderly actions init` command.
```bash theme={"theme":{"light":"catppuccin-latte","dark":"catppuccin-mocha"}}
$ cd tdly-actions
$ tenderly actions init
```
When prompted, select your Tenderly projects where you want to deploy Web3 Actions. List out the contents of the directory to explore the files created by the CLI:
```bash title="example" showLineNumbers theme={"theme":{"light":"catppuccin-latte","dark":"catppuccin-mocha"}}
ls actions
example.ts
tsconfig.json
package.json
```
The Tenderly CLI will also create an npm project which will allow your Web3 Actions to use any npm package.
**Install NPM dependencies** - we’ll use Axios to make requests to an external API and Ethers to interact with the blockchain. Run the following command from your terminal to add these dependencies to your npm project:
```bash title="example" showLineNumbers theme={"theme":{"light":"catppuccin-latte","dark":"catppuccin-mocha"}}
cd actions && npm install --save-dev axios ethers @types/node && cd ..
```
### 3: Create Your Web3 Action
Before moving forward, copy the `CoinOracleContract.json` file to the `actions` directory. **You can find this JSON file in Remix or** [**this GitHub repo**](https://github.com/Tenderly/examples-web3-actions/blob/main/simple-coin-oracle/actions/CoinOracleContract.json).
All files your Web3 Action code uses and references must be placed in the{' '}
`actions` directory (e.g.{' '}
`CoinOracleContract.json`).
Set the `CONTRACT_ADDRESS` variable to the address of your deployed `Oracle`:
```typescript title="example.ts" showLineNumbers theme={"theme":{"light":"catppuccin-latte","dark":"catppuccin-mocha"}}
const CONTRACT_ADDRESS = '...'; // replace with contract address
export const coinPrice: ActionFn = async (context: Context, event: Event) => {
let transactionEvent = event as TransactionEvent;
const ifc = new ethers.utils.Interface(CoinOracleContract.abi);
const { data, topics } = transactionEvent.logs[0];
const priceRequest = ifc.decodeEventLog('RequestCoinPrice', data, topics);
const price = await getPrice();
const oc = await oracleContract(context, ifc);
await oc.update(priceRequest.reqId, price, {
gasLimit: 250000,
gasPrice: ethers.utils.parseUnits('100', 'gwei'),
});
console.log(`Processed: ${priceRequest.reqId} with price in cents: ${price}`);
};
const getPrice = async (coin: string) => {
const coinInfo = await axios.get(`https://api.coingecko.com/api/v3/coins/${coin}`);
return coinInfo.data.market_data.current_price.usd * 100;
};
const oracleContract = async (context: Context, contractInterface: ethers.utils.Interface) => {
const etherscanApiKey = await context.secrets.get('oracle.providerApiKey');
const provider = ethers.getDefaultProvider(ethers.providers.getNetwork(3), {
etherscan: etherscanApiKey,
});
const oracleWallet = new ethers.Wallet(
await context.secrets.get('oracle.addressPrivateKey'),
provider,
);
const contract = new ethers.Contract(CONTRACT_ADDRESS, contractInterface, oracleWallet);
return contract;
};
```
Our Web3 Action will make a call to a CoinGecko API using Axios in `getPrice`. The result we get from the API will be the price in cents. We’ll send this data back to our smart contract.
However, before moving forward, we have to take care of some plumbing.
**Off-road: Deal with Typescript.** If Typescript throws an error, add the following two lines to your `tsconfig.json` file, under `compilerOptions`. This will stop Typescript from frowning upon us for importing a JSON file as an ES module.
```json title="example.json" showLineNumbers theme={"theme":{"light":"catppuccin-latte","dark":"catppuccin-mocha"}}
"esModuleInterop": true,
"resolveJsonModule": true
```
**Plumbing: Instantiate the Ethers Interface.** The `CoinOracleContract.json` file creates an `Interface` instance that Ethers uses to encode and decode data exchanged when interacting with smart contracts. We’re passing the `abi` part of the entire JSON file.
**Get the Event Data.** Use the `Interface` we just created (`ifc`) to `decodeEventLog`. We know that the first log entry (`logs[0]`) corresponds to the `RequestCoinPrice` event, so this is the one we want to decode. In more complex interactions, you may need to do this dynamically[ **like we did here**](/monitoring/web3-actions/tutorials/on-chain-events).
**Necessary Web3 Plumbing aka Boilerplate.** To interact with our Oracle Contract, we need to do some plumbing. The contract has a restriction - updates can be sent only by the `owner`. This means we need to send transactions from the address that deployed it. The plumbing is done in the `oracleContract` function, and here’s the breakdown of steps.
**Plumbing: Configure a Provider Object.** We can obtain the provider using `ethers.getDefaultProvider` to work with network `3` (Ropsten’s ID). We’re also passing a second argument – a configuration object which contains the API key. Consult [**ethers docs**](https://docs.ethers.io/v5/api/providers/#providers-getDefaultProvider) for more information on how to configure other providers and use alternatives like `JsonRpcProvider`.
**Plumbing: Create a Wallet.** You need to create a `Wallet` to ensure that each transaction originating from our oracle is signed and funded by the same address that deployed the contract. Since the Wallet’s private key is sensitive information, we’re reading it from *Secrets*:
`await context.secrets.get("w3_oracle.oracle_address_private_key")`
**Plumbing: Create a Contract.** This is the step where we piece together everything we’ve created so far:
We use a pre-made smart contract for this project. Feel free to explore the code and adapt it to your own use case.
Note that the `SimpleCoinConsumer` contract accepts the `coinPrice` coming in only from the `CoinOracle` it was assigned when it got deployed. Additionally, `CoinOracle` accepts updates only if it is signed by the same Wallet that deployed it (`owner`).
## The Plan
Here’s a list of steps we’ll need to take to build our oracle:
* Deploy the `CoinOracle` and `SimpleCoinConsumer` smart contracts.
* Get the API key and other information needed to use one of the Ethereum providers. We’ll store this data in the Web3 Actions Secrets (*needed for interaction 5*).
* Get the Private Key of the account that deployed the Oracle Contract (`owner`) and store it in the Web3 Actions Secrets (*needed to sign transactions in interaction 5*).
* Initialize Tenderly’s Web3 Actions directory on your dev environment and add npm dependencies.
* Create a Web3 Action that will send price updates to the oracle.
### 1: Deploy the Smart Contracts
Both `CoinOracle` and `SimpleCoinConsumer` contracts are stored in the same file: `CoinOracle.sol`. Check out the source code [**in our GitHub repo**](https://github.com/Tenderly/examples-web3-actions/blob/main/simple-coin-oracle/CoinOracle.sol).
The `CoinOracle` contact must be deployed first, before the `SimpleCoinConsumer` contract, preferably using a different Wallet. Make sure to pass the `CoinOracle` address as the constructor parameter.
For the purpose of this tutorial, we’ll deploy to the Ropsten test network (ID is 3) but you’re free to use a different one.
### 2: Initialize Web3 Actions
For this tutorial, you’ll need access to the **Tenderly Dashboard**. If you don’t have an account,
[**sign up here for free**](https://dashboard.tenderly.co/register?utm_source=homepage) (no cc
required as well).
**Install the Tenderly CLI (follow** [**this installation guide**](https://github.com/Tenderly/tenderly-cli#installation)**)**. With the Tenderly CLI installed on your machine, create a new directory `tdly-actions` and `cd` into it to initialize your Web3 Actions using the `tenderly actions init` command.
```bash theme={"theme":{"light":"catppuccin-latte","dark":"catppuccin-mocha"}}
$ cd tdly-actions
$ tenderly actions init
```
When prompted, select your Tenderly projects where you want to deploy Web3 Actions. List out the contents of the directory to explore the files created by the CLI:
```bash title="example" showLineNumbers theme={"theme":{"light":"catppuccin-latte","dark":"catppuccin-mocha"}}
ls actions
example.ts
tsconfig.json
package.json
```
The Tenderly CLI will also create an npm project which will allow your Web3 Actions to use any npm package.
**Install NPM dependencies** - we’ll use Axios to make requests to an external API and Ethers to interact with the blockchain. Run the following command from your terminal to add these dependencies to your npm project:
```bash title="example" showLineNumbers theme={"theme":{"light":"catppuccin-latte","dark":"catppuccin-mocha"}}
cd actions && npm install --save-dev axios ethers @types/node && cd ..
```
### 3: Create Your Web3 Action
Before moving forward, copy the `CoinOracleContract.json` file to the `actions` directory. **You can find this JSON file in Remix or** [**this GitHub repo**](https://github.com/Tenderly/examples-web3-actions/blob/main/simple-coin-oracle/actions/CoinOracleContract.json).
All files your Web3 Action code uses and references must be placed in the{' '}
`actions` directory (e.g.{' '}
`CoinOracleContract.json`).
Set the `CONTRACT_ADDRESS` variable to the address of your deployed `Oracle`:
```typescript title="example.ts" showLineNumbers theme={"theme":{"light":"catppuccin-latte","dark":"catppuccin-mocha"}}
const CONTRACT_ADDRESS = '...'; // replace with contract address
export const coinPrice: ActionFn = async (context: Context, event: Event) => {
let transactionEvent = event as TransactionEvent;
const ifc = new ethers.utils.Interface(CoinOracleContract.abi);
const { data, topics } = transactionEvent.logs[0];
const priceRequest = ifc.decodeEventLog('RequestCoinPrice', data, topics);
const price = await getPrice();
const oc = await oracleContract(context, ifc);
await oc.update(priceRequest.reqId, price, {
gasLimit: 250000,
gasPrice: ethers.utils.parseUnits('100', 'gwei'),
});
console.log(`Processed: ${priceRequest.reqId} with price in cents: ${price}`);
};
const getPrice = async (coin: string) => {
const coinInfo = await axios.get(`https://api.coingecko.com/api/v3/coins/${coin}`);
return coinInfo.data.market_data.current_price.usd * 100;
};
const oracleContract = async (context: Context, contractInterface: ethers.utils.Interface) => {
const etherscanApiKey = await context.secrets.get('oracle.providerApiKey');
const provider = ethers.getDefaultProvider(ethers.providers.getNetwork(3), {
etherscan: etherscanApiKey,
});
const oracleWallet = new ethers.Wallet(
await context.secrets.get('oracle.addressPrivateKey'),
provider,
);
const contract = new ethers.Contract(CONTRACT_ADDRESS, contractInterface, oracleWallet);
return contract;
};
```
Our Web3 Action will make a call to a CoinGecko API using Axios in `getPrice`. The result we get from the API will be the price in cents. We’ll send this data back to our smart contract.
However, before moving forward, we have to take care of some plumbing.
**Off-road: Deal with Typescript.** If Typescript throws an error, add the following two lines to your `tsconfig.json` file, under `compilerOptions`. This will stop Typescript from frowning upon us for importing a JSON file as an ES module.
```json title="example.json" showLineNumbers theme={"theme":{"light":"catppuccin-latte","dark":"catppuccin-mocha"}}
"esModuleInterop": true,
"resolveJsonModule": true
```
**Plumbing: Instantiate the Ethers Interface.** The `CoinOracleContract.json` file creates an `Interface` instance that Ethers uses to encode and decode data exchanged when interacting with smart contracts. We’re passing the `abi` part of the entire JSON file.
**Get the Event Data.** Use the `Interface` we just created (`ifc`) to `decodeEventLog`. We know that the first log entry (`logs[0]`) corresponds to the `RequestCoinPrice` event, so this is the one we want to decode. In more complex interactions, you may need to do this dynamically[ **like we did here**](/monitoring/web3-actions/tutorials/on-chain-events).
**Necessary Web3 Plumbing aka Boilerplate.** To interact with our Oracle Contract, we need to do some plumbing. The contract has a restriction - updates can be sent only by the `owner`. This means we need to send transactions from the address that deployed it. The plumbing is done in the `oracleContract` function, and here’s the breakdown of steps.
**Plumbing: Configure a Provider Object.** We can obtain the provider using `ethers.getDefaultProvider` to work with network `3` (Ropsten’s ID). We’re also passing a second argument – a configuration object which contains the API key. Consult [**ethers docs**](https://docs.ethers.io/v5/api/providers/#providers-getDefaultProvider) for more information on how to configure other providers and use alternatives like `JsonRpcProvider`.
**Plumbing: Create a Wallet.** You need to create a `Wallet` to ensure that each transaction originating from our oracle is signed and funded by the same address that deployed the contract. Since the Wallet’s private key is sensitive information, we’re reading it from *Secrets*:
`await context.secrets.get("w3_oracle.oracle_address_private_key")`
**Plumbing: Create a Contract.** This is the step where we piece together everything we’ve created so far:
-
`Contract` instance by passing{' '}
`CONTRACT_ADDRESS`.
-
`contractInterface` for encoding data we want to send
to the network.
-
`oracleWallet` to sign the transaction.
**🎉 Send Data Back to the Oracle Contract.** With the plumbing completed, the last line invokes the function `receiveWeatherUpdate` and sends the prediction our oracle has come up with. This bit issues a transaction to our smart contract.
### 4: Specify When Your Web3 Action Gets Executed
We want execute the transaction every time the `RequestCoinPrice` event is fired by the `OracleContract` on the Ropsten network. We want to do this only after the transaction has been mined.
Replace `YOUR_USERNAME` and `YOUR_PROJECT_SLUG` with your Tenderly username and the slug of your project. You can copy those from the Dashboard URL:
`https://dashboard.tenderly.co/{YOUR_USERNAME}/{YOUR_PROJECT_SLUG}/transactions`
Also, replace `CONTRACT_ADDRESS` with the address of your deployed Oracle Contract:
```yaml title="example.yaml" showLineNumbers theme={"theme":{"light":"catppuccin-latte","dark":"catppuccin-mocha"}}
account_id: ''
actions:
YOUR_USERNAME/YOUR_PROJECT_SLUG:
runtime: v1
sources: actions
specs:
coinOracle:
description: Swapit
function: coinOracle:coinPrice
trigger:
type: transaction
transaction:
status:
- mined
filters:
- network: 3
eventEmitted:
contract:
address: CONTRACT_ADDRESS
name: RequestCoinPrice
project_slug: ''
```
### 5: Create Web3 Action Secrets
For Web3 Actions to perform operations on the deployed `OracleContract`, we need a way to access the contract. You can choose any provider service (Infura, QuickNode, Alchemy, Etherscan, etc). Check [**Ethers’ Default Provider docs**](https://docs.ethers.io/v5/api/providers/#providers-getDefaultProvider) to find out what’s needed to establish the access.
Since we’re using Etherscan as the provider, we only need the API key. The key will be stored in Web3 Actions Secrets.
Keep all your sensitive data tucked away safely in the Web3 Actions Secrets (e.g., API keys,
Wallet private keys, etc). Secrets are highly secure, so even if you try to{' '}
`console.log` the values, they will remain hidden.
**Secrets.** Head over to your Tenderly Dashboard to place the private key you copied in Web3 Actions Secrets. From the sidebar, go to “Actions”, click “Secrets”, and then “Add New”. Name the secret `oracle.providerApiKey` and paste the API token as well as any other sensitive information you need.
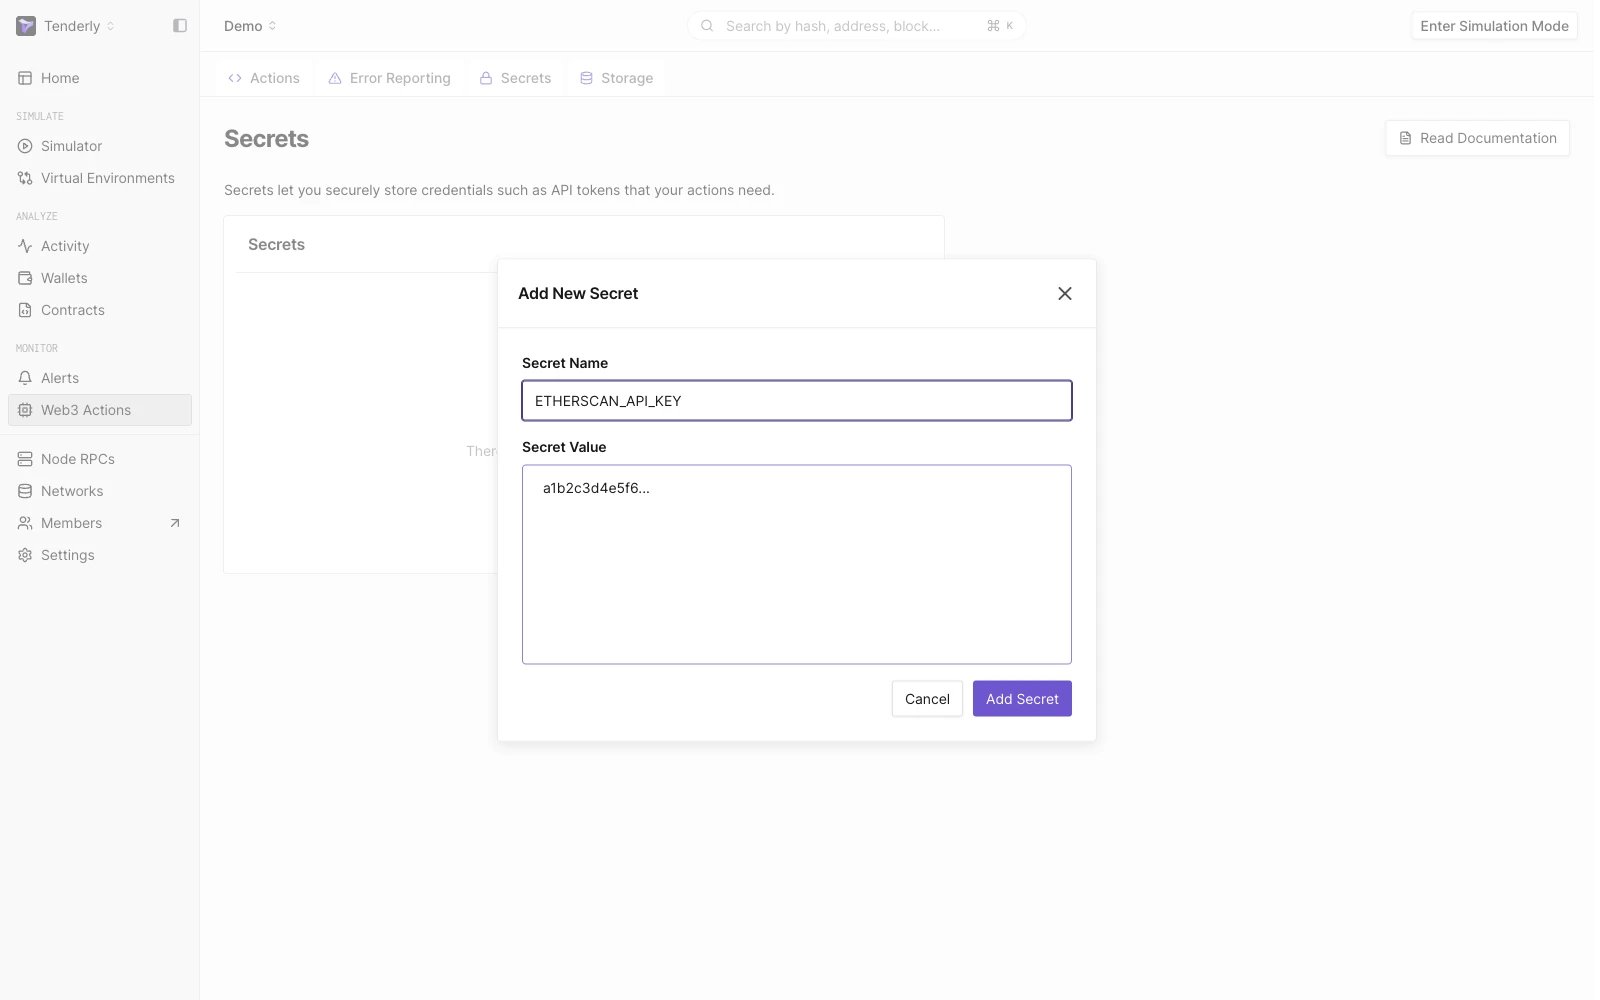 **Store Oracle Wallet Private Key.** To send transactions to the chain, our Web3 Action needs to have a private key to sign transactions and fund them. The `OracleContract` is designed to only accept updates that are signed by the address that deployed them.
If you’re using Metamask, pick the account you used to deploy the smart contract and copy its private key [**following this Metamask guide**](https://metamask.zendesk.com/hc/en-us/articles/360015289632-How-to-Export-an-Account-Private-Key).
In the Tenderly Dashboard, create a new Secret called `w3_oracle.oracle_address_private_key` and paste the private key.
### 6: Deploy Your Web3 Action
Go to the root of your project (folder containing the `tenderly.yaml` file) and run the following command:
```bash title="example" showLineNumbers theme={"theme":{"light":"catppuccin-latte","dark":"catppuccin-mocha"}}
tenderly actions deploy
```
After the CLI shows successful deployment, you can head to Tenderly Dashboard. There you should see that your Web3 Action has been deployed (or is getting ready to be deployed).
### 7: Execute the Project
To check if what we’ve created so far is working, head back to Remix and invoke the `doSomethingSmart` function of the `SimpleCoinConsumer` contract.
After a while, you should see an execution in the Execution tab in your Tenderly Dashboard. You’ll also see a new transaction that was sent from the oracle’s address by your Web3 Action, calling the `update` function of the `OracleContract` contract. 🎉
**Store Oracle Wallet Private Key.** To send transactions to the chain, our Web3 Action needs to have a private key to sign transactions and fund them. The `OracleContract` is designed to only accept updates that are signed by the address that deployed them.
If you’re using Metamask, pick the account you used to deploy the smart contract and copy its private key [**following this Metamask guide**](https://metamask.zendesk.com/hc/en-us/articles/360015289632-How-to-Export-an-Account-Private-Key).
In the Tenderly Dashboard, create a new Secret called `w3_oracle.oracle_address_private_key` and paste the private key.
### 6: Deploy Your Web3 Action
Go to the root of your project (folder containing the `tenderly.yaml` file) and run the following command:
```bash title="example" showLineNumbers theme={"theme":{"light":"catppuccin-latte","dark":"catppuccin-mocha"}}
tenderly actions deploy
```
After the CLI shows successful deployment, you can head to Tenderly Dashboard. There you should see that your Web3 Action has been deployed (or is getting ready to be deployed).
### 7: Execute the Project
To check if what we’ve created so far is working, head back to Remix and invoke the `doSomethingSmart` function of the `SimpleCoinConsumer` contract.
After a while, you should see an execution in the Execution tab in your Tenderly Dashboard. You’ll also see a new transaction that was sent from the oracle’s address by your Web3 Action, calling the `update` function of the `OracleContract` contract. 🎉