> ## Documentation Index
> Fetch the complete documentation index at: https://docs.tenderly.co/llms.txt
> Use this file to discover all available pages before exploring further.

# Rabby Wallet Transaction Preview

> Add transaction preview to Rabby Wallet using the Tenderly Simulation API so users can preview outcomes before sending on-chain.

This tutorial shows how to integrate a "transaction preview" feature into a Rabby Wallet example using the [Tenderly Simulation API](/api-reference).

[Transaction Preview](/simulations/transaction-preview) enables wallet users to simulate transaction execution and preview the exact outcomes without sending transactions on-chain. This way, users can better understand the financial implications of their transactions and send them with confidence. Additionally, you help protect users’ funds, eliminate unnecessary gas costs, and improve the overall user experience and security of your product.

Here’s the GitHub repository of this open-source example:

<Card title="Integrate Tenderly Transaction Simulations Into Rabby Wallet" href="" />

<iframe src="https://youtube.com/embed/6Dqd_1EANfY" style={{ aspectRatio: 16 / 9, width: '100%' }} />

Tenderly Rabby Transaction Preview Demo

<Warning>
  This tutorial is solely for illustrative purposes, showcasing how to integrate Transaction Preview
  into Rabby Wallet. It’s not intended or recommended for any other usage.
</Warning>

## Project overview

In this tutorial, you’ll learn how to integrate the Tenderly Simulation API into the [Rabby Wallet Chrome extension](https://github.com/RabbyHub/Rabby/blob/develop/README.md). First, you’ll learn how to interact with the API and implement the transaction simulation logic. Then, you’ll group the simulation data and expose it to the user. This way, you’ll improve the user experience in this Rabby Wallet example by adding new functionalities.

### Prerequisites

For this tutorial, you need:

* [Node.js](https://nodejs.org) (version 14 or later)
* [Yarn](https://classic.yarnpkg.com/lang/en/docs/install)
* Knowledge of React.js, TypeScript, and [Tailwind CSS](https://tailwindcss.com)

Let’s start building! 👷‍♂️

## Step 1: Clone the Rabby Wallet project

First, fork or clone the official Rabby Wallet GitHub repository. To do this, run:

```bash title="example" showLineNumbers theme={"theme":{"light":"catppuccin-latte","dark":"catppuccin-mocha"}}
git clone https://github.com/RabbyHub/Rabby.git
```

Next, navigate to the project root and install the dependencies using the Yarn package manager:

```bash title="example" showLineNumbers theme={"theme":{"light":"catppuccin-latte","dark":"catppuccin-mocha"}}
yarn install
```

Then, use the following command to run the repo locally:

```bash title="example" showLineNumbers theme={"theme":{"light":"catppuccin-latte","dark":"catppuccin-mocha"}}
yarn build:dev
```

The `dist` folder will be generated. You can use it to load your Chrome extension.

Go to `chrome://extensions` and enable **Developer mode**. Then, click the "**Load unpacked**" button, navigate to your Rabby directory, and select the `dist` folder. The unpacked extension will be visible on the screen, and you can start using Rabby Wallet.

Now, you can import your existing wallet or create a new one.

<Note>
  Before you start, make sure to disable the production version of the Rabby Wallet Chrome Extension if you have it installed.

  Please follow the [official guidelines](https://github.com/RabbyHub/Rabby) from the Rabby team in case you encounter any connection issues.
</Note>

<Frame caption="Enabled unpacked version of the Rabby Wallet">
  <img src="https://mintcdn.com/tenderly/XsEZlaGXYskrtN68/images/image%20(110).webp?fit=max&auto=format&n=XsEZlaGXYskrtN68&q=85&s=520d02bca5404aca64622e997566e6f3" alt="Enabled unpacked version of the Rabby Wallet" width="854" height="462" data-path="images/image (110).webp" />
</Frame>

<Frame caption="Disabled production version of the Rabby Wallet">
  <img src="https://mintcdn.com/tenderly/XsEZlaGXYskrtN68/images/image%20(112).webp?fit=max&auto=format&n=XsEZlaGXYskrtN68&q=85&s=6e4fd241cbd2ebf214eb5e55f3335748" alt="Disabled production version of the Rabby Wallet" width="840" height="454" data-path="images/image (112).webp" />
</Frame>

## Step 2: Generate a Tenderly access token

To use the Tenderly Simulation API, you need to generate an access token. Follow these steps:

1. [Create a free Tenderly account](https://dashboard.tenderly.co/register) or log into your existing one.
2. Go to the [Authorization page](https://dashboard.tenderly.co/account/authorization) and click the **Generate Access Token** button.
3. The token secret is displayed only once. Be sure to copy and store it somewhere safe as you won’t be able to retrieve it later.

<figure>
  !\[Tenderly Docs]\(/images/image (113).webp)

  <figcaption />
</figure>

Follow the guide below if you need any help with the API authentication process:

<Card title="How to Generate API Access Tokens" href="" />

## Step 3: Build the simulation logic

Next, we’ll cover the following steps:

* Set up a secure storage system for the Tenderly credentials.
* Create the necessary code to connect with the Tenderly Simulation API.
* Use both private and public endpoints to interact with the API.
* Construct a proper payload for these endpoints.

### Handling Tenderly Credentials

First, you need to retrieve the Tenderly credentials. Create a file `/_raw/tenderly.json` and update the Tenderly credentials:

```json title="example.json" showLineNumbers theme={"theme":{"light":"catppuccin-latte","dark":"catppuccin-mocha"}}
{
  "tenderlyAccount": "YOUR_ACCOUNT_NAME",
  "tenderlyProject": "YOUR_PROJECT_NAME",
  "tenderlyAccessToken": "YOUR_ACCESS_TOKEN"
}
```

To access the Tenderly credentials in your project, you need to update `build/webpack.common.config.js` with the following:

```javascript title="example.js" showLineNumbers theme={"theme":{"light":"catppuccin-latte","dark":"catppuccin-mocha"}}
const { tenderlyAccount, tenderlyProject, tenderlyAccessToken } = require('../_raw/tenderly.json');

// other code...

const config = {
  plugins: [
    // abbreviated
    new webpack.DefinePlugin({
      'process.env.version': JSON.stringify(`version: ${version}`),
      'process.env.release': JSON.stringify(version),
      // Tenderly Credentials
      'process.env.TENDERLY_ACCOUNT_SLUG': JSON.stringify(tenderlyAccount),
      'process.env.TENDERLY_PROJECT_SLUG': JSON.stringify(tenderlyProject),
      'process.env.TENDERLY_ACCESS_TOKEN': JSON.stringify(tenderlyAccessToken),
    }),
  ],
  resolve: {
    // abbreviated
  },
};
```

You can [find the implementation here](https://github.com/Tenderly/tenderly-rabby-transaction-preview/blob/develop/build/webpack.common.config.js#L221).

### Implementing the transaction simulation logic

Next, create a `src/ui/utils/tenderly.ts` file and implement the logic using the Tenderly Simulation API. [Get the complete source code here](https://github.com/Tenderly/tenderly-rabby-transaction-preview/blob/develop/src/ui/utils/tenderly.ts).

```tsx title="example.tsx" showLineNumbers theme={"theme":{"light":"catppuccin-latte","dark":"catppuccin-mocha"}}

export const simulateTransaction = async (tx: Tx): Promise<Record<string, any> | null> => {
  const TENDERLY_ACCOUNT_SLUG = process.env.TENDERLY_ACCOUNT_SLUG;
  const TENDERLY_PROJECT_SLUG = process.env.TENDERLY_PROJECT_SLUG;
  const TENDERLY_ACCESS_TOKEN = process.env.TENDERLY_ACCESS_TOKEN;

  if (!TENDERLY_ACCOUNT_SLUG || !TENDERLY_PROJECT_SLUG || !TENDERLY_ACCESS_TOKEN) {
    throw new Error('Tenderly credentials are not set up correctly.');
  }

  const txPayload: any = {
    ...tx,
    save: true,
    save_if_fails: true,
    simulation_type: 'full',
    source: 'rabby-wallet',
    network_id: tx.chainId.toString(),
    gas: parseInt(tx.gas as string, 16) || null,
    gas_price: parseInt(tx.gasPrice as string, 16) || null,
    value: parseInt(tx.value, 16) || null,
    input: tx.data,
  };

  try {
    const simulationResponse = await axios.post(
      `https://api.tenderly.co/api/v1/account/${TENDERLY_ACCOUNT_SLUG}/project/${TENDERLY_PROJECT_SLUG}/simulate`,
      txPayload,
      {
        headers: {
          'Content-Type': 'application/json',
          'X-Access-Key': TENDERLY_ACCESS_TOKEN as string,
        },
      },
    );

    // Make the simulation publicly accessible
    if (simulationResponse?.data?.simulation?.id) {
      await axios.post(
        `https://api.tenderly.co/api/v1/account/${TENDERLY_ACCOUNT_SLUG}/project/${TENDERLY_PROJECT_SLUG}/simulations/${simulationResponse.data.simulation.id}/share`,
        {},
        {
          headers: {
            'Content-Type': 'application/json',
            'X-Access-Key': TENDERLY_ACCESS_TOKEN as string,
          },
        },
      );
    }

    return simulationResponse?.data;
  } catch (e) {
    console.error({ e });
    return null;
  }
};
```

Here, we used two endpoints.

The first endpoint allows you to simulate a transaction with different parameters on any of the [104 networks](/platform/supported-networks) supported by Tenderly. Go to our [Simulation API reference](/api-reference) to see all required and optional fields for this endpoint.

```bash title="example" showLineNumbers theme={"theme":{"light":"catppuccin-latte","dark":"catppuccin-mocha"}}
https://api.tenderly.co/api/v1/account/{accountId}/project/{projectId}/simulate
```

The second endpoint enables you to make a simulated transaction publicly accessible. This way, you can share it with your team members or associates for additional insights or quick issue resolution.

```bash title="example" showLineNumbers theme={"theme":{"light":"catppuccin-latte","dark":"catppuccin-mocha"}}
https://api.tenderly.co/api/v1/account/{accountId}/project/{projectId}/simulations/{simulationID}/share
```

The last step is to call the `simulateTransaction` function within the `SignTx.tx` component by placing it inside the `explainTx` function, which is invoked before a transaction is signed. For code details, refer to this [link](https://github.com/Tenderly/tenderly-rabby-transaction-preview/blob/develop/src/ui/views/Approval/components/SignTx.tsx#L911).

## Step 4: Display a simulated transaction preview

To help users understand what will happen when sending transactions, you can show human-readable simulation data in the UI. For instance, once wallet users simulate transactions, you can display which assets have been transferred.

In the Rabby Wallet example, we created three easy-to-understand sections:

1. **`Tenderly Simulation Summary`**: Think of this as a transaction report card. It gives you the basic information about your transaction, with a direct link to a detailed simulation overview in the Tenderly Dashboard.
2. **`Assets In & Assets Out`**: Get a clear list of all assets (either ERC20 or NFT tokens) your wallet is about to interact with.
3. **`Tokens Transferred`**: View every token transfer that happens within a transaction. For added clarity, group all transfers by address and highlight native coin transfers.

<Frame caption="Transaction preview for ERC20 token swap on Uniswap">
  <img src="https://mintcdn.com/tenderly/XsEZlaGXYskrtN68/images/image%20(114).webp?fit=max&auto=format&n=XsEZlaGXYskrtN68&q=85&s=5d41e85766b24da2a541d8c60ea31565" alt="Transaction preview for ERC20 token swap on Uniswap" width="491" height="1255" data-path="images/image (114).webp" />
</Frame>

<Frame caption="Transaction preview for NFT token purchase on Joepegs">
  <img src="https://mintcdn.com/tenderly/XsEZlaGXYskrtN68/images/image%20(115).webp?fit=max&auto=format&n=XsEZlaGXYskrtN68&q=85&s=cfdd30d3b489394ff18d90d9f7304b5c" alt="Transaction preview for NFT token purchase on Joepegs" width="443" height="1265" data-path="images/image (115).webp" />
</Frame>

### Tenderly Simulation Summary

First, let’s create the Tenderly Simulation Summary section. Here, we show the simulation status, a network where the transaction is executed, and the gas value.

<figure>
  !\[Tenderly Docs]\(/images/image (116).webp)

  <figcaption />
</figure>

To build this section, you need to interact with the [Tenderly Simulation API response](/api-reference). Start by creating a `TenderlySimulationSummary.tsx` file. You can find the whole code implementation below or in [the GitHub repo here](https://github.com/Tenderly/tenderly-rabby-transaction-preview/blob/develop/src/ui/views/Approval/components/TxComponents/Tenderly/TenderlySimulationSummary/TenderlySimulationSummary.tsx).

```tsx title="example.tsx" showLineNumbers theme={"theme":{"light":"catppuccin-latte","dark":"catppuccin-mocha"}}


const TenderlySimulationSummary = ({ simulation }: { simulation: Record<string, any> | null }) => {
  const isSuccess = !!simulation?.status;
  const simulationUrl = `https://dashboard.tenderly.co/${process.env.TENDERLY_ACCOUNT_SLUG}/${process.env.TENDERLY_PROJECT_SLUG}/simulator/${simulation?.id}`;
  const sharedSimulationUrl = `https://tdly.co/shared/simulation/${simulation?.id}`;

  return (
    <div className="tenderly-simulation-summary container">
      <p className="text-16 text-gray-title font-medium mb-12">Tenderly Simulation Summary</p>
      {!simulation && <div>Something went wrong.</div>}
      {simulation && (
        <div className="flex flex-col gap-8">
          <div className="flex items-center justify-between gap-2">
            <div>Status</div>
            <div className={isSuccess ? 'text-green' : 'text-red'}>
              {isSuccess ? 'Success' : 'Failed'}
            </div>
          </div>
          <div className="flex items-center justify-between gap-2">
            <div>Network</div>
            <div className="flex items-center gap-4">
              <div className="flex items-center rounded-full">
                <img
                  src={TenderlyNetwork[simulation.network_id]?.image}
                  className="h-16 rounded-full"
                  alt="Tenderly"
                />
              </div>
              <div>{TenderlyNetwork[simulation.network_id]?.name}</div>
            </div>
          </div>
          <div className="flex items-center justify-between gap-2">
            <div>Gas</div>
            <div>{simulation.gas}</div>
          </div>
          <Button
            className="tenderly-simulation-summary-button flex items-center justify-between gap-2 pb-0"
            href={simulationUrl}
            target="_blank"
            rel="noreferrer"
            size="large"
            block
          >
            <div>View details</div>
            <div className="flex items-center gap-2">
              <img src={TenderlySvg} className="h-32" alt="Tenderly" />
              <IconRightArrow />
            </div>
          </Button>
          <Button
            className="text-[#6E56CF] bg-white flex items-center justify-center gap-2 pb-0"
            href={sharedSimulationUrl}
            target="_blank"
            rel="noreferrer"
            type="link"
            size="middle"
            block
          >
            <div>Share simulation ✨</div>
          </Button>
        </div>
      )}
    </div>
  );
};

export default TenderlySimulationSummary;
```

Notice how we generated the links that lead users to the Tenderly Dashboard. The first link is for the authenticated users and the second one is a shareable transaction simulation link:

```tsx title="example.tsx" showLineNumbers theme={"theme":{"light":"catppuccin-latte","dark":"catppuccin-mocha"}}
const simulationUrl = `https://dashboard.tenderly.co/${process.env.TENDERLY_ACCOUNT_SLUG}/${process.env.TENDERLY_PROJECT_SLUG}/simulator/${simulation?.id}`;
const sharedSimulationUrl = `https://tdly.co/shared/simulation/${simulation?.id}`;
```

To retrieve the data from a simulated transaction, refer to the Tenderly Simulation API reference:

<Card title="Tenderly Simulation API" href="" />

### Assets In & Assets Out

The second section provides insights into managing and monitoring the flow of assets within the Rabby Wallet example. It shows both the incoming and outgoing assets to give you a better view of the wallet activity.

<figure>
  !\[Tenderly Docs]\(/images/image (117).webp)

  <figcaption />
</figure>

To achieve this, start by creating a `TenderlyWalletChanges.tsx` file:

```tsx title="example.tsx" showLineNumbers theme={"theme":{"light":"catppuccin-latte","dark":"catppuccin-mocha"}}


const TenderlyWalletChanges = ({
  account,
  assetChanges,
}: {
  account?: Account;
  assetChanges: any;
}) => {
  const { assetsInList, assetsOutList } = React.useMemo(() => {
    const assetsInList = assetChanges.filter(asset => asset.to === account?.address) || [];
    const assetsOutList = assetChanges.filter(asset => asset.from === account?.address) || [];

    return {
      assetsInList,
      assetsOutList,
    };
  }, [account, assetChanges]);

  return (
    <div className="TenderlyWalletChanges">
      <div className="TenderlyWalletChanges__Content">
        {/* Assets Out */}
        {assetsOutList?.length > 0 && (
          <>
            <p className="text-16 text-gray-title font-medium mb-4">Assets Out</p>
            <div className="flex flex-col gap-4 border border-gray-divider rounded-sm">
              {assetsOutList.map((token, index) => (
                <div
                  key={index}
                  className={clsx('flex gap-4 p-4', {
                    'border-t-[1px] border-gray-divider': index !== 0,
                  })}
                >
                  <div className="flex items-center justify-center p-4">
                    <img src={token.token_info.logo} className="w-60 rounded" alt="Tenderly" />
                  </div>
                  <div className="flex flex-col gap-4">
                    <div className="flex flex-col gap-1">
                      <div className="font-semibold">
                        {token.token_info.symbol.toUpperCase()}
                        {token.token_id && <span className="ml-2">#{Number(token.token_id)}</span>}
                      </div>
                      <div className="text-12 text-gray-content">{token.token_info.name}</div>
                    </div>
                    <div className="flex flex-wrap items-center gap-4">
                      <div className="font-semibold">{token.type}:</div>
                      <div className="text-red-forbidden">- {formatAmount(token.amount)}</div>
                      <div className="text-12 text-gray-content">
                        (≈ {formatUsdValue(new BigNumber(token.dollar_value).toFixed())})
                      </div>
                    </div>
                  </div>
                </div>
              ))}
            </div>
          </>
        )}

        {/* Assets In */}
        {assetsInList?.length > 0 && (
          <>
            <p className="text-16 text-gray-title font-medium mt-4 mb-4">Assets In</p>
            <div className="flex flex-col gap-4 border border-gray-divider rounded-sm">
              {assetsInList.map((token, index) => (
                <div
                  key={index}
                  className={clsx('flex gap-4 p-4', {
                    'border-t-[1px] border-gray-divider': index !== 0,
                  })}
                >
                  <div className="flex items-center justify-center p-4">
                    <img src={token.token_info.logo} className="w-60 rounded" alt="Tenderly" />
                  </div>
                  <div className="flex flex-col gap-4">
                    <div className="flex flex-col gap-1">
                      <div className="font-semibold">
                        {token.token_info.symbol.toUpperCase()}
                        {token.token_id && <span className="ml-2">#{Number(token.token_id)}</span>}
                      </div>
                      <div className="text-12 text-gray-content">{token.token_info.name}</div>
                    </div>
                    <div className="flex flex-wrap items-center gap-4">
                      <div className="font-semibold">{token.type}:</div>
                      <div className="text-green">+ {formatAmount(token.amount)}</div>
                      <div className="text-12 text-gray-content">
                        (≈ {formatUsdValue(new BigNumber(token.dollar_value).toFixed())})
                      </div>
                    </div>
                  </div>
                </div>
              ))}
            </div>
          </>
        )}
      </div>
      <TenderlyCredits classname="mt-12" />
    </div>
  );
};

export default TenderlyWalletChanges;
```

Here, we filtered out the asset changes array and created two lists:

1. Assets getting into the wallet
2. Assets going out of the wallet

Then, we used helper functions to preview and format the data.

However, you can also create your own UI layout to show the important asset information.

Learn more about simulation asset changes here:

<Card title="Asset and Balance Changes" href="" />

### Tokens Transferred

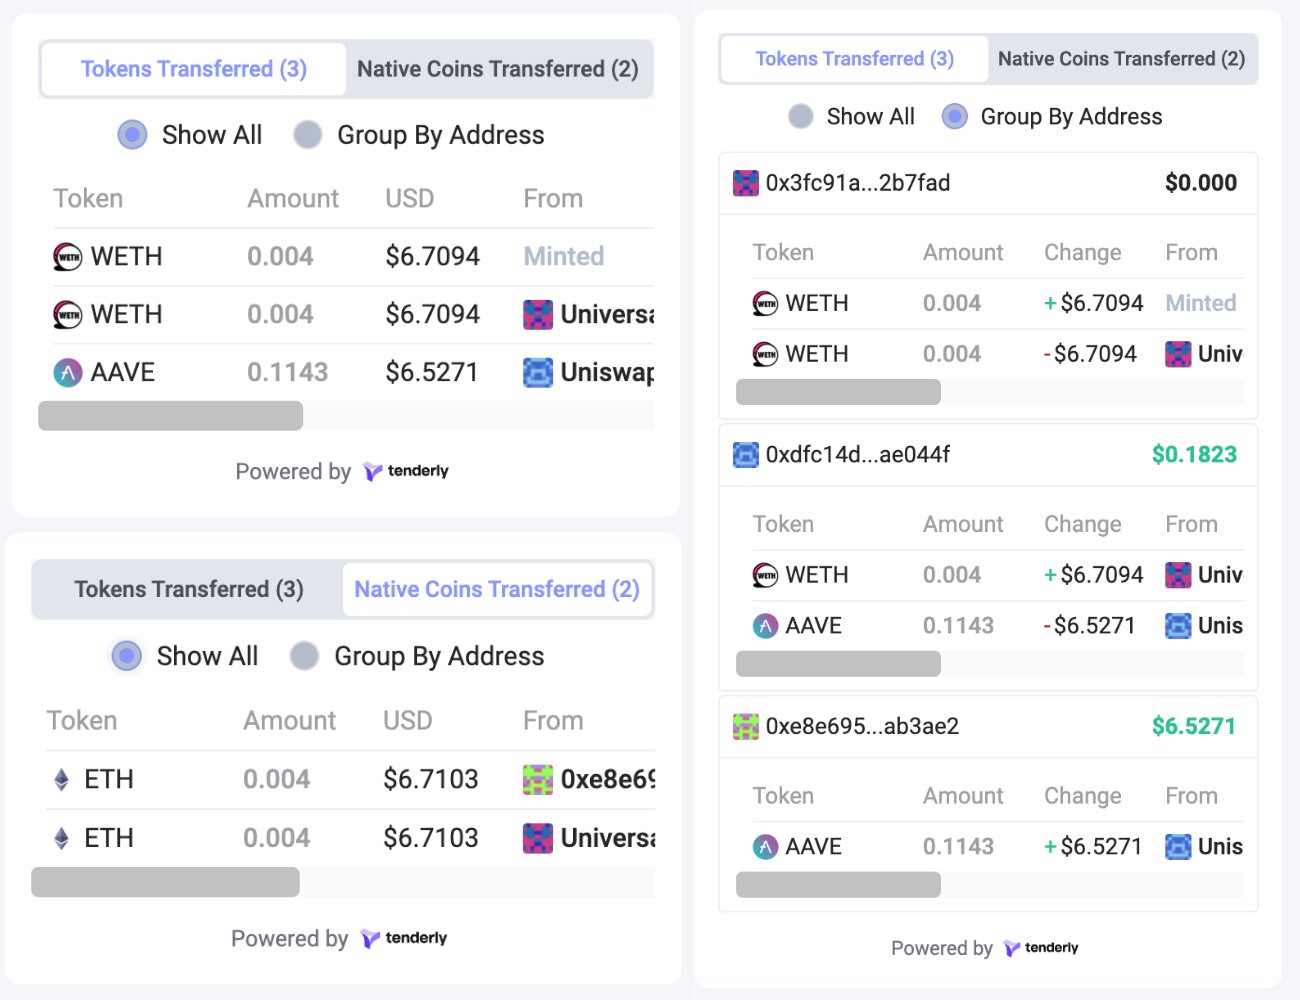
The Token Transfers section is a more complex component. This file primarily manages the layout, so let’s first discuss the sorting logic. You can find the [implementation of this section here](https://github.com/Tenderly/tenderly-rabby-transaction-preview/blob/a6b8059eeae4c856f32b328632a8cd8aa274f757/src/ui/views/Approval/components/TxComponents/Tenderly/AssetChanges/TenderlyAssetChanges.tsx).

Start by creating a `TenderlyAssetChanges.tsx` file. It contains the logic for presenting two tabs: **Tokens Transferred** and **Native Coins Transferred**. To do this, you need to add the logic for sorting, switching between tabs, and grouping the data by address.

<Frame caption="Tokens Transferred UI">
  <img src="https://mintcdn.com/tenderly/XsEZlaGXYskrtN68/images/Rabby%20Wallet.webp?fit=max&auto=format&n=XsEZlaGXYskrtN68&q=85&s=8963a07f3dd1bdd1f3ab1eeca41d86f4" alt="Tokens Transferred UI" width="1300" height="1000" data-path="images/Rabby Wallet.webp" />
</Frame>

First, let’s group the data and create two arrays: tokens transferred and native coins transferred:

```tsx title="example.tsx" showLineNumbers theme={"theme":{"light":"catppuccin-latte","dark":"catppuccin-mocha"}}
const assetChangesMappedByType = React.useMemo<
  Record<AssetChangesTabs, TransactionAssetChangeData[]>
>(
  () =>
    transactionAssetChanges.reduce(
      (
        acc: {
          nativeCoinsTransferred: TransactionAssetChangeData[];
          tokensTransferred: TransactionAssetChangeData[];
        },
        assetChange: TransactionAssetChangeData,
      ) => {
        const { type } = assetChange.tokenInfo;
        if (type === TokenType.NATIVE) {
          return {
            ...acc,
            [AssetChangesTabs.nativeCoins]: [...(acc?.nativeCoinsTransferred ?? []), assetChange],
          };
        }
        return {
          ...acc,
          [AssetChangesTabs.tokens]: [...(acc?.tokensTransferred ?? []), assetChange],
        };
      },
      { [AssetChangesTabs.nativeCoins]: [], [AssetChangesTabs.tokens]: [] },
    ),
  [assetChanges],
);
```

Next, let’s write the logic for handling sorting types in two ways: chronologically and per address. Here, we need two components: **ChronologicalContent.tsx** and **PerAddressContent.tsx**.

You can find the implementation in the GitHub repository:

* [ChronologicalContent.tsx](https://github.com/Tenderly/tenderly-rabby-transaction-preview/blob/develop/src/ui/views/Approval/components/TxComponents/Tenderly/AssetChanges/ChronologicalContent.tsx)
* [PerAddressContent.tsx](https://github.com/Tenderly/tenderly-rabby-transaction-preview/blob/develop/src/ui/views/Approval/components/TxComponents/Tenderly/AssetChanges/PerAddressContent.tsx)

### Grouping and previewing all components

Finally, let’s put all of the components together. To do this, you need to create a `TenderlySimulationResult.tsx` file. You also need to use the `useWallet()` hook provided by the Rabby team to interact with the connected wallet address.

Here’s the code overview:

```tsx title="example.tsx" showLineNumbers theme={"theme":{"light":"catppuccin-latte","dark":"catppuccin-mocha"}}

const TenderlySimulationResult = ({ data }: { data: Record<string, any> | null }) => {
  const [account, setAccount] = React.useState<Account>();
  const wallet = useWallet();

  const init = async () => {
    const currentAccount = await wallet.syncGetCurrentAccount();

    if (currentAccount) {
      setAccount(currentAccount);
    }
  };

  React.useEffect(() => {
    init();
  }, []);

  return (
    <div className="tenderly-simulation-result mt-16">
      <ActionWrapper>
        {!data && <div className="bg-[#f5f6fa] sticky top-[64px] z-10">Something went wrong.</div>}
        {data && <TenderlySimulationSummary simulation={data.simulation} />}
      </ActionWrapper>
      {data?.transaction?.transaction_info.asset_changes && (
        <>
          <ActionWrapper>
            <TenderlyWalletChanges
              account={account}
              assetChanges={data.transaction.transaction_info.asset_changes}
            />
          </ActionWrapper>
          <ActionWrapper>
            <TenderlyAssetChanges
              assetChanges={data.transaction.transaction_info.asset_changes}
              contracts={data.contracts}
            />
          </ActionWrapper>
        </>
      )}
    </div>
  );
};

export default TenderlySimulationResult;
```

## What's next?

Congrats! You added the Transaction Preview feature to a Rabby Wallet example using the Tenderly Simulation API. 🎉

To dive into the logic, check out the [complete source code on GitHub](https://github.com/Tenderly/tenderly-rabby-transaction-preview).

Additionally, you can initiate Tenderly transaction simulations using three different methods depending on your project requirements. To learn about other ways to integrate transaction simulations into your wallet or dapp, take a look at the following resources:

<Card title="Simulation API" href="" />

<Card title="Simulating Transactions" href="" />

<Card title="Simulation RPC" href="" />
