> ## Documentation Index
> Fetch the complete documentation index at: https://docs.tenderly.co/llms.txt
> Use this file to discover all available pages before exploring further.
# 通过 Dashboard 验证合约
> 了解如何通过 Tenderly Dashboard 在浏览器中公开或私密地验证智能合约。
**适用于:** 公共网络(主网和测试网)。若要在 Virtual Environment 上验证合约,请参阅[部署并验证合约](/virtual-environments/develop/deploy-contracts)。
在 Tenderly Dashboard 中直接从浏览器验证智能合约。如果您不使用 Hardhat 或 Foundry,这是最快的方式;如果您使用它们,[Hardhat](/contract-verification/hardhat) 或 [Foundry](/contract-verification/foundry) 工作流会自动完成此过程。
## 前提条件
要验证合约,您需要提供:
* **源代码**
* 用于编译已部署版本的**准确编译器设置**
您可以通过 Dashboard 以多种方式上传源代码:
* 上传由编译器生成的、包含[合约元数据](https://docs.soliditylang.org/en/latest/metadata.html)的 JSON 文件
* 直接粘贴源代码
* 从您的文件系统上传源文件
* 上传包含所有智能合约的整个目录。这使得验证含有从其他文件导入的合约变得容易。
## 公开和私密验证
在验证智能合约时,您需要在两种模式之间选择:**私密**和**公开**。
* **公开(在 Tenderly 内)**:已验证的合约及其源代码对所有 Tenderly 用户可见。您愿意与项目外的用户共享您的合约。您希望合约的调用者能够使用监控工具。
* **私密(在 Tenderly 内)**:已验证的合约仅对团队/协作者可见。适合合约开发期间使用。
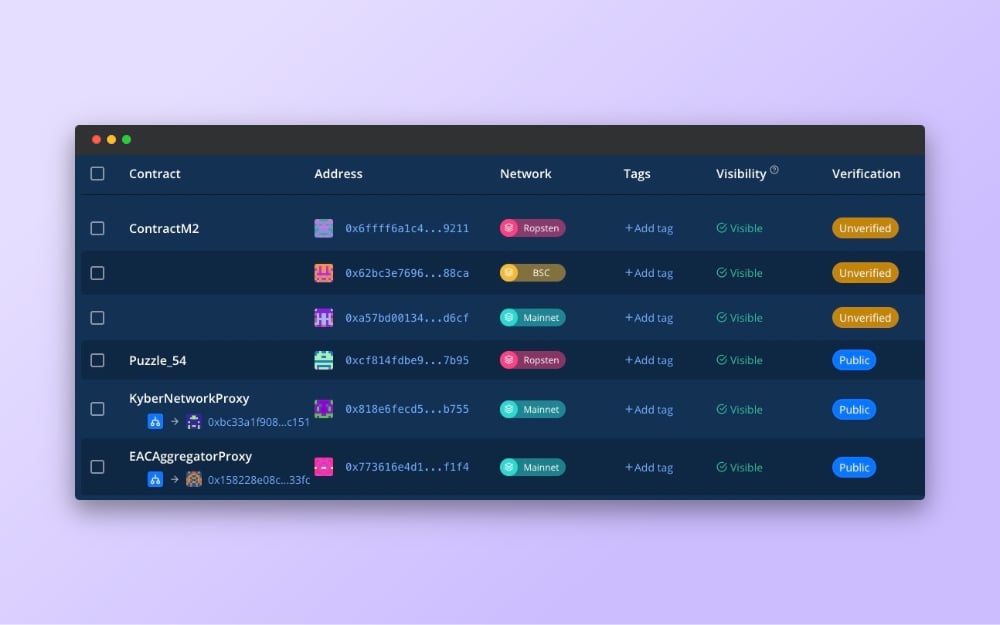
Contracts 选项卡中的 **Verification** 列显示您的合约是否已验证,以及是私密的还是公开的。
 ## Dashboard 合约验证指南
在您[将未验证的合约添加](/developer-explorer/contracts)到 Tenderly 项目后,以下是使用 Dashboard 验证它的步骤。
### 找到未验证的合约
在 Dashboard 中,在 Contracts 列表中找到您未验证的合约,然后点击验证状态旁边的 **Verify** 按钮。
## Dashboard 合约验证指南
在您[将未验证的合约添加](/developer-explorer/contracts)到 Tenderly 项目后,以下是使用 Dashboard 验证它的步骤。
### 找到未验证的合约
在 Dashboard 中,在 Contracts 列表中找到您未验证的合约,然后点击验证状态旁边的 **Verify** 按钮。
 ### 选择上传方式
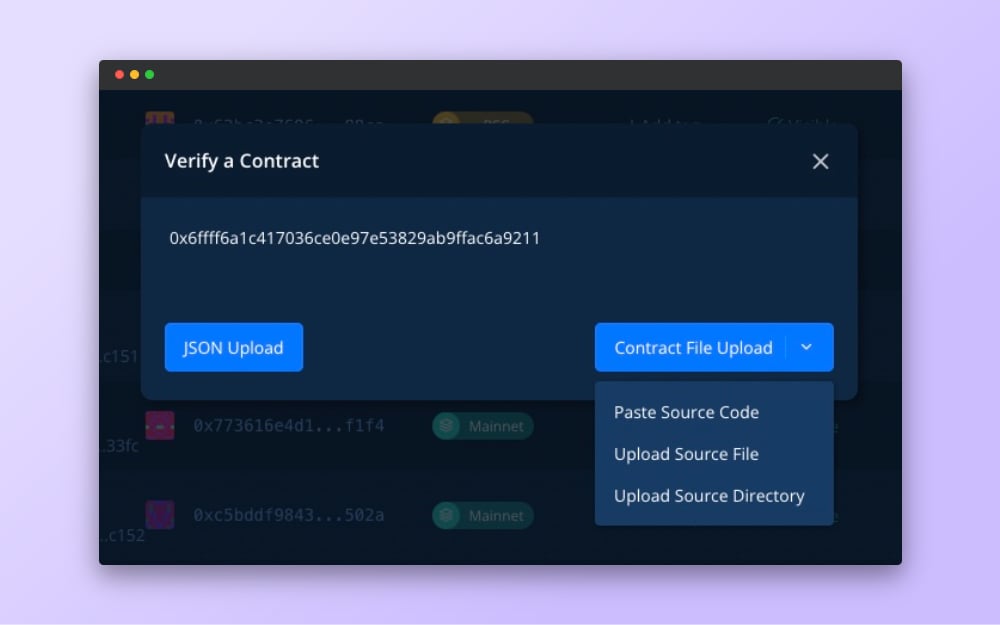
选择以下一种方式:
* **JSON Upload**:粘贴 Solidity 编译器生成的 JSON 元数据。
* **ABI Upload**:粘贴合约 ABI。
* **Contract Source Upload**:直接粘贴源代码、上传单个源文件或上传整个项目目录。对于导入项目中其他合约的合约,目录方式效果最佳。
### 选择上传方式
选择以下一种方式:
* **JSON Upload**:粘贴 Solidity 编译器生成的 JSON 元数据。
* **ABI Upload**:粘贴合约 ABI。
* **Contract Source Upload**:直接粘贴源代码、上传单个源文件或上传整个项目目录。对于导入项目中其他合约的合约,目录方式效果最佳。
 ### 选择合约和可见性
如果上传包含多个合约,请选择与上一步显示的地址相匹配的合约。切换 **Make Private** 以进行[私密验证](#public-and-private-verification)。
### 选择合约和可见性
如果上传包含多个合约,请选择与上一步显示的地址相匹配的合约。切换 **Make Private** 以进行[私密验证](#public-and-private-verification)。
 如果缺少任何导入项,Dashboard 会提示您在继续之前添加它们。
### 设置编译器设置
填写编译器版本、优化器设置(启用/运行次数)、EVM 版本,以及如果您的合约使用链接库,则填写库地址对。与已部署字节码的任何不匹配都将导致验证失败。
如果缺少任何导入项,Dashboard 会提示您在继续之前添加它们。
### 设置编译器设置
填写编译器版本、优化器设置(启用/运行次数)、EVM 版本,以及如果您的合约使用链接库,则填写库地址对。与已部署字节码的任何不匹配都将导致验证失败。
 ### 完成
点击 **Finish** 提交。合约的验证状态会在 Contracts 列表中更新。
## 如何批量验证智能合约
如果您向项目中添加了多个未验证的合约,可以批量验证它们。请按以下步骤操作:
### 找到所有未验证的合约
在 Contract 部分点击 **Verify All Contracts**。
这将打开一个模态框,列出项目中所有未验证的合约。
### 完成
点击 **Finish** 提交。合约的验证状态会在 Contracts 列表中更新。
## 如何批量验证智能合约
如果您向项目中添加了多个未验证的合约,可以批量验证它们。请按以下步骤操作:
### 找到所有未验证的合约
在 Contract 部分点击 **Verify All Contracts**。
这将打开一个模态框,列出项目中所有未验证的合约。
 ### 为每个合约添加源代码
在每个合约旁点击 **Add Source**,并按照上文[单合约流程](#dashboard-contract-verification-guide)提供上传内容、编译器设置和可见性开关。
### 为每个合约添加源代码
在每个合约旁点击 **Add Source**,并按照上文[单合约流程](#dashboard-contract-verification-guide)提供上传内容、编译器设置和可见性开关。
 ### 完成
点击 **Finish** 提交。所有合约验证完成后,选择是否在项目的交易列表中显示它们。
### 完成
点击 **Finish** 提交。所有合约验证完成后,选择是否在项目的交易列表中显示它们。