> ## Documentation Index
> Fetch the complete documentation index at: https://docs.tenderly.co/llms.txt
> Use this file to discover all available pages before exploring further.
# 如何构建自定义 Oracle
> 学习如何使用 Web3 Actions 构建自定义 oracle,用于从 现实世界系统收集数据。
在本教程中,我们将向您展示如何 **使用 Tenderly Web3 Actions 构建自定义 Web3 oracle**。Oracle 从现实世界系统中收集数据并将其发送到区块链。它充当从 Web2 应用程序向智能合约流式传输数据的入口点。
使用 oracle,我们可以从我们的智能合约内部访问来自区块链外部的数据源(例如交易所、交通和天气数据、gas 费率、油价等)。
完整代码可在 [**此 GitHub
仓库**](https://github.com/Tenderly/examples-web3-actions/) 中获取。
## 项目概览
本项目的目的是教您如何构建一个 Web3 Action,当智能合约通过链上事件发起数据请求时,从 Web2 API 获取数据。然后将该数据发送回请求它的合约。
以下是本项目流程的简要说明。
* 创建一个 Consumer —— 一个向 Oracle Contract 请求 ETH 价格的智能合约。
* Oracle Contract 通过 `RequestCoinPrice` 事件向 CoinGecko API 请求新的币价。
* 一旦观察到价格请求,就会调用 Web3 Action 来获取该值。
* 将价格值推送回 Oracle Contract。
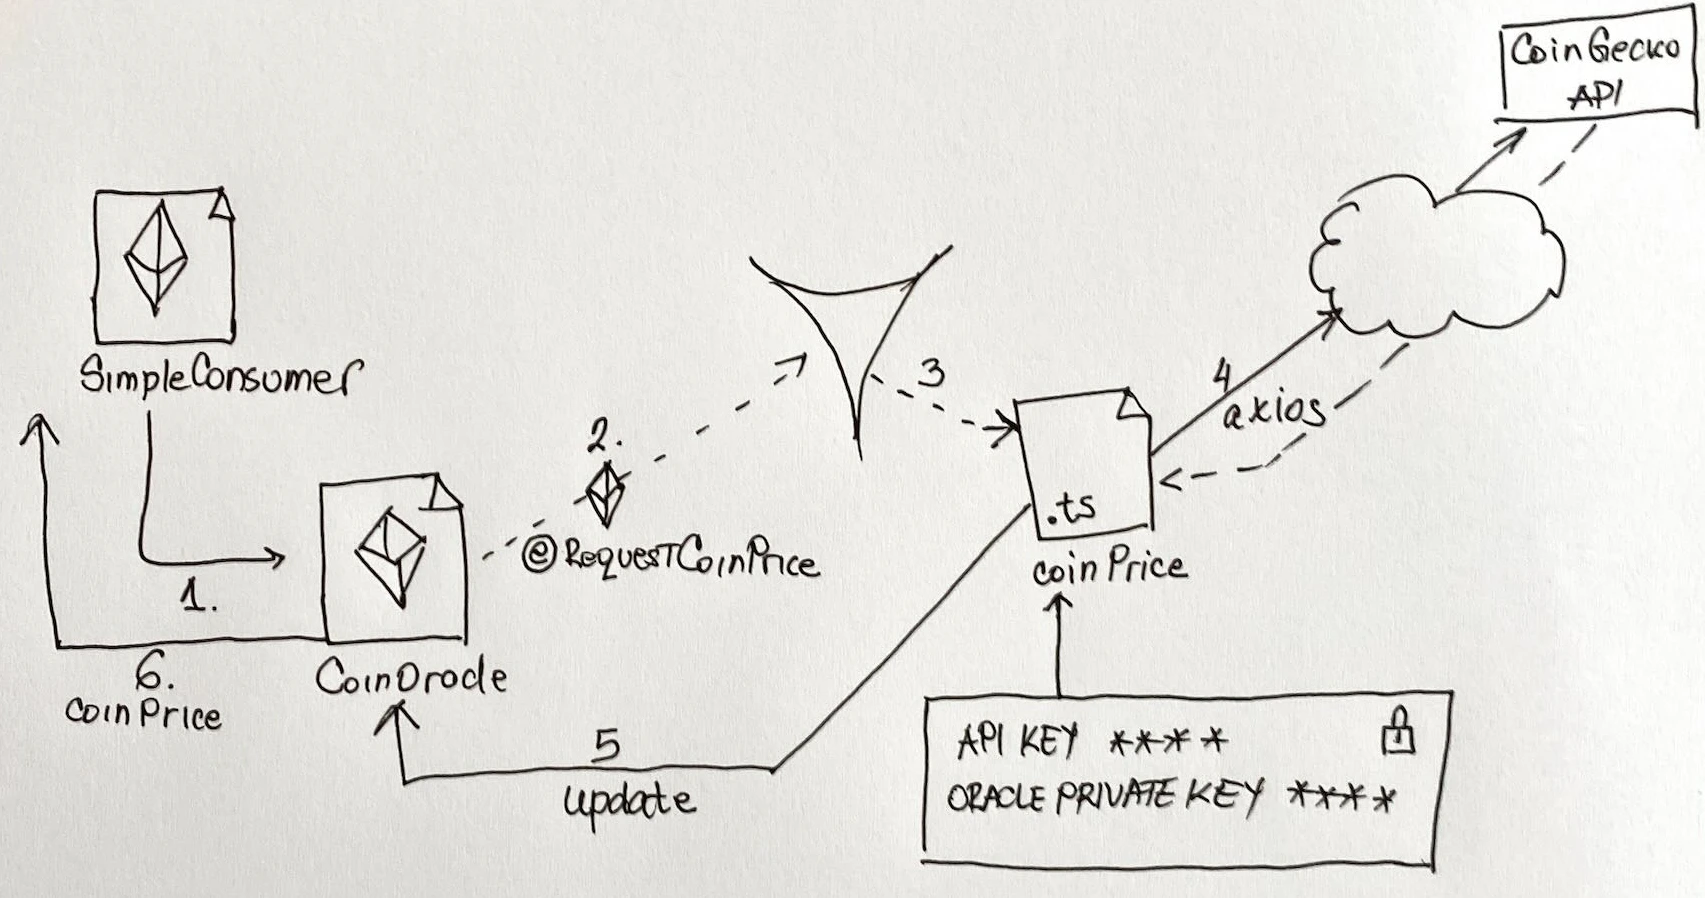 我们在本项目中使用一个预制的智能合约。请随意浏览代码并根据您自己的用例进行调整。
请注意,`SimpleConsumer` 合约只接受来自其部署时分配的 `CoinOracle` 的 `coinPrice`。此外,`CoinOracle` 仅在由部署它的同一钱包(`owner`)签名时才接受更新。
## 计划
以下是构建 oracle 需要采取的步骤列表:
* 部署 `CoinOracle` 和 `SimpleCoinConsumer` 智能合约。
* 获取使用某个 Ethereum 提供商所需的 API 密钥和其他信息。我们会将这些数据存储在 Web3 Actions Secrets 中(*交互 5 需要*)。
* 获取部署了 Oracle Contract 的账户(`owner`)的私钥,并将其存储在 Web3 Actions Secrets 中(*交互 5 中签署事务需要*)。
* 在您的开发环境中初始化 Tenderly 的 Web3 Actions 目录并添加 npm 依赖。
* 创建一个将向 oracle 发送价格更新的 Web3 Action。
### 1:部署智能合约
`CoinOracle` 和 `SimpleCoinConsumer` 合约都存储在同一个文件中:`CoinOracle.sol`。请查看 [**我们 GitHub 仓库中**](https://github.com/Tenderly/examples-web3-actions/blob/main/simple-coin-oracle/CoinOracle.sol) 的源代码。
必须先部署 `CoinOracle` 合约,再部署 `SimpleCoinConsumer` 合约,最好使用不同的钱包。请确保将 `CoinOracle` 地址作为构造函数参数传入。
出于本教程的目的,我们将部署到 Ropsten 测试网(ID 为 3),但您也可以使用其他网络。
### 2:初始化 Web3 Actions
本教程需要访问 **Tenderly Dashboard**。如果您还没有账户,请
[**在此免费注册**](https://dashboard.tenderly.co/register?utm_source=homepage)(也无需信用卡)。
**安装 Tenderly CLI(按照** [**此安装指南**](https://github.com/Tenderly/tenderly-cli#installation)**)**。安装 Tenderly CLI 后,创建一个新目录 `tdly-actions` 并 `cd` 进入该目录,使用 `tenderly actions init` 命令初始化您的 Web3 Actions。
```bash theme={"theme":{"light":"catppuccin-latte","dark":"catppuccin-mocha"}}
$ cd tdly-actions
$ tenderly actions init
```
出现提示时,选择您要部署 Web3 Actions 的 Tenderly 项目。列出目录内容以查看 CLI 创建的文件:
```bash title="example" showLineNumbers theme={"theme":{"light":"catppuccin-latte","dark":"catppuccin-mocha"}}
ls actions
example.ts
tsconfig.json
package.json
```
Tenderly CLI 还会创建一个 npm 项目,允许您的 Web3 Actions 使用任何 npm 包。
**安装 NPM 依赖** —— 我们将使用 Axios 向外部 API 发送请求,并使用 Ethers 与区块链交互。从终端运行以下命令,将这些依赖添加到 npm 项目:
```bash title="example" showLineNumbers theme={"theme":{"light":"catppuccin-latte","dark":"catppuccin-mocha"}}
cd actions && npm install --save-dev axios ethers @types/node && cd ..
```
### 3:创建您的 Web3 Action
在继续之前,将 `CoinOracleContract.json` 文件复制到 `actions` 目录。 **您可以在 Remix 或** [**此 GitHub 仓库**](https://github.com/Tenderly/examples-web3-actions/blob/main/simple-coin-oracle/actions/CoinOracleContract.json) **中找到此 JSON 文件**。
您的 Web3 Action 代码使用和引用的所有文件都必须放在{' '}
`actions` 目录中(例如{' '}
`CoinOracleContract.json`)。
将 `CONTRACT_ADDRESS` 变量设置为您部署的 `Oracle` 的地址:
```typescript title="example.ts" showLineNumbers theme={"theme":{"light":"catppuccin-latte","dark":"catppuccin-mocha"}}
const CONTRACT_ADDRESS = '...'; // replace with contract address
export const coinPrice: ActionFn = async (context: Context, event: Event) => {
let transactionEvent = event as TransactionEvent;
const ifc = new ethers.utils.Interface(CoinOracleContract.abi);
const { data, topics } = transactionEvent.logs[0];
const priceRequest = ifc.decodeEventLog('RequestCoinPrice', data, topics);
const price = await getPrice();
const oc = await oracleContract(context, ifc);
await oc.update(priceRequest.reqId, price, {
gasLimit: 250000,
gasPrice: ethers.utils.parseUnits('100', 'gwei'),
});
console.log(`Processed: ${priceRequest.reqId} with price in cents: ${price}`);
};
const getPrice = async (coin: string) => {
const coinInfo = await axios.get(`https://api.coingecko.com/api/v3/coins/${coin}`);
return coinInfo.data.market_data.current_price.usd * 100;
};
const oracleContract = async (context: Context, contractInterface: ethers.utils.Interface) => {
const etherscanApiKey = await context.secrets.get('oracle.providerApiKey');
const provider = ethers.getDefaultProvider(ethers.providers.getNetwork(3), {
etherscan: etherscanApiKey,
});
const oracleWallet = new ethers.Wallet(
await context.secrets.get('oracle.addressPrivateKey'),
provider,
);
const contract = new ethers.Contract(CONTRACT_ADDRESS, contractInterface, oracleWallet);
return contract;
};
```
我们的 Web3 Action 将在 `getPrice` 中使用 Axios 调用 CoinGecko API。从 API 获取的结果将是以美分为单位的价格。我们将把这个数据发送回我们的智能合约。
不过在继续之前,我们需要处理一些管道工作。
**旁路:处理 Typescript。** 如果 Typescript 抛出错误,请在您的 `tsconfig.json` 文件的 `compilerOptions` 下添加以下两行。这将阻止 Typescript 因将 JSON 文件作为 ES 模块导入而不满。
```json title="example.json" showLineNumbers theme={"theme":{"light":"catppuccin-latte","dark":"catppuccin-mocha"}}
"esModuleInterop": true,
"resolveJsonModule": true
```
**管道:实例化 Ethers Interface。** `CoinOracleContract.json` 文件创建了一个 `Interface` 实例,Ethers 用它来编码和解码与智能合约交互时交换的数据。我们传入的是整个 JSON 文件的 `abi` 部分。
**获取事件数据。** 使用我们刚刚创建的 `Interface`(`ifc`)来 `decodeEventLog`。我们知道第一个日志条目(`logs[0]`)对应于 `RequestCoinPrice` 事件,所以这就是我们想要解码的事件。在更复杂的交互中,您可能需要动态执行此操作,[**就像我们在这里所做的一样**](/monitoring/web3-actions/tutorials/on-chain-events)。
**必要的 Web3 管道即样板代码。** 要与我们的 Oracle Contract 交互,我们需要做一些管道工作。合约有一个限制 —— 只有 `owner` 才能发送更新。这意味着我们需要从部署它的地址发送事务。管道工作在 `oracleContract` 函数中完成,以下是步骤分解。
**管道:配置 Provider 对象。** 我们可以使用 `ethers.getDefaultProvider` 获取用于处理网络 `3`(Ropsten 的 ID)的 provider。我们还传入了第二个参数 —— 包含 API 密钥的配置对象。有关如何配置其他 provider 以及使用 `JsonRpcProvider` 等替代方案的更多信息,请查阅 [**ethers 文档**](https://docs.ethers.io/v5/api/providers/#providers-getDefaultProvider)。
**管道:创建 Wallet。** 您需要创建一个 `Wallet`,以确保源自我们 oracle 的每个事务都由部署合约的同一地址签名和资助。由于 Wallet 的私钥是敏感信息,我们从 *Secrets* 中读取它:
`await context.secrets.get("w3_oracle.oracle_address_private_key")`
**管道:创建 Contract。** 这是我们将迄今为止创建的所有东西拼接在一起的步骤:
我们在本项目中使用一个预制的智能合约。请随意浏览代码并根据您自己的用例进行调整。
请注意,`SimpleConsumer` 合约只接受来自其部署时分配的 `CoinOracle` 的 `coinPrice`。此外,`CoinOracle` 仅在由部署它的同一钱包(`owner`)签名时才接受更新。
## 计划
以下是构建 oracle 需要采取的步骤列表:
* 部署 `CoinOracle` 和 `SimpleCoinConsumer` 智能合约。
* 获取使用某个 Ethereum 提供商所需的 API 密钥和其他信息。我们会将这些数据存储在 Web3 Actions Secrets 中(*交互 5 需要*)。
* 获取部署了 Oracle Contract 的账户(`owner`)的私钥,并将其存储在 Web3 Actions Secrets 中(*交互 5 中签署事务需要*)。
* 在您的开发环境中初始化 Tenderly 的 Web3 Actions 目录并添加 npm 依赖。
* 创建一个将向 oracle 发送价格更新的 Web3 Action。
### 1:部署智能合约
`CoinOracle` 和 `SimpleCoinConsumer` 合约都存储在同一个文件中:`CoinOracle.sol`。请查看 [**我们 GitHub 仓库中**](https://github.com/Tenderly/examples-web3-actions/blob/main/simple-coin-oracle/CoinOracle.sol) 的源代码。
必须先部署 `CoinOracle` 合约,再部署 `SimpleCoinConsumer` 合约,最好使用不同的钱包。请确保将 `CoinOracle` 地址作为构造函数参数传入。
出于本教程的目的,我们将部署到 Ropsten 测试网(ID 为 3),但您也可以使用其他网络。
### 2:初始化 Web3 Actions
本教程需要访问 **Tenderly Dashboard**。如果您还没有账户,请
[**在此免费注册**](https://dashboard.tenderly.co/register?utm_source=homepage)(也无需信用卡)。
**安装 Tenderly CLI(按照** [**此安装指南**](https://github.com/Tenderly/tenderly-cli#installation)**)**。安装 Tenderly CLI 后,创建一个新目录 `tdly-actions` 并 `cd` 进入该目录,使用 `tenderly actions init` 命令初始化您的 Web3 Actions。
```bash theme={"theme":{"light":"catppuccin-latte","dark":"catppuccin-mocha"}}
$ cd tdly-actions
$ tenderly actions init
```
出现提示时,选择您要部署 Web3 Actions 的 Tenderly 项目。列出目录内容以查看 CLI 创建的文件:
```bash title="example" showLineNumbers theme={"theme":{"light":"catppuccin-latte","dark":"catppuccin-mocha"}}
ls actions
example.ts
tsconfig.json
package.json
```
Tenderly CLI 还会创建一个 npm 项目,允许您的 Web3 Actions 使用任何 npm 包。
**安装 NPM 依赖** —— 我们将使用 Axios 向外部 API 发送请求,并使用 Ethers 与区块链交互。从终端运行以下命令,将这些依赖添加到 npm 项目:
```bash title="example" showLineNumbers theme={"theme":{"light":"catppuccin-latte","dark":"catppuccin-mocha"}}
cd actions && npm install --save-dev axios ethers @types/node && cd ..
```
### 3:创建您的 Web3 Action
在继续之前,将 `CoinOracleContract.json` 文件复制到 `actions` 目录。 **您可以在 Remix 或** [**此 GitHub 仓库**](https://github.com/Tenderly/examples-web3-actions/blob/main/simple-coin-oracle/actions/CoinOracleContract.json) **中找到此 JSON 文件**。
您的 Web3 Action 代码使用和引用的所有文件都必须放在{' '}
`actions` 目录中(例如{' '}
`CoinOracleContract.json`)。
将 `CONTRACT_ADDRESS` 变量设置为您部署的 `Oracle` 的地址:
```typescript title="example.ts" showLineNumbers theme={"theme":{"light":"catppuccin-latte","dark":"catppuccin-mocha"}}
const CONTRACT_ADDRESS = '...'; // replace with contract address
export const coinPrice: ActionFn = async (context: Context, event: Event) => {
let transactionEvent = event as TransactionEvent;
const ifc = new ethers.utils.Interface(CoinOracleContract.abi);
const { data, topics } = transactionEvent.logs[0];
const priceRequest = ifc.decodeEventLog('RequestCoinPrice', data, topics);
const price = await getPrice();
const oc = await oracleContract(context, ifc);
await oc.update(priceRequest.reqId, price, {
gasLimit: 250000,
gasPrice: ethers.utils.parseUnits('100', 'gwei'),
});
console.log(`Processed: ${priceRequest.reqId} with price in cents: ${price}`);
};
const getPrice = async (coin: string) => {
const coinInfo = await axios.get(`https://api.coingecko.com/api/v3/coins/${coin}`);
return coinInfo.data.market_data.current_price.usd * 100;
};
const oracleContract = async (context: Context, contractInterface: ethers.utils.Interface) => {
const etherscanApiKey = await context.secrets.get('oracle.providerApiKey');
const provider = ethers.getDefaultProvider(ethers.providers.getNetwork(3), {
etherscan: etherscanApiKey,
});
const oracleWallet = new ethers.Wallet(
await context.secrets.get('oracle.addressPrivateKey'),
provider,
);
const contract = new ethers.Contract(CONTRACT_ADDRESS, contractInterface, oracleWallet);
return contract;
};
```
我们的 Web3 Action 将在 `getPrice` 中使用 Axios 调用 CoinGecko API。从 API 获取的结果将是以美分为单位的价格。我们将把这个数据发送回我们的智能合约。
不过在继续之前,我们需要处理一些管道工作。
**旁路:处理 Typescript。** 如果 Typescript 抛出错误,请在您的 `tsconfig.json` 文件的 `compilerOptions` 下添加以下两行。这将阻止 Typescript 因将 JSON 文件作为 ES 模块导入而不满。
```json title="example.json" showLineNumbers theme={"theme":{"light":"catppuccin-latte","dark":"catppuccin-mocha"}}
"esModuleInterop": true,
"resolveJsonModule": true
```
**管道:实例化 Ethers Interface。** `CoinOracleContract.json` 文件创建了一个 `Interface` 实例,Ethers 用它来编码和解码与智能合约交互时交换的数据。我们传入的是整个 JSON 文件的 `abi` 部分。
**获取事件数据。** 使用我们刚刚创建的 `Interface`(`ifc`)来 `decodeEventLog`。我们知道第一个日志条目(`logs[0]`)对应于 `RequestCoinPrice` 事件,所以这就是我们想要解码的事件。在更复杂的交互中,您可能需要动态执行此操作,[**就像我们在这里所做的一样**](/monitoring/web3-actions/tutorials/on-chain-events)。
**必要的 Web3 管道即样板代码。** 要与我们的 Oracle Contract 交互,我们需要做一些管道工作。合约有一个限制 —— 只有 `owner` 才能发送更新。这意味着我们需要从部署它的地址发送事务。管道工作在 `oracleContract` 函数中完成,以下是步骤分解。
**管道:配置 Provider 对象。** 我们可以使用 `ethers.getDefaultProvider` 获取用于处理网络 `3`(Ropsten 的 ID)的 provider。我们还传入了第二个参数 —— 包含 API 密钥的配置对象。有关如何配置其他 provider 以及使用 `JsonRpcProvider` 等替代方案的更多信息,请查阅 [**ethers 文档**](https://docs.ethers.io/v5/api/providers/#providers-getDefaultProvider)。
**管道:创建 Wallet。** 您需要创建一个 `Wallet`,以确保源自我们 oracle 的每个事务都由部署合约的同一地址签名和资助。由于 Wallet 的私钥是敏感信息,我们从 *Secrets* 中读取它:
`await context.secrets.get("w3_oracle.oracle_address_private_key")`
**管道:创建 Contract。** 这是我们将迄今为止创建的所有东西拼接在一起的步骤:
-
通过传入 `CONTRACT_ADDRESS` 创建 `Contract` 实例。
-
`contractInterface` 用于编码我们要发送到网络的数据。
-
`oracleWallet` 用于签署事务。
**🎉 将数据发送回 Oracle Contract。** 管道工作完成后,最后一行调用 `receiveWeatherUpdate` 函数并发送 oracle 得出的预测。这段代码向我们的智能合约发起一笔事务。
### 4:指定 Web3 Action 何时执行
我们希望每次 `OracleContract` 在 Ropsten 网络上触发 `RequestCoinPrice` 事件时都执行该事务。我们只想在事务被打包后执行。
将 `YOUR_USERNAME` 和 `YOUR_PROJECT_SLUG` 替换为您的 Tenderly 用户名和项目 slug。您可以从 Dashboard URL 中复制它们:
`https://dashboard.tenderly.co/{YOUR_USERNAME}/{YOUR_PROJECT_SLUG}/transactions`
同时,将 `CONTRACT_ADDRESS` 替换为您部署的 Oracle Contract 的地址:
```yaml title="example.yaml" showLineNumbers theme={"theme":{"light":"catppuccin-latte","dark":"catppuccin-mocha"}}
account_id: ''
actions:
YOUR_USERNAME/YOUR_PROJECT_SLUG:
runtime: v1
sources: actions
specs:
coinOracle:
description: Swapit
function: coinOracle:coinPrice
trigger:
type: transaction
transaction:
status:
- mined
filters:
- network: 3
eventEmitted:
contract:
address: CONTRACT_ADDRESS
name: RequestCoinPrice
project_slug: ''
```
### 5:创建 Web3 Action Secrets
为了让 Web3 Actions 能够对已部署的 `OracleContract` 执行操作,我们需要一种访问该合约的方法。您可以选择任何 provider 服务(Infura、QuickNode、Alchemy、Etherscan 等)。查看 [**Ethers 的 Default Provider 文档**](https://docs.ethers.io/v5/api/providers/#providers-getDefaultProvider) 了解建立访问所需的内容。
由于我们使用 Etherscan 作为 provider,我们只需要 API 密钥。密钥将存储在 Web3 Actions Secrets 中。
将所有敏感数据安全地保存在 Web3 Actions Secrets 中(例如 API 密钥、
钱包私钥等)。Secrets 非常安全,即使您尝试{' '}
`console.log` 这些值,它们也会保持隐藏。
**Secrets。** 前往您的 Tenderly Dashboard,将复制的私钥放入 Web3 Actions Secrets 中。从侧边栏进入 "Actions",点击 "Secrets",然后点击 "Add New"。将该 secret 命名为 `oracle.providerApiKey`,并粘贴 API token 以及您需要的任何其他敏感信息。
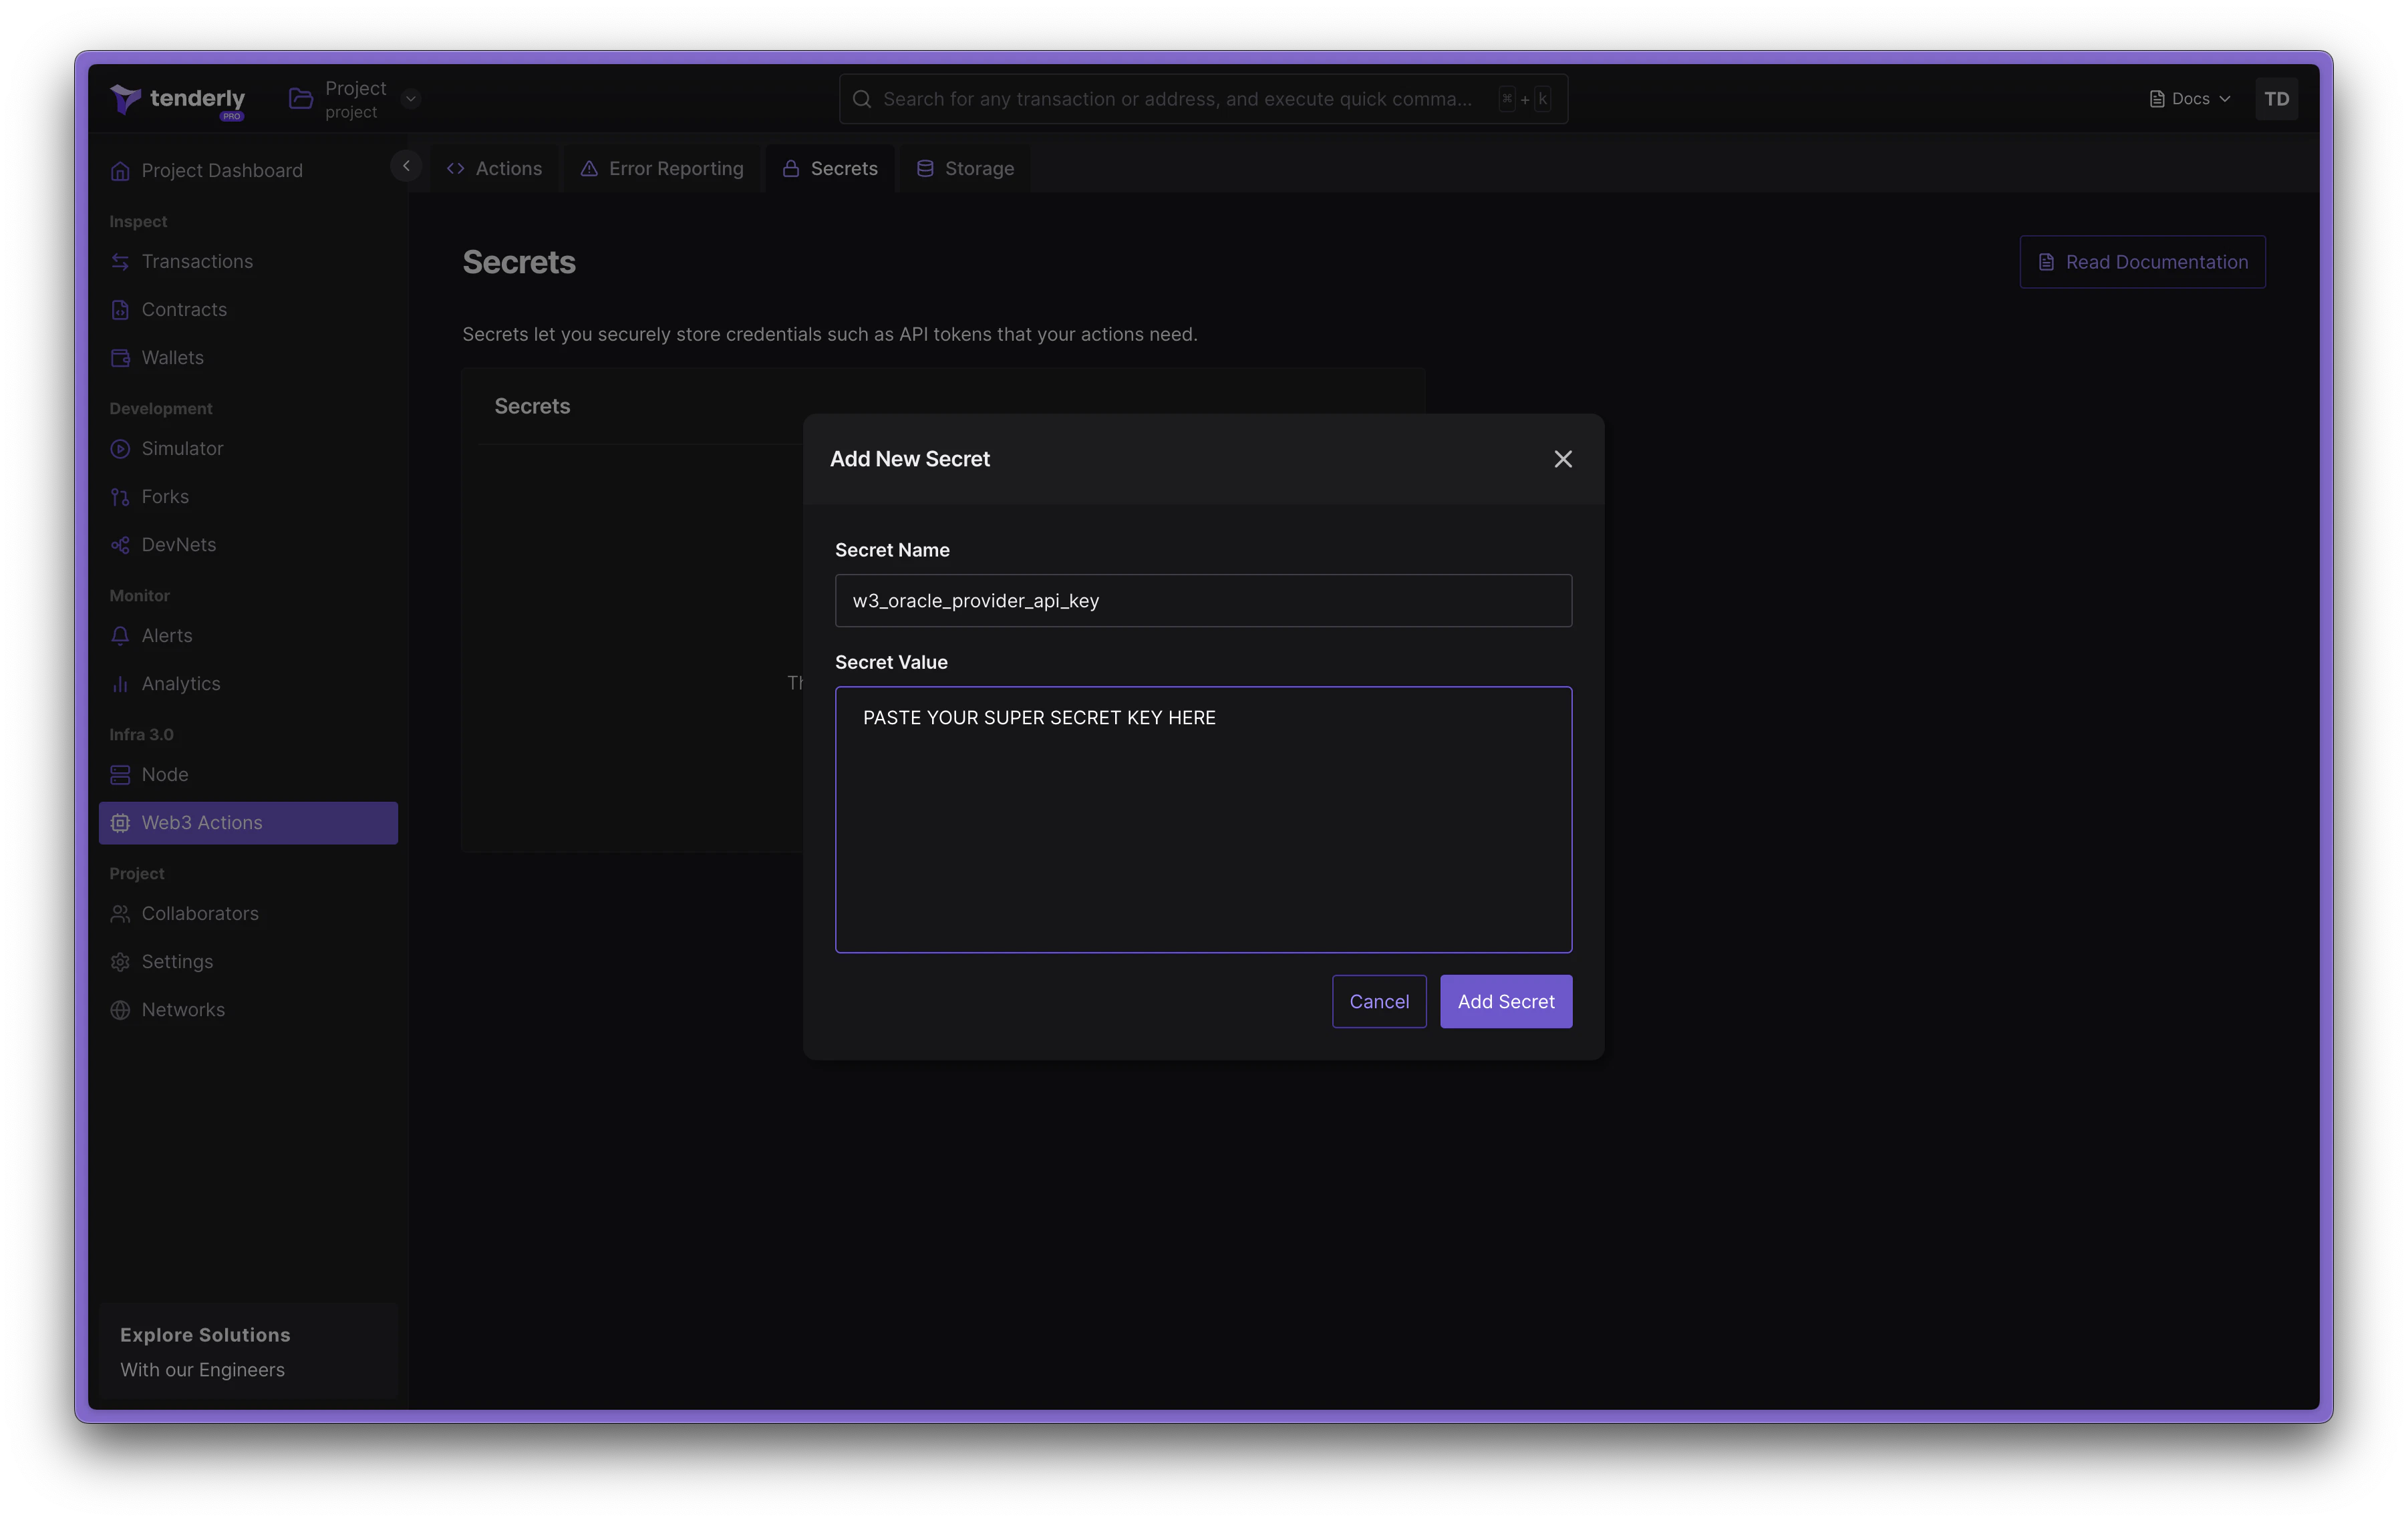 **存储 Oracle Wallet 私钥。** 为了向链上发送事务,我们的 Web3 Action 需要一个私钥来签署事务并为其提供资金。`OracleContract` 被设计为仅接受由部署它的地址签名的更新。
如果您使用 Metamask,请选择您用来部署智能合约的账户,并 [**按照此 Metamask 指南**](https://metamask.zendesk.com/hc/en-us/articles/360015289632-How-to-Export-an-Account-Private-Key) 复制其私钥。
在 Tenderly Dashboard 中,创建一个名为 `w3_oracle.oracle_address_private_key` 的新 Secret,并粘贴该私钥。
### 6:部署您的 Web3 Action
前往您项目的根目录(包含 `tenderly.yaml` 文件的文件夹)并运行以下命令:
```bash title="example" showLineNumbers theme={"theme":{"light":"catppuccin-latte","dark":"catppuccin-mocha"}}
tenderly actions deploy
```
CLI 显示部署成功后,您可以前往 Tenderly Dashboard。在那里您应该会看到您的 Web3 Action 已被部署(或正在准备部署)。
### 7:执行项目
要检查我们迄今为止创建的内容是否正常工作,请返回 Remix 并调用 `SimpleCoinConsumer` 合约的 `doSomethingSmart` 函数。
稍后,您应该会在 Tenderly Dashboard 的 Execution 选项卡中看到一次执行。您还会看到从 oracle 地址由您的 Web3 Action 发送的新事务,该事务调用了 `OracleContract` 合约的 `update` 函数。🎉
**存储 Oracle Wallet 私钥。** 为了向链上发送事务,我们的 Web3 Action 需要一个私钥来签署事务并为其提供资金。`OracleContract` 被设计为仅接受由部署它的地址签名的更新。
如果您使用 Metamask,请选择您用来部署智能合约的账户,并 [**按照此 Metamask 指南**](https://metamask.zendesk.com/hc/en-us/articles/360015289632-How-to-Export-an-Account-Private-Key) 复制其私钥。
在 Tenderly Dashboard 中,创建一个名为 `w3_oracle.oracle_address_private_key` 的新 Secret,并粘贴该私钥。
### 6:部署您的 Web3 Action
前往您项目的根目录(包含 `tenderly.yaml` 文件的文件夹)并运行以下命令:
```bash title="example" showLineNumbers theme={"theme":{"light":"catppuccin-latte","dark":"catppuccin-mocha"}}
tenderly actions deploy
```
CLI 显示部署成功后,您可以前往 Tenderly Dashboard。在那里您应该会看到您的 Web3 Action 已被部署(或正在准备部署)。
### 7:执行项目
要检查我们迄今为止创建的内容是否正常工作,请返回 Remix 并调用 `SimpleCoinConsumer` 合约的 `doSomethingSmart` 函数。
稍后,您应该会在 Tenderly Dashboard 的 Execution 选项卡中看到一次执行。您还会看到从 oracle 地址由您的 Web3 Action 发送的新事务,该事务调用了 `OracleContract` 合约的 `update` 函数。🎉