> ## Documentation Index
> Fetch the complete documentation index at: https://docs.tenderly.co/llms.txt
> Use this file to discover all available pages before exploring further.
# Hardhat 与 Github Actions
> 使用 Tenderly Github action 建立持续集成与持续部署(CI/CD),通过 Hardhat 测试和暂存 Solidity 智能合约
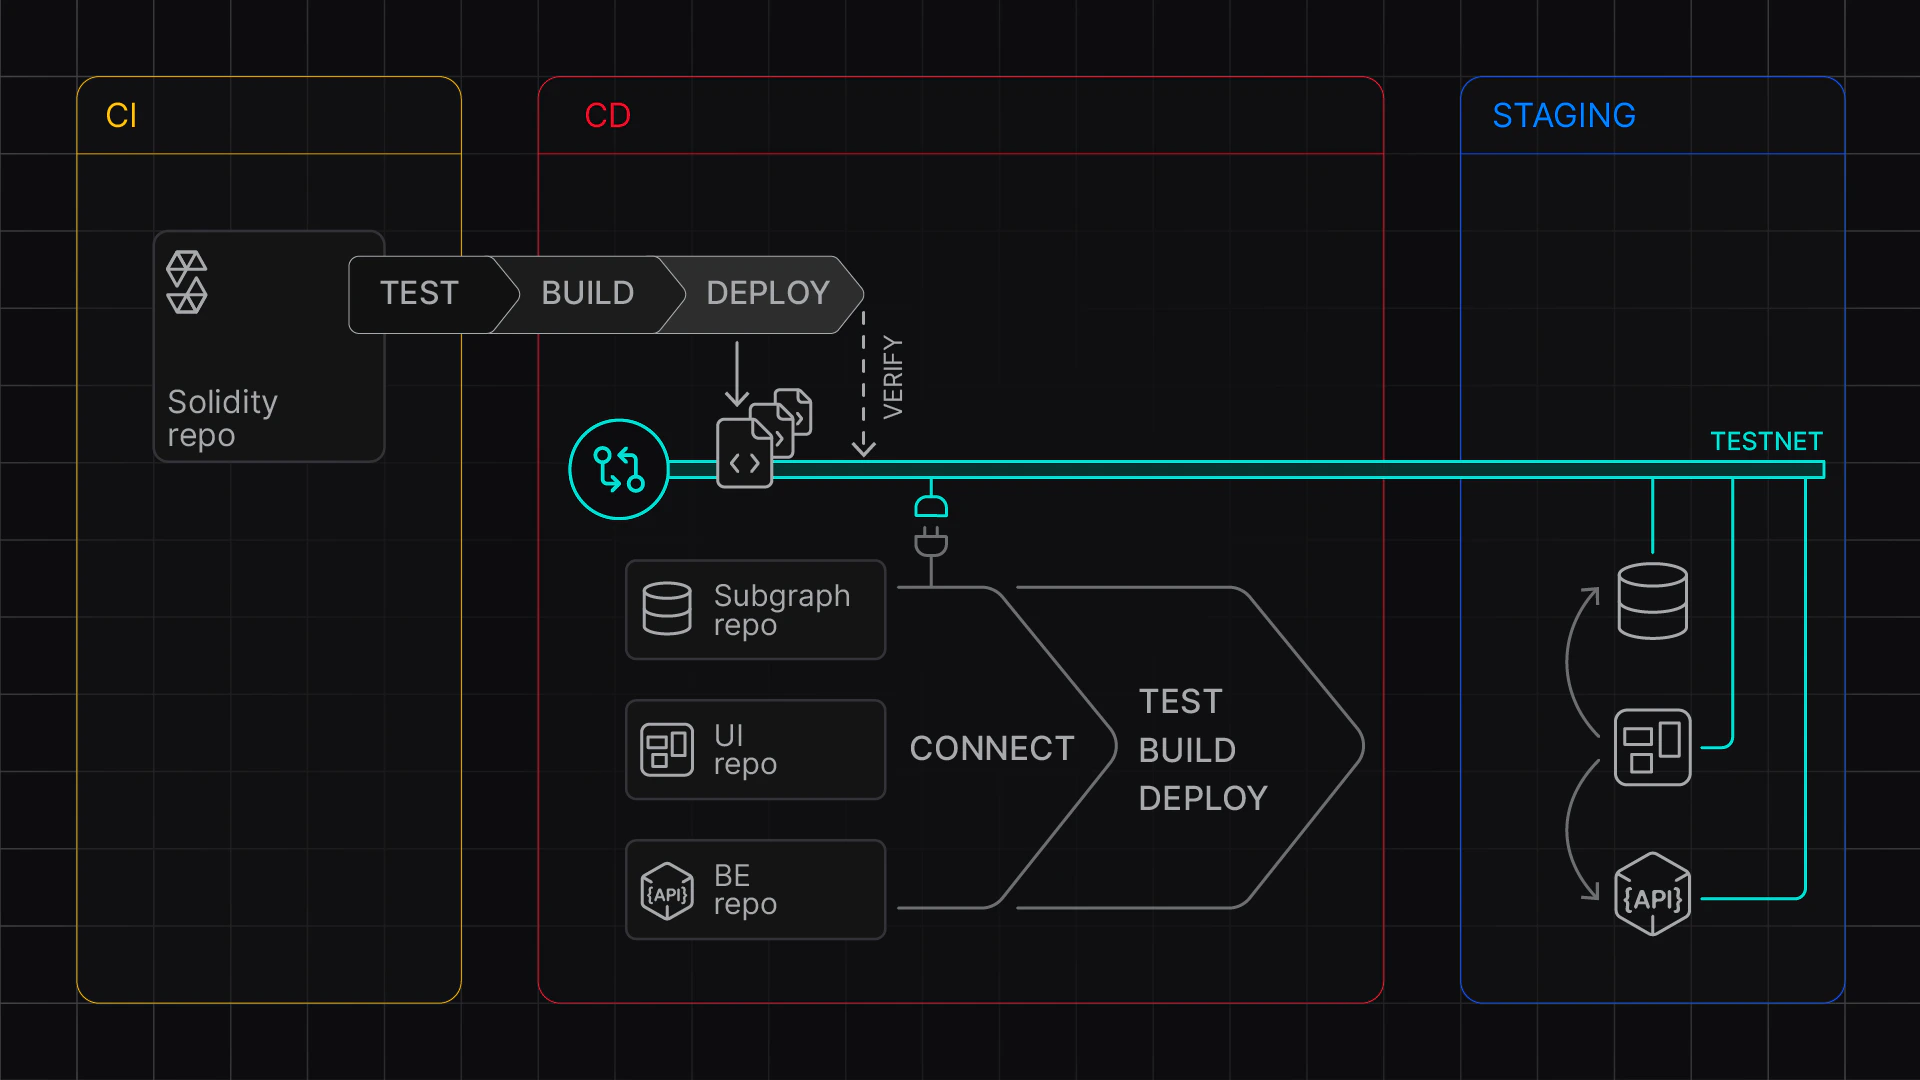
学习如何配置一个 GitHub Action,在 Tenderly Virtual Environments 上使用 Hardhat 建立持续集成和持续部署流水线(CI/CD)。
使用 [Tenderly Virtual Environment Setup](https://github.com/marketplace/actions/tenderly-virtual-testnet-setup) 启用自动化构建,在多个网络上测试和部署您的合约。测试成功后,您可以通过将它们部署到已配置的 Virtual Environments 来向团队其他成员暂存合约。
在本指南中,您需要完成两个阶段:
1. 本地设置:设置 Hardhat,创建并测试工作流文件。
2. Github 设置:设置 GitHub Action,配置 GitHub secrets 和变量,并测试构建。
作为参考,请使用此示例项目:
本指南演示了一个依赖 Hardhat-ignition 的 CI 设置。对于 `hardhat-verify` 设置,流程和配置类似。
 ## 阶段 1:本地设置
首先,我们将安装必要的依赖项并创建一个工作流文件。
### 安装依赖项
确保您已安装以下软件包:
```bash theme={"theme":{"light":"catppuccin-latte","dark":"catppuccin-mocha"}}
npm install --save-dev @tenderly/hardhat-tenderly @nomicfoundation/hardhat-ignition
```
### 创建工作流文件
要设置 GitHub Action,请创建一个新的工作流:
```bash theme={"theme":{"light":"catppuccin-latte","dark":"catppuccin-mocha"}}
mkdir -p .github/workflows
touch ci-cd.yaml
```
接下来,粘贴以下 yaml 文件,它配置了两个作业:
* **`test`** 作业使用单个网络运行 hardhat 测试
* **`deploy`** 作业在测试成功后将合约部署到多个网络(Mainnet 和 Base)
`mode` 参数的取值为 `CI` 和 `CD`。
* `CD` 模式使 Virtual Environment 保持活动状态,您可以使用已部署的合约。
* `CI` 模式在步骤完成后暂停 Virtual Environment。您将能够检查交易,但无法发送更多的 RPC 请求。
```yaml showLineNumbers title="ci-cd.yaml" theme={"theme":{"light":"catppuccin-latte","dark":"catppuccin-mocha"}}
name: Hardhat CI/CD Multichain
on: [push, pull_request]
env:
## Needed available as env variables for hardhat.config.js
TENDERLY_PROJECT_NAME: ${{ vars.TENDERLY_PROJECT_NAME }}
TENDERLY_ACCOUNT_NAME: ${{ vars.TENDERLY_ACCOUNT_NAME }}
jobs:
test:
runs-on: ubuntu-latest
steps:
- uses: actions/checkout@v4
- name: Setup Node.js
uses: actions/setup-node@v4
with:
node-version: '20'
cache: 'npm'
- name: Setup Virtual Environment
uses: tenderly/vnet-github-action@v1.0.14
with:
mode: CI # pauses the Virtual Environment after deployment
access_key: ${{ secrets.TENDERLY_ACCESS_KEY }}
project_name: ${{ vars.TENDERLY_PROJECT_NAME }}
account_name: ${{ vars.TENDERLY_ACCOUNT_NAME }}
testnet_name: "Testing"
network_id: 1
chain_id_prefix: 7357
public_explorer: true
verification_visibility: 'src'
push_on_complete: true
- name: Install dependencies
run: npm install
working-directory: examples/hardhat-ignition
- name: Run Tests
run: npm run test:1
working-directory: examples/hardhat-ignition
deploy:
needs: test
runs-on: ubuntu-latest
permissions:
contents: write
steps:
- uses: actions/checkout@v4
- name: Setup Node.js
uses: actions/setup-node@v4
with:
node-version: '20'
cache: 'npm'
- name: Setup Virtual Environment
uses: tenderly/vnet-github-action@v1.0.14
with:
mode: CD
access_key: ${{ secrets.TENDERLY_ACCESS_KEY }}
project_name: ${{ vars.TENDERLY_PROJECT_NAME }}
account_name: ${{ vars.TENDERLY_ACCOUNT_NAME }}
testnet_name: "Staging"
network_id: |
1
8453
chain_id_prefix: ""
public_explorer: true
verification_visibility: 'src'
push_on_complete: true
- name: Install dependencies
run: npm install
working-directory: examples/hardhat-ignition
- name: Deploy Contracts Mainnet
run: npm run deploy:1 -- --deployment-id deploy-1-${BUILD_SLUG}
working-directory: examples/hardhat-ignition
- name: Deploy Contracts Base
run: npm run deploy:8453 -- --deployment-id deploy-8453-${BUILD_SLUG}
working-directory: examples/hardhat-ignition
```
### 准备环境变量
对于本地测试,使用此模板设置一个 `.env` 文件:
```dotenv theme={"theme":{"light":"catppuccin-latte","dark":"catppuccin-mocha"}}
## Access parameters
TENDERLY_ACCESS_KEY=...
TENDERLY_PROJECT_NAME=...
TENDERLY_ACCOUNT_NAME=...
## Network-specific parameters (populated by the action in CI/CD)
TENDERLY_ADMIN_RPC_URL_1=... # Mainnet RPC
TENDERLY_ADMIN_RPC_URL_8453=... # Base RPC
TENDERLY_CHAIN_ID_1=... # Mainnet chain ID
TENDERLY_CHAIN_ID_8453=... # Base chain ID
```
必需的变量:
* `TENDERLY_ACCESS_KEY`:了解如何[获取您的 access key](/platform/account/projects/api-tokens)
* `TENDERLY_ACCOUNT_NAME` 和 `TENDERLY_PROJECT_NAME`:按照步骤[获取您的账户和项目名称](/platform/account/projects/api-tokens)
### 配置 Hardhat
将 Virtual Environment 配置添加到 `hardhat.config.ts`:
```typescript title='hardhat.config.ts' showLineNumbers theme={"theme":{"light":"catppuccin-latte","dark":"catppuccin-mocha"}}
dotenv.config();
const config: HardhatUserConfig = {
solidity: "0.8.27",
networks: {
mainnet: {
url: process.env.TENDERLY_ADMIN_RPC_URL_1,
chainId: parseInt(process.env.TENDERLY_CHAIN_ID_1 || "1")
},
base: {
url: process.env.TENDERLY_ADMIN_RPC_URL_8453,
chainId: parseInt(process.env.TENDERLY_CHAIN_ID_8453 || "8453")
}
},
etherscan: {
apiKey: {
mainnet: process.env.TENDERLY_ACCESS_KEY!,
base: process.env.TENDERLY_ACCESS_KEY!
},
customChains: [
{
network: "mainnet",
chainId: parseInt(process.env.TENDERLY_CHAIN_ID_1!),
urls: {
apiURL: `${process.env.TENDERLY_ADMIN_RPC_URL_1}/verify`,
browserURL: process.env.TENDERLY_ADMIN_RPC_URL_1!
}
},
{
network: "base",
chainId: parseInt(process.env.TENDERLY_CHAIN_ID_8453!),
urls: {
apiURL: `${process.env.TENDERLY_ADMIN_RPC_URL_8453}/verify`,
browserURL: process.env.TENDERLY_ADMIN_RPC_URL_8453!
}
}
]
},
tenderly: {
project: process.env.TENDERLY_PROJECT_NAME!,
username: process.env.TENDERLY_ACCOUNT_NAME!,
accessKey: process.env.TENDERLY_ACCESS_KEY!
},
sourcify: {
enabled: false
}
};
export default config;
```
### 添加测试和部署脚本
将以下脚本添加到您的 `package.json`,用于多网络测试和部署:
```json theme={"theme":{"light":"catppuccin-latte","dark":"catppuccin-mocha"}}
{
"scripts": {
"deploy:1": "npx hardhat ignition deploy ./ignition/modules/Counter.js --network mainnet",
"deploy:8453": "npx hardhat ignition deploy ./ignition/modules/Counter.js --network base",
"test:1": "npx hardhat test --network mainnet"
}
}
```
部署命令使用 BUILD\_SLUG 环境变量(由 action 提供)来创建唯一的部署标识符。
### 在本地测试构建
要在本地测试构建,请运行以下命令:
```bash theme={"theme":{"light":"catppuccin-latte","dark":"catppuccin-mocha"}}
# Test on mainnet fork
npx hardhat test:1
# Deploy to mainnet fork
npx hardhat deploy:1
# Deploy to Base fork
npx hardhat deploy:8453
```
### 在本地测试 Github Action
要在本地测试您的 action,您可以使用 [Act](https://github.com/nektos/act):
```bash theme={"theme":{"light":"catppuccin-latte","dark":"catppuccin-mocha"}}
act --secret-file .env --var-file .env
```
## 阶段 2:Github 设置
本地设置成功后,通过配置带有环境变量和必要 secrets 的 Github 继续操作。
### 在 GitHub 中配置 secrets 和环境变量
您必须配置以下 Github 变量和 secret:
**Variables:**
* `TENDERLY_PROJECT_NAME`
* `TENDERLY_ACCOUNT_NAME`
**Secrets:**
* `TENDERLY_ACCESS_KEY`
您可以通过 [GitHub UI](https://docs.github.com/en/actions/how-tos/write-workflows/choose-what-workflows-do/use-variables#creating-configuration-variables-for-a-repository) 或使用 `gh` 命令行进行配置:
```bash theme={"theme":{"light":"catppuccin-latte","dark":"catppuccin-mocha"}}
source .env
gh variable set TENDERLY_PROJECT_NAME --body ${TENDERLY_PROJECT_NAME}
gh variable set TENDERLY_ACCOUNT_NAME --body ${TENDERLY_ACCOUNT_NAME}
gh secret set TENDERLY_ACCESS_KEY --body ${TENDERLY_ACCESS_KEY}
```
### 推送更新
要触发 GitHub Action,请推送您的更改:
```bash theme={"theme":{"light":"catppuccin-latte","dark":"catppuccin-mocha"}}
git add .
git commit -m "Add CI/CD workflow for multichain deployment"
git push
```
### 查看您的 action
前往您的 Github 仓库并查看 Actions 选项卡。您应该看到:
1. Test 作业针对 Mainnet fork 运行
2. Deploy 作业创建两个 Virtual Environments(Mainnet 和 Base)
3. 部署构件被推送到仓库
### 获取 RPC 链接
要获取已部署合约的 RPC 链接:
1. 前往 **Tenderly dashboard > Virtual Environments**
2. 找到您的 CD Virtual Environments(一个用于 Mainnet fork,一个用于 Base fork)
3. 单击每个以获取它们各自的 RPC URL
## 环境变量参考
GitHub Action 暴露以下网络特定的变量:
| 变量 | 描述 |
| -------------------------------------- | ---------------------------- |
| `TENDERLY_TESTNET_ID_{network_id}` | Virtual Environment 的 UUID |
| `TENDERLY_ADMIN_RPC_URL_{network_id}` | 带作弊码方法的 Admin RPC 端点 |
| `TENDERLY_PUBLIC_RPC_URL_{network_id}` | Public RPC 端点 |
| `TENDERLY_CHAIN_ID_{network_id}` | 链 ID |
| `TENDERLY_TESTNET_SLUG_{network_id}` | 唯一的 Virtual Environment slug |
| `BUILD_SLUG` | 当前构建的唯一标识符 |
## 后续步骤
探索其他示例:
* [Hardhat with ethers-v6](https://github.com/Tenderly/vnet-github-action/tree/main/examples/hardhat)
* [Foundry setup](https://github.com/Tenderly/vnet-github-action/tree/main/examples/foundry)
* [Advanced deployment patterns](https://github.com/Tenderly/vnet-github-action/tree/main/examples/advanced)
## 阶段 1:本地设置
首先,我们将安装必要的依赖项并创建一个工作流文件。
### 安装依赖项
确保您已安装以下软件包:
```bash theme={"theme":{"light":"catppuccin-latte","dark":"catppuccin-mocha"}}
npm install --save-dev @tenderly/hardhat-tenderly @nomicfoundation/hardhat-ignition
```
### 创建工作流文件
要设置 GitHub Action,请创建一个新的工作流:
```bash theme={"theme":{"light":"catppuccin-latte","dark":"catppuccin-mocha"}}
mkdir -p .github/workflows
touch ci-cd.yaml
```
接下来,粘贴以下 yaml 文件,它配置了两个作业:
* **`test`** 作业使用单个网络运行 hardhat 测试
* **`deploy`** 作业在测试成功后将合约部署到多个网络(Mainnet 和 Base)
`mode` 参数的取值为 `CI` 和 `CD`。
* `CD` 模式使 Virtual Environment 保持活动状态,您可以使用已部署的合约。
* `CI` 模式在步骤完成后暂停 Virtual Environment。您将能够检查交易,但无法发送更多的 RPC 请求。
```yaml showLineNumbers title="ci-cd.yaml" theme={"theme":{"light":"catppuccin-latte","dark":"catppuccin-mocha"}}
name: Hardhat CI/CD Multichain
on: [push, pull_request]
env:
## Needed available as env variables for hardhat.config.js
TENDERLY_PROJECT_NAME: ${{ vars.TENDERLY_PROJECT_NAME }}
TENDERLY_ACCOUNT_NAME: ${{ vars.TENDERLY_ACCOUNT_NAME }}
jobs:
test:
runs-on: ubuntu-latest
steps:
- uses: actions/checkout@v4
- name: Setup Node.js
uses: actions/setup-node@v4
with:
node-version: '20'
cache: 'npm'
- name: Setup Virtual Environment
uses: tenderly/vnet-github-action@v1.0.14
with:
mode: CI # pauses the Virtual Environment after deployment
access_key: ${{ secrets.TENDERLY_ACCESS_KEY }}
project_name: ${{ vars.TENDERLY_PROJECT_NAME }}
account_name: ${{ vars.TENDERLY_ACCOUNT_NAME }}
testnet_name: "Testing"
network_id: 1
chain_id_prefix: 7357
public_explorer: true
verification_visibility: 'src'
push_on_complete: true
- name: Install dependencies
run: npm install
working-directory: examples/hardhat-ignition
- name: Run Tests
run: npm run test:1
working-directory: examples/hardhat-ignition
deploy:
needs: test
runs-on: ubuntu-latest
permissions:
contents: write
steps:
- uses: actions/checkout@v4
- name: Setup Node.js
uses: actions/setup-node@v4
with:
node-version: '20'
cache: 'npm'
- name: Setup Virtual Environment
uses: tenderly/vnet-github-action@v1.0.14
with:
mode: CD
access_key: ${{ secrets.TENDERLY_ACCESS_KEY }}
project_name: ${{ vars.TENDERLY_PROJECT_NAME }}
account_name: ${{ vars.TENDERLY_ACCOUNT_NAME }}
testnet_name: "Staging"
network_id: |
1
8453
chain_id_prefix: ""
public_explorer: true
verification_visibility: 'src'
push_on_complete: true
- name: Install dependencies
run: npm install
working-directory: examples/hardhat-ignition
- name: Deploy Contracts Mainnet
run: npm run deploy:1 -- --deployment-id deploy-1-${BUILD_SLUG}
working-directory: examples/hardhat-ignition
- name: Deploy Contracts Base
run: npm run deploy:8453 -- --deployment-id deploy-8453-${BUILD_SLUG}
working-directory: examples/hardhat-ignition
```
### 准备环境变量
对于本地测试,使用此模板设置一个 `.env` 文件:
```dotenv theme={"theme":{"light":"catppuccin-latte","dark":"catppuccin-mocha"}}
## Access parameters
TENDERLY_ACCESS_KEY=...
TENDERLY_PROJECT_NAME=...
TENDERLY_ACCOUNT_NAME=...
## Network-specific parameters (populated by the action in CI/CD)
TENDERLY_ADMIN_RPC_URL_1=... # Mainnet RPC
TENDERLY_ADMIN_RPC_URL_8453=... # Base RPC
TENDERLY_CHAIN_ID_1=... # Mainnet chain ID
TENDERLY_CHAIN_ID_8453=... # Base chain ID
```
必需的变量:
* `TENDERLY_ACCESS_KEY`:了解如何[获取您的 access key](/platform/account/projects/api-tokens)
* `TENDERLY_ACCOUNT_NAME` 和 `TENDERLY_PROJECT_NAME`:按照步骤[获取您的账户和项目名称](/platform/account/projects/api-tokens)
### 配置 Hardhat
将 Virtual Environment 配置添加到 `hardhat.config.ts`:
```typescript title='hardhat.config.ts' showLineNumbers theme={"theme":{"light":"catppuccin-latte","dark":"catppuccin-mocha"}}
dotenv.config();
const config: HardhatUserConfig = {
solidity: "0.8.27",
networks: {
mainnet: {
url: process.env.TENDERLY_ADMIN_RPC_URL_1,
chainId: parseInt(process.env.TENDERLY_CHAIN_ID_1 || "1")
},
base: {
url: process.env.TENDERLY_ADMIN_RPC_URL_8453,
chainId: parseInt(process.env.TENDERLY_CHAIN_ID_8453 || "8453")
}
},
etherscan: {
apiKey: {
mainnet: process.env.TENDERLY_ACCESS_KEY!,
base: process.env.TENDERLY_ACCESS_KEY!
},
customChains: [
{
network: "mainnet",
chainId: parseInt(process.env.TENDERLY_CHAIN_ID_1!),
urls: {
apiURL: `${process.env.TENDERLY_ADMIN_RPC_URL_1}/verify`,
browserURL: process.env.TENDERLY_ADMIN_RPC_URL_1!
}
},
{
network: "base",
chainId: parseInt(process.env.TENDERLY_CHAIN_ID_8453!),
urls: {
apiURL: `${process.env.TENDERLY_ADMIN_RPC_URL_8453}/verify`,
browserURL: process.env.TENDERLY_ADMIN_RPC_URL_8453!
}
}
]
},
tenderly: {
project: process.env.TENDERLY_PROJECT_NAME!,
username: process.env.TENDERLY_ACCOUNT_NAME!,
accessKey: process.env.TENDERLY_ACCESS_KEY!
},
sourcify: {
enabled: false
}
};
export default config;
```
### 添加测试和部署脚本
将以下脚本添加到您的 `package.json`,用于多网络测试和部署:
```json theme={"theme":{"light":"catppuccin-latte","dark":"catppuccin-mocha"}}
{
"scripts": {
"deploy:1": "npx hardhat ignition deploy ./ignition/modules/Counter.js --network mainnet",
"deploy:8453": "npx hardhat ignition deploy ./ignition/modules/Counter.js --network base",
"test:1": "npx hardhat test --network mainnet"
}
}
```
部署命令使用 BUILD\_SLUG 环境变量(由 action 提供)来创建唯一的部署标识符。
### 在本地测试构建
要在本地测试构建,请运行以下命令:
```bash theme={"theme":{"light":"catppuccin-latte","dark":"catppuccin-mocha"}}
# Test on mainnet fork
npx hardhat test:1
# Deploy to mainnet fork
npx hardhat deploy:1
# Deploy to Base fork
npx hardhat deploy:8453
```
### 在本地测试 Github Action
要在本地测试您的 action,您可以使用 [Act](https://github.com/nektos/act):
```bash theme={"theme":{"light":"catppuccin-latte","dark":"catppuccin-mocha"}}
act --secret-file .env --var-file .env
```
## 阶段 2:Github 设置
本地设置成功后,通过配置带有环境变量和必要 secrets 的 Github 继续操作。
### 在 GitHub 中配置 secrets 和环境变量
您必须配置以下 Github 变量和 secret:
**Variables:**
* `TENDERLY_PROJECT_NAME`
* `TENDERLY_ACCOUNT_NAME`
**Secrets:**
* `TENDERLY_ACCESS_KEY`
您可以通过 [GitHub UI](https://docs.github.com/en/actions/how-tos/write-workflows/choose-what-workflows-do/use-variables#creating-configuration-variables-for-a-repository) 或使用 `gh` 命令行进行配置:
```bash theme={"theme":{"light":"catppuccin-latte","dark":"catppuccin-mocha"}}
source .env
gh variable set TENDERLY_PROJECT_NAME --body ${TENDERLY_PROJECT_NAME}
gh variable set TENDERLY_ACCOUNT_NAME --body ${TENDERLY_ACCOUNT_NAME}
gh secret set TENDERLY_ACCESS_KEY --body ${TENDERLY_ACCESS_KEY}
```
### 推送更新
要触发 GitHub Action,请推送您的更改:
```bash theme={"theme":{"light":"catppuccin-latte","dark":"catppuccin-mocha"}}
git add .
git commit -m "Add CI/CD workflow for multichain deployment"
git push
```
### 查看您的 action
前往您的 Github 仓库并查看 Actions 选项卡。您应该看到:
1. Test 作业针对 Mainnet fork 运行
2. Deploy 作业创建两个 Virtual Environments(Mainnet 和 Base)
3. 部署构件被推送到仓库
### 获取 RPC 链接
要获取已部署合约的 RPC 链接:
1. 前往 **Tenderly dashboard > Virtual Environments**
2. 找到您的 CD Virtual Environments(一个用于 Mainnet fork,一个用于 Base fork)
3. 单击每个以获取它们各自的 RPC URL
## 环境变量参考
GitHub Action 暴露以下网络特定的变量:
| 变量 | 描述 |
| -------------------------------------- | ---------------------------- |
| `TENDERLY_TESTNET_ID_{network_id}` | Virtual Environment 的 UUID |
| `TENDERLY_ADMIN_RPC_URL_{network_id}` | 带作弊码方法的 Admin RPC 端点 |
| `TENDERLY_PUBLIC_RPC_URL_{network_id}` | Public RPC 端点 |
| `TENDERLY_CHAIN_ID_{network_id}` | 链 ID |
| `TENDERLY_TESTNET_SLUG_{network_id}` | 唯一的 Virtual Environment slug |
| `BUILD_SLUG` | 当前构建的唯一标识符 |
## 后续步骤
探索其他示例:
* [Hardhat with ethers-v6](https://github.com/Tenderly/vnet-github-action/tree/main/examples/hardhat)
* [Foundry setup](https://github.com/Tenderly/vnet-github-action/tree/main/examples/foundry)
* [Advanced deployment patterns](https://github.com/Tenderly/vnet-github-action/tree/main/examples/advanced)