> ## Documentation Index
> Fetch the complete documentation index at: https://docs.tenderly.co/llms.txt
> Use this file to discover all available pages before exploring further.
# 暂存合约
> 通过在 CI/CD 中使用 Foundry 部署到 Virtual Environment 来暂存合约,然后与您的团队共享 RPC URL 和合约地址。
将最新代码部署到 Virtual Environments,并通过共享 RPC 链接和合约地址将其提供给您的团队。
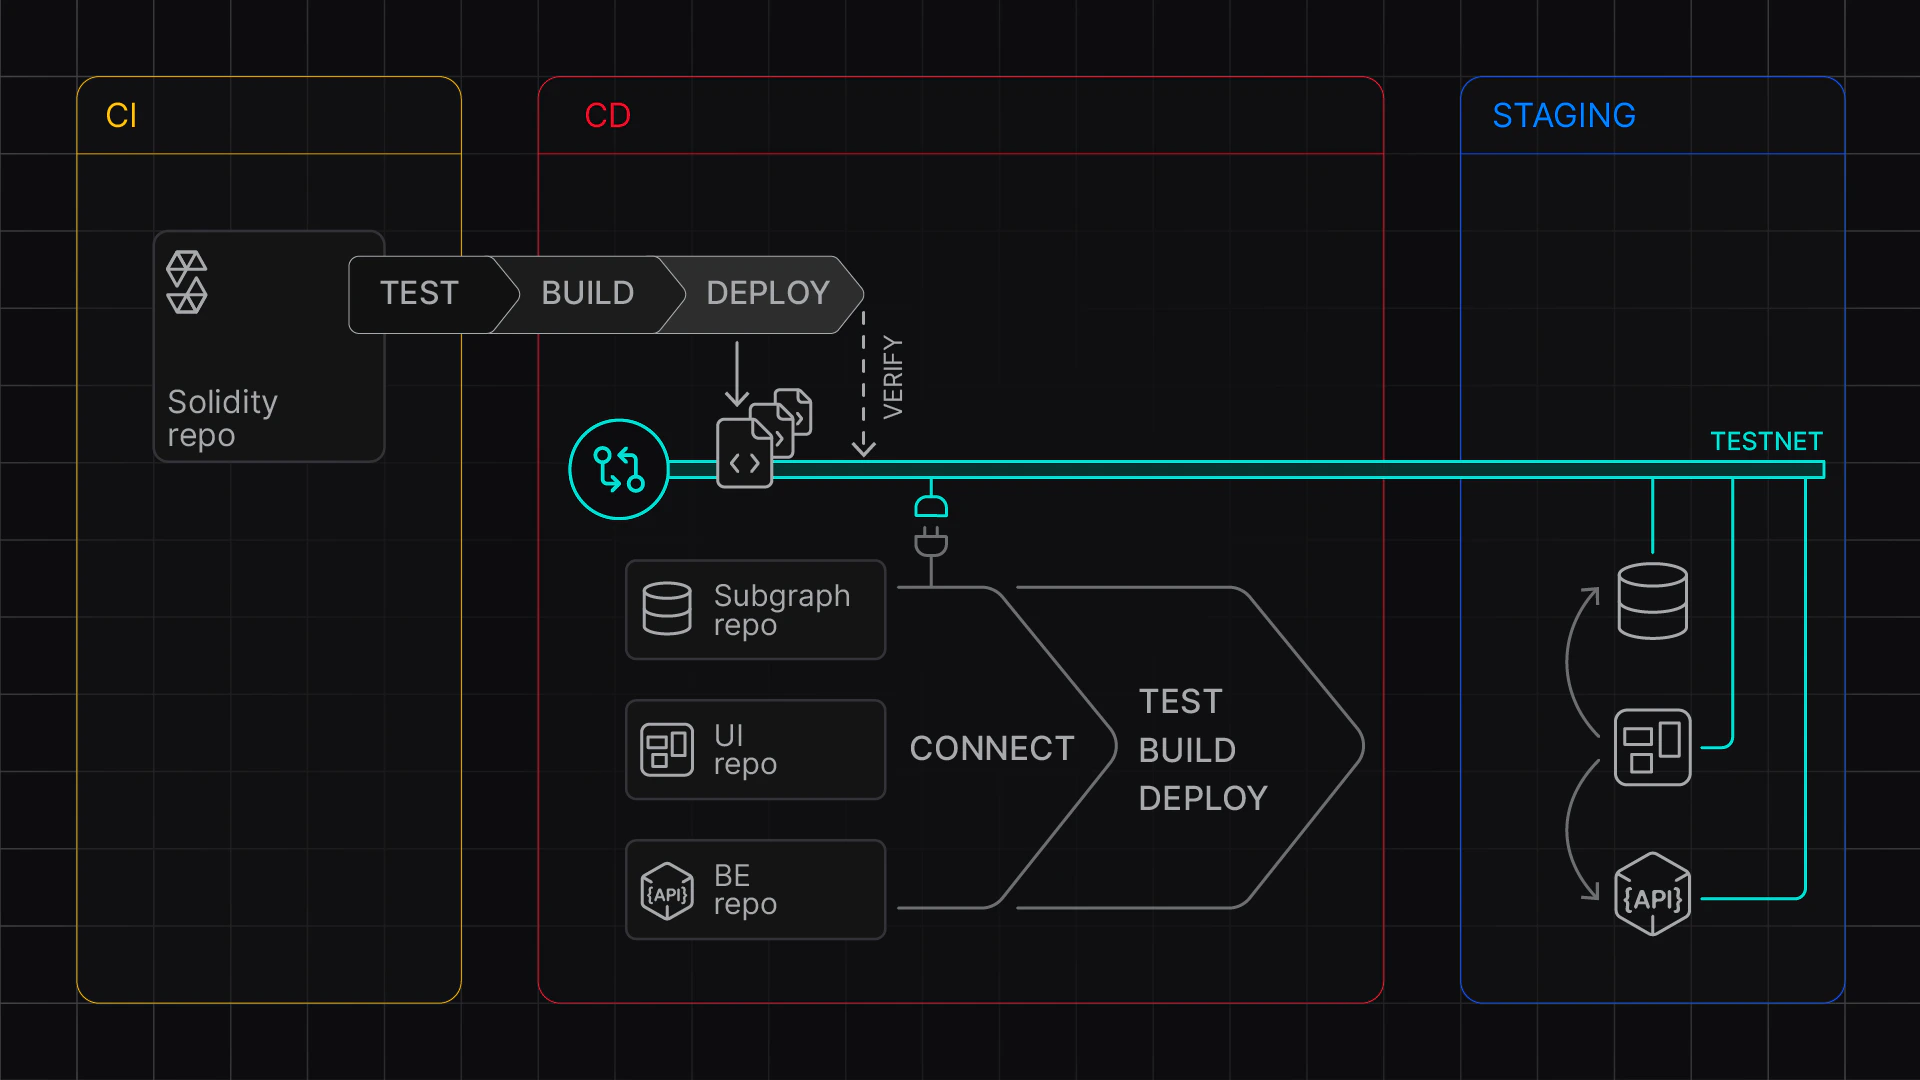 ### 创建 Virtual Environment
创建一个新的 Virtual Environment 来暂存您的合约,方法为:
* 使用 [Virtual Environments 仪表板](/virtual-environments/quickstart#configure-your-virtual-environment)
* 使用 [REST API](/virtual-environments/develop/create-virtual-environment-via-api)
### 设置环境变量
要创建 Virtual Environment 并部署与验证合约,请设置以下环境变量:
* **`TENDERLY_ACCOUNT_ID`** 为您的[账户 ID](/platform/account/projects/slug)
* **`TENDERLY_PROJECT`** 为您的[项目 (slug)](/platform/account/projects/slug)
* **`TENDERLY_ACCESS_KEY`** 为您[生成的 access key](/platform/account/projects/api-tokens)
* **`ORIGINAL_NETWORK_ID`** 为您要作为 Virtual Environment 基础的[网络 ID](/platform/supported-networks)
* **`FOUNDRY_REPO`** 为 Foundry 仓库的路径
* **`DEPLOYER_ADDRESS`** 为您要从其部署的账户
* 添加部署脚本所需的其他环境变量
```bash showLineNumbers title='.env' theme={"theme":{"light":"catppuccin-latte","dark":"catppuccin-mocha"}}
export TENDERLY_ACCOUNT_ID=
export TENDERLY_PROJECT=
export TENDERLY_ACCESS_KEY=
## TestNet Configuration
export TENDERLY_TESTNET_NAME=staging
export PURPOSE=development
export ORIGINAL_NETWORK_ID=1
export BLOCK_NUMBER=latest
## Custom Chain ID (Prefixed with 7357 - test)
export CHAIN_ID=7357$ORIGINAL_NETWORK_ID
## Public explorer verification visibility
## abi | full | none
export VERIFICATION_VISIBILITY=abi
# Foundry Repo (Absolute path only!)
export FOUNDRY_REPO=
## Deployer address
export DEPLOYER_ADDRESS=...
## Custom stuff needed for deployment scripts
## Add your custom stuff here
export ADMIN_ADDRESS=...
```
### 编写您的部署命令
编辑 `deploy-command.sh` 并添加部署合约的命令。注意您需要向 Foundry 或 Hardhat 项目添加验证;参见[部署和验证合约](/virtual-environments/develop/deploy-contracts)。
例如:
```bash showLineNumbers title='deploy-command.sh' theme={"theme":{"light":"catppuccin-latte","dark":"catppuccin-mocha"}}
#!/bin/bash
cd $FOUNDRY_REPO
## TODO: Your deployment command here:
MAX_SEGMENT_COUNT=3
FOUNDRY_PROFILE=optimized \
forge script script/DeployCore.s.sol \
--broadcast \
--rpc-url $TENDERLY_VIRTUAL_TESTNET_RPC \
--sig "run(address)" \
--verify \
--verifier-url $VERIFICATION_URL \
$ADMIN_ADDRESS
```
### 暂存合约
运行以下命令,它们将:
* 创建一个新的 Virtual Environment
* 使用无限水龙头为 **`$DEPLOYER_ADDRESS`** 注入测试 ETH
* 配置 Foundry 的 **`foundry.toml`** 以在您的自定义链上进行验证
* 部署您的合约
* 最后清理 `foundry.toml`
```bash showLineNumbers title='stage.sh' theme={"theme":{"light":"catppuccin-latte","dark":"catppuccin-mocha"}}
# create a testnet - or paste the Unlocked TestNet RPC URL
source src/contracts-staging/.env
cd src/contracts-staging
## Create a fresh testnet
export VIRTUAL_NETWORK_RPC_URL=$(./create-testnet.sh)
echo "Created a Virtual Environment at ${VIRTUAL_NETWORK_RPC_URL}"
### run the deployment
./deploy-to-testnet.sh
```
RPC 链接显示在输出中,您的合约会在 Virtual Environment 上部署和验证。
### 分享地址
收集已部署合约的 ABI 和地址,并将它们连同 Virtual Environment RPC 一起分发给您的团队。
### 创建 Virtual Environment
创建一个新的 Virtual Environment 来暂存您的合约,方法为:
* 使用 [Virtual Environments 仪表板](/virtual-environments/quickstart#configure-your-virtual-environment)
* 使用 [REST API](/virtual-environments/develop/create-virtual-environment-via-api)
### 设置环境变量
要创建 Virtual Environment 并部署与验证合约,请设置以下环境变量:
* **`TENDERLY_ACCOUNT_ID`** 为您的[账户 ID](/platform/account/projects/slug)
* **`TENDERLY_PROJECT`** 为您的[项目 (slug)](/platform/account/projects/slug)
* **`TENDERLY_ACCESS_KEY`** 为您[生成的 access key](/platform/account/projects/api-tokens)
* **`ORIGINAL_NETWORK_ID`** 为您要作为 Virtual Environment 基础的[网络 ID](/platform/supported-networks)
* **`FOUNDRY_REPO`** 为 Foundry 仓库的路径
* **`DEPLOYER_ADDRESS`** 为您要从其部署的账户
* 添加部署脚本所需的其他环境变量
```bash showLineNumbers title='.env' theme={"theme":{"light":"catppuccin-latte","dark":"catppuccin-mocha"}}
export TENDERLY_ACCOUNT_ID=
export TENDERLY_PROJECT=
export TENDERLY_ACCESS_KEY=
## TestNet Configuration
export TENDERLY_TESTNET_NAME=staging
export PURPOSE=development
export ORIGINAL_NETWORK_ID=1
export BLOCK_NUMBER=latest
## Custom Chain ID (Prefixed with 7357 - test)
export CHAIN_ID=7357$ORIGINAL_NETWORK_ID
## Public explorer verification visibility
## abi | full | none
export VERIFICATION_VISIBILITY=abi
# Foundry Repo (Absolute path only!)
export FOUNDRY_REPO=
## Deployer address
export DEPLOYER_ADDRESS=...
## Custom stuff needed for deployment scripts
## Add your custom stuff here
export ADMIN_ADDRESS=...
```
### 编写您的部署命令
编辑 `deploy-command.sh` 并添加部署合约的命令。注意您需要向 Foundry 或 Hardhat 项目添加验证;参见[部署和验证合约](/virtual-environments/develop/deploy-contracts)。
例如:
```bash showLineNumbers title='deploy-command.sh' theme={"theme":{"light":"catppuccin-latte","dark":"catppuccin-mocha"}}
#!/bin/bash
cd $FOUNDRY_REPO
## TODO: Your deployment command here:
MAX_SEGMENT_COUNT=3
FOUNDRY_PROFILE=optimized \
forge script script/DeployCore.s.sol \
--broadcast \
--rpc-url $TENDERLY_VIRTUAL_TESTNET_RPC \
--sig "run(address)" \
--verify \
--verifier-url $VERIFICATION_URL \
$ADMIN_ADDRESS
```
### 暂存合约
运行以下命令,它们将:
* 创建一个新的 Virtual Environment
* 使用无限水龙头为 **`$DEPLOYER_ADDRESS`** 注入测试 ETH
* 配置 Foundry 的 **`foundry.toml`** 以在您的自定义链上进行验证
* 部署您的合约
* 最后清理 `foundry.toml`
```bash showLineNumbers title='stage.sh' theme={"theme":{"light":"catppuccin-latte","dark":"catppuccin-mocha"}}
# create a testnet - or paste the Unlocked TestNet RPC URL
source src/contracts-staging/.env
cd src/contracts-staging
## Create a fresh testnet
export VIRTUAL_NETWORK_RPC_URL=$(./create-testnet.sh)
echo "Created a Virtual Environment at ${VIRTUAL_NETWORK_RPC_URL}"
### run the deployment
./deploy-to-testnet.sh
```
RPC 链接显示在输出中,您的合约会在 Virtual Environment 上部署和验证。
### 分享地址
收集已部署合约的 ABI 和地址,并将它们连同 Virtual Environment RPC 一起分发给您的团队。