Simulate a Token Mint, Approve, and TransferFrom Bundle
Simulate a 3-step bundle that mints DAI, approves a spender, and transfers tokens, with shared state across steps for testing multi-transaction flows.
This guide builds a 3-step simulation bundle that exercises the classic ERC-20 approval flow: mint tokens to a holder, approve a spender, then let the spender call transferFrom. Each step depends on state that the previous step creates, which is why a bundle is the right tool here.
Simulating each transaction in isolation breaks down:
Mint alone: you can verify the mint logic, but the holder address has no tokens on mainnet.
Approve alone: the simulation needs the holder to actually have a balance to approve from.
TransferFrom alone: requires both the balance and the approval to be in place.
A Sim Bundle runs all three in sequence, sharing the resulting state. Step 2 sees the minted balance from step 1. Step 3 sees the approval from step 2.
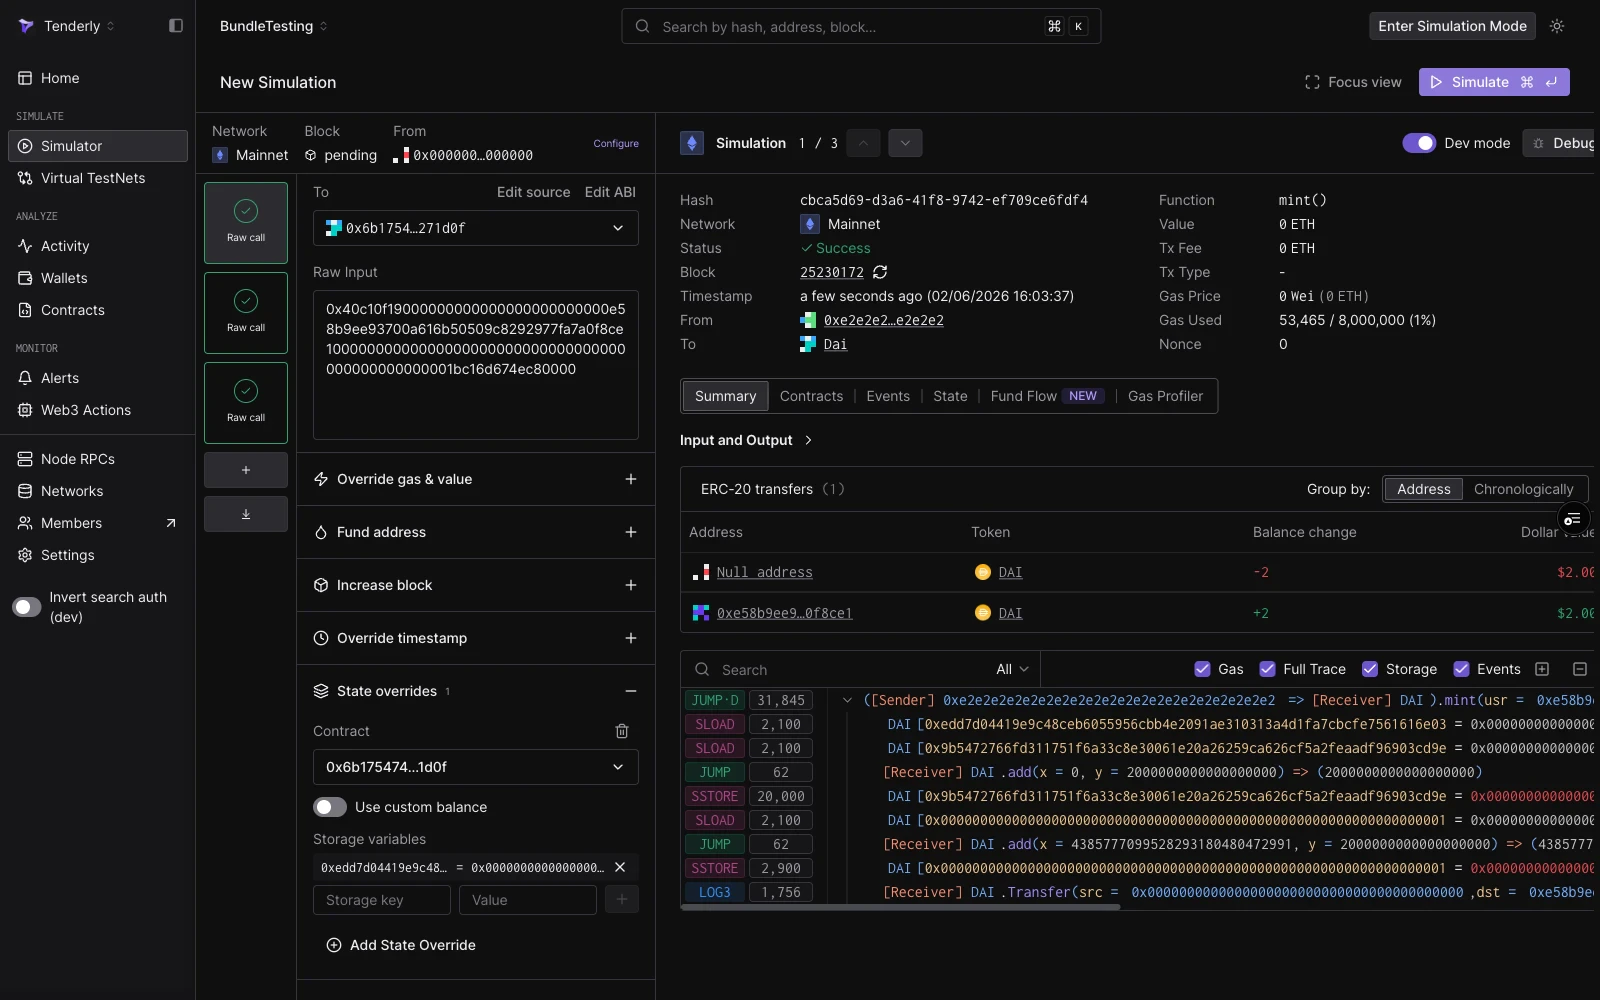
DAI’s mint function is guarded by a wards mapping: only addresses registered as wards can call it. The fake ward (0xe2e2...e2) is not a ward on mainnet. To make this step succeed, add a state override that sets the ward storage slot for that address to 1:
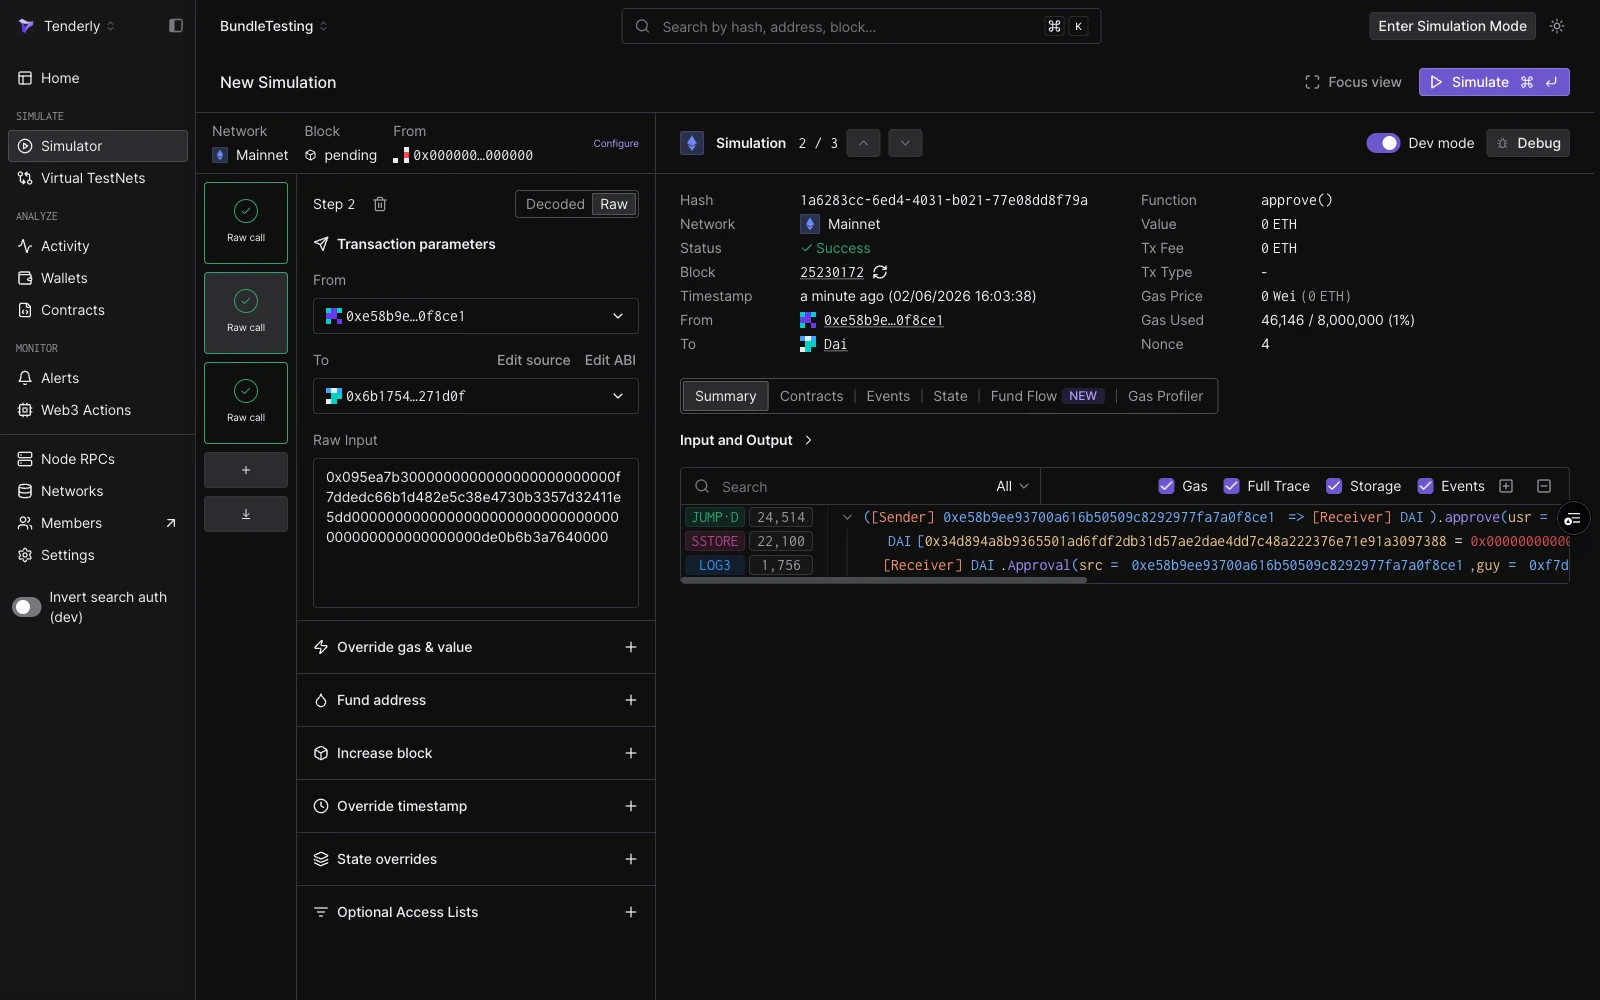
The holder approves a spender to pull up to 1 DAI. This step works because step 1 already credited 2 DAI to the holder’s balance in the shared state stream.
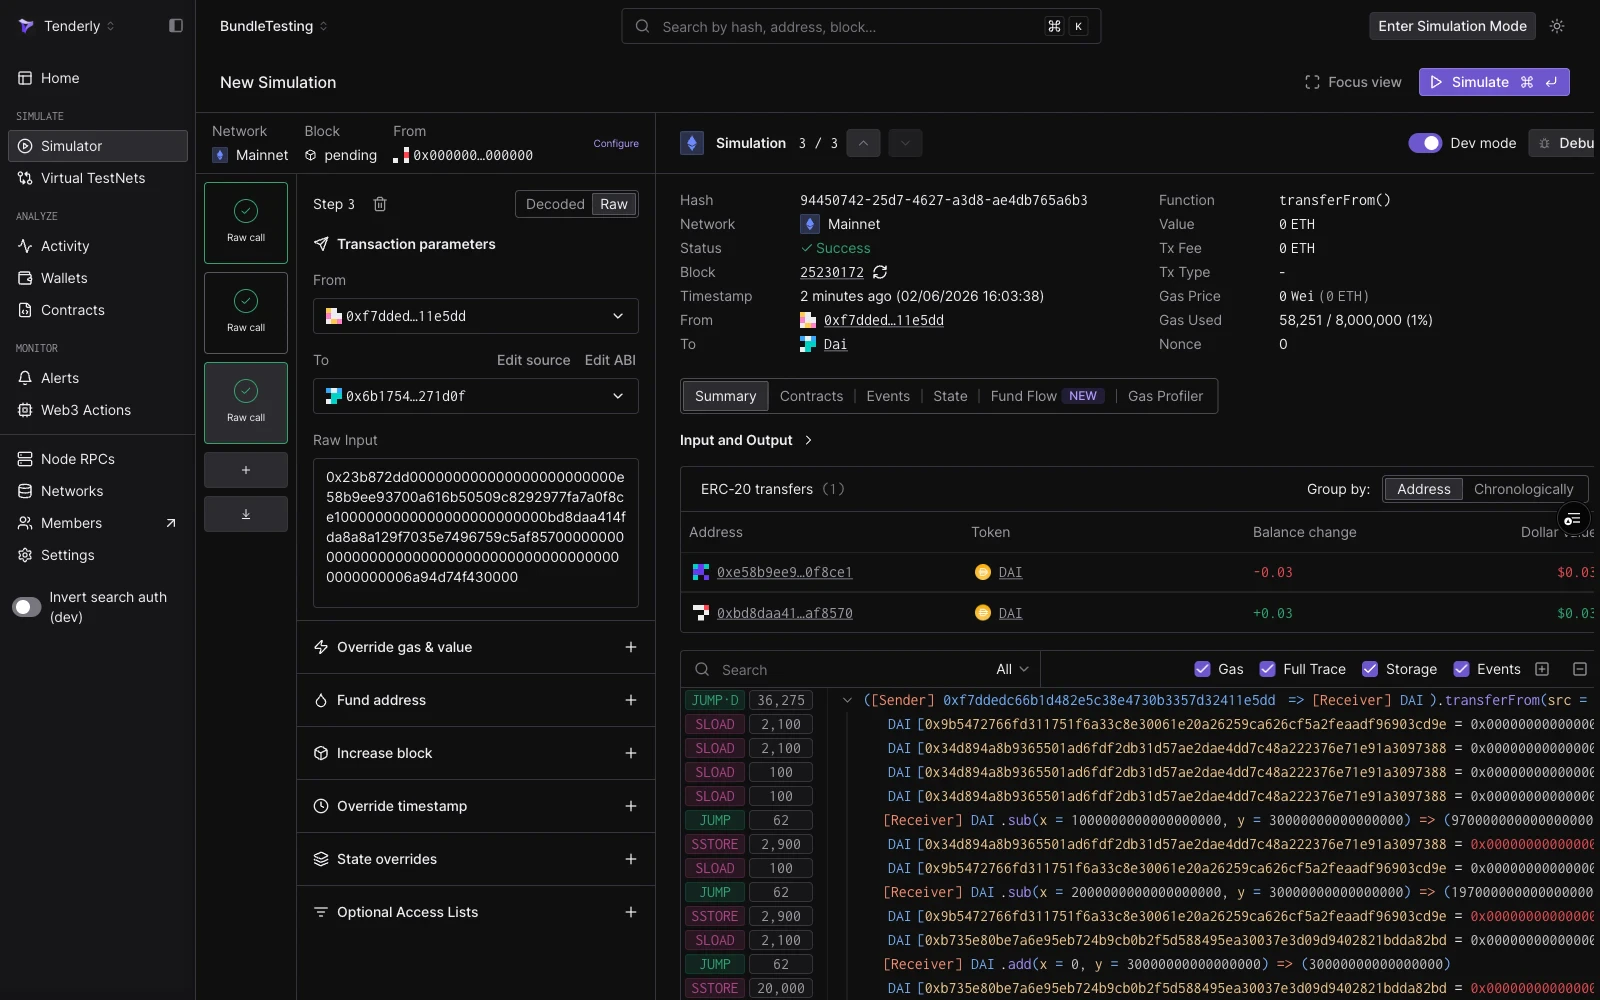
The spender moves 0.03 DAI from the holder to a recipient. This works because step 2 granted the allowance, which is only visible inside the bundle’s state stream, not on-chain.
Then expand State overrides, add the DAI contract, and enter the ward storage slot and value from the table above. Click Add storage override to commit the slot.
Step 1 with the mint calldata filled and the ward state override configured.
4
Add Step 2: Approve
Click + Add function call in the bundle rail. Switch the new step to Raw mode. Set:
Click Simulate (or press ⌘↵). All three steps execute in sequence. Click each step in the rail to inspect its decoded output, gas used, events, and token transfers.
The bundle after running: step 2 (approve) is focused, showing the Approval event and decoded output.
Step 3 (transferFrom) succeeded. The 0.03 DAI transfer is visible in the ERC-20 transfers tab.
The response is an array of three simulation results, one per step. Each entry contains status, gasUsed, decoded logs, a trace, assetChanges, and balanceChanges.A successful run shows "status": true for all three steps. If a step reverts (for example, because the state override is missing from step 1), the API returns all results up to and including the failing step, and subsequent steps are not run.
assetChanges entry with "type": "Mint" and 2 DAI credited to the holder. Transfer event from the zero address.
Approve
Approval event in logs. No asset changes (approvals don’t move tokens).
TransferFrom
assetChanges entry with "type": "Transfer" and 0.03 DAI moving from holder to recipient. Transfer event in logs. balanceChanges showing negative delta for the holder and positive for the recipient.
State overrides: how to override storage, balance, and bytecode in simulations.
Simulator UI: layout reference and keyboard shortcuts for the bundle builder.
{"docsConfig":{"theme":"mint","$schema":"https://mintlify.com/docs.json","name":"Tenderly","description":"Tenderly developer documentation — Virtual Environments, Node RPC, Simulation API, Debugger, Monitor, Alerts, Web3 Actions, and more.","colors":{"primary":"#7857FF","light":"#9B83FF","dark":"#7857FF"},"logo":{"light":"https://mintcdn.com/tenderly/OpA99rKrR1G10AGk/logo/tenderly-logo-light-background.svg?fit=max\u0026auto=format\u0026n=OpA99rKrR1G10AGk\u0026q=85\u0026s=8655a53ac5f0fdc1af7c82f4e2e270ef","dark":"https://mintcdn.com/tenderly/OpA99rKrR1G10AGk/logo/tenderly-logo-dark-background.svg?fit=max\u0026auto=format\u0026n=OpA99rKrR1G10AGk\u0026q=85\u0026s=17e892ea6a8bbd3f67e2055373d36609","href":"/introduction"},"favicon":"https://mintcdn.com/tenderly/nRyi0uSIGTr6AMxX/favicon.ico?fit=max\u0026auto=format\u0026n=nRyi0uSIGTr6AMxX\u0026q=85\u0026s=6a58780606747ae9bd8a65444d16422d","api":{"playground":{"display":"interactive","proxy":false},"examples":{"defaults":"required","languages":["curl","javascript","python","go"]}},"appearance":{"default":"dark"},"navbar":{"links":[{"href":"https://blog.tenderly.co","label":"Blog"},{"href":"mailto:support@tenderly.co","label":"Support"}],"primary":{"type":"button","label":"Dashboard","href":"https://dashboard.tenderly.co"}},"footer":{"socials":{"x":"https://x.com/TenderlyApp","github":"https://github.com/Tenderly","linkedin":"https://www.linkedin.com/company/tenderly-co"}},"search":{"prompt":"Search the Tenderly docs..."},"styling":{"codeblocks":{"theme":{"light":"catppuccin-latte","dark":"catppuccin-mocha"}},"latex":true},"contextual":{"options":["copy","view","assistant","claude","chatgpt","perplexity","cursor","vscode","mcp",{"title":"Add to Claude Code","description":"Connect the Tenderly MCP server to Claude Code","icon":"terminal","href":"https://docs.tenderly.co/ai-tools/quickstart"}],"display":"header"},"navigation":{"languages":[{"language":"en","href":"introduction"},{"language":"ru","href":"ru/introduction"},{"language":"zh","href":"zh/introduction"},{"language":"hi","href":"hi/introduction"}]}},"deployment":{"deploymentMetadataValue":{"subdomain":"tenderly","hasAudioNarration":false,"actualSubdomain":"tenderly","customDomains":["docs.tenderly.co"],"gitSource":{"type":"github","owner":"tenderly","repo":"tenderly-mintlify","deployBranch":"main","contentDirectory":"","isPrivate":true,"mountPath":"","label":""},"chroma":{"liveDeploymentHistoryId":"6ad8a23c182ff03fed6c7814","collectionId":"783aa2e3-7a6e-40cf-8aa6-2bb1545d62fa","schemaVersion":"v3","latestBuiltDeploymentHistoryId":"6ad8a23c182ff03fed6c7814"},"feedback":{"thumbs":true},"entitlements":{"AI_CHAT":{"status":"ENABLED"}},"buildId":"6ad8a23c182ff03fed6c7814","clientVersion":"0.0.3926","searchFilterCounts":[{"language":"en","tag":"Documentation","count":171},{"language":"hi","tag":"Documentation","count":163},{"language":"ru","tag":"Documentation","count":163},{"language":"zh","tag":"Documentation","count":163},{"language":"en","tag":"Simulator","count":73},{"language":"hi","tag":"Simulator","count":73},{"language":"ru","tag":"Simulator","count":73},{"language":"zh","tag":"Simulator","count":73},{"language":"default","tag":"API Reference","count":52},{"language":"en","tag":"Virtual Environments","count":41},{"language":"hi","tag":"Virtual Environments","count":41},{"language":"ru","tag":"Virtual Environments","count":41},{"language":"zh","tag":"Virtual Environments","count":41},{"language":"en","tag":"Monitor","count":30},{"language":"hi","tag":"Monitor","count":30},{"language":"ru","tag":"Monitor","count":30},{"language":"zh","tag":"Monitor","count":30},{"language":"en","tag":"Console","count":27},{"language":"en","tag":"How-to guides","count":27},{"language":"hi","tag":"Console","count":27},{"language":"hi","tag":"How-to guides","count":27},{"language":"ru","tag":"Console","count":27},{"language":"ru","tag":"How-to guides","count":27},{"language":"zh","tag":"Console","count":27},{"language":"zh","tag":"How-to guides","count":27},{"language":"en","tag":"Troubleshooting","count":22},{"language":"hi","tag":"Troubleshooting","count":22},{"language":"ru","tag":"Troubleshooting","count":22},{"language":"zh","tag":"Troubleshooting","count":22},{"language":"en","tag":"Web3 Actions","count":21},{"language":"en","tag":"Node RPC","count":21},{"language":"hi","tag":"Web3 Actions","count":21},{"language":"ru","tag":"Web3 Actions","count":21},{"language":"zh","tag":"Web3 Actions","count":21},{"language":"hi","tag":"Node RPC","count":20},{"language":"ru","tag":"Node RPC","count":20},{"language":"zh","tag":"Node RPC","count":20},{"language":"en","tag":"Simulation API","count":15},{"language":"hi","tag":"Simulation API","count":15},{"language":"ru","tag":"Simulation API","count":15},{"language":"zh","tag":"Simulation API","count":15},{"language":"default","tag":"Actions","count":10},{"language":"default","tag":"Simulator","count":9},{"language":"default","tag":"Virtual Environments","count":9},{"language":"default","tag":"Contracts","count":7},{"language":"default","tag":"Alerts","count":6},{"language":"default","tag":"Projects","count":5},{"language":"default","tag":"Wallets","count":3},{"language":"default","tag":"Delivery Channels","count":2},{"language":"default","tag":"Other","count":1}]},"assistantConfig":{"enableAskAiButton":false,"enableStarterQuestions":true,"enableContextualStarterQuestions":true,"enableAskAiSearchBar":true,"deflection":{"enabled":true,"email":"support@tenderly.co","showHelpButton":true}},"hasChatPermissions":true,"hasWebMcpPermissions":false,"toggles":[{"name":"kill-isr","enabled":true,"variant":{"name":"disabled","enabled":false,"feature_enabled":true},"impressionData":false},{"name":"agent-mintlify-slack","enabled":true,"variant":{"name":"disabled","enabled":false,"feature_enabled":true},"impressionData":false},{"name":"editor-v7-file-tree","enabled":true,"variant":{"name":"disabled","enabled":false,"feature_enabled":true},"impressionData":false},{"name":"agent-integrations-settings","enabled":true,"variant":{"name":"disabled","enabled":false,"feature_enabled":true},"impressionData":false},{"name":"automations-pr-grouping","enabled":true,"variant":{"name":"disabled","enabled":false,"feature_enabled":true},"impressionData":false},{"name":"custom-prefix","enabled":true,"variant":{"name":"disabled","enabled":false,"feature_enabled":true},"impressionData":false},{"name":"analytics-v7","enabled":true,"variant":{"name":"disabled","enabled":false,"feature_enabled":true},"impressionData":false},{"name":"user-flows-analytics","enabled":true,"variant":{"name":"disabled","enabled":false,"feature_enabled":true},"impressionData":false},{"name":"no-publish-flow","enabled":true,"variant":{"name":"disabled","enabled":false,"feature_enabled":true},"impressionData":false},{"name":"workos-onboarding","enabled":true,"variant":{"name":"disabled","enabled":false,"feature_enabled":true},"impressionData":false},{"name":"llms-txt-v2","enabled":true,"variant":{"name":"disabled","enabled":false,"feature_enabled":true},"impressionData":false},{"name":"pause-universal-search-reconcile","enabled":true,"variant":{"name":"disabled","enabled":false,"feature_enabled":true},"impressionData":false},{"name":"snapshot-serving-live","enabled":true,"variant":{"name":"disabled","enabled":false,"feature_enabled":true},"impressionData":false},{"name":"stripTemperatureMiddleware","enabled":true,"variant":{"name":"disabled","enabled":false,"feature_enabled":true},"impressionData":false},{"name":"per-site-search-delta","enabled":true,"variant":{"name":"disabled","enabled":false,"feature_enabled":true},"impressionData":false},{"name":"support-platform-pylon-zendesk","enabled":true,"variant":{"name":"disabled","enabled":false,"feature_enabled":true},"impressionData":false},{"name":"snapshot-serving","enabled":true,"variant":{"name":"disabled","enabled":false,"feature_enabled":true},"impressionData":false},{"name":"instant-rollback","enabled":true,"variant":{"name":"disabled","enabled":false,"feature_enabled":true},"impressionData":false},{"name":"granular-notifications-server","enabled":true,"variant":{"name":"disabled","enabled":false,"feature_enabled":true},"impressionData":false},{"name":"granular-notifications","enabled":true,"variant":{"name":"disabled","enabled":false,"feature_enabled":true},"impressionData":false},{"name":"editor-private-page-search","enabled":true,"variant":{"name":"disabled","enabled":false,"feature_enabled":true},"impressionData":false},{"name":"automations-fable","enabled":true,"variant":{"name":"disabled","enabled":false,"feature_enabled":true},"impressionData":false},{"name":"fixed-ai-action-pricing","enabled":true,"variant":{"name":"disabled","enabled":false,"feature_enabled":true},"impressionData":false},{"name":"automation-resolve-merge-conflict","enabled":true,"variant":{"name":"disabled","enabled":false,"feature_enabled":true},"impressionData":false},{"name":"scoped-publishing","enabled":true,"variant":{"name":"disabled","enabled":false,"feature_enabled":true},"impressionData":false},{"name":"mintql","enabled":true,"variant":{"name":"disabled","enabled":false,"feature_enabled":true},"impressionData":false},{"name":"page-level-analytics","enabled":true,"variant":{"name":"disabled","enabled":false,"feature_enabled":true},"impressionData":false},{"name":"editor-version-history-v2","enabled":true,"variant":{"name":"disabled","enabled":false,"feature_enabled":true},"impressionData":false},{"name":"editor-nav-generations","enabled":true,"variant":{"name":"disabled","enabled":false,"feature_enabled":true},"impressionData":false},{"name":"billing-page-v2","enabled":true,"variant":{"name":"disabled","enabled":false,"feature_enabled":true},"impressionData":false},{"name":"vite-origin","enabled":true,"variant":{"name":"disabled","enabled":false,"feature_enabled":true},"impressionData":false},{"name":"workspace-projects","enabled":true,"variant":{"name":"disabled","enabled":false,"feature_enabled":true},"impressionData":false},{"name":"assistant-v5","enabled":true,"variant":{"name":"disabled","enabled":false,"feature_enabled":true},"impressionData":false},{"name":"byok-sep-25","enabled":true,"variant":{"name":"disabled","enabled":false,"feature_enabled":true},"impressionData":false},{"name":"fork-pr-previews","enabled":true,"variant":{"name":"disabled","enabled":false,"feature_enabled":true},"impressionData":false},{"name":"revalidation-jwt","enabled":true,"variant":{"name":"disabled","enabled":false,"feature_enabled":true},"impressionData":false},{"name":"editor-agent-model-picker","enabled":true,"variant":{"name":"disabled","enabled":false,"feature_enabled":true},"impressionData":false},{"name":"hobby-abuse-scan","enabled":true,"variant":{"name":"disabled","enabled":false,"feature_enabled":true},"impressionData":false},{"name":"dashboard-inbox","enabled":true,"variant":{"name":"disabled","enabled":false,"feature_enabled":true},"impressionData":false}],"privacy":{"consentBanner":{"enabled":true}},"isAtlas":false,"googleFontsInlined":false},"customCss":[{"filePath":"custom.css","content":"html.dark .shiki,html.dark .shiki span{color:var(--shiki-dark)!important;background-color:var(--shiki-dark-bg)!important;font-style:var(--shiki-dark-font-style)!important;font-weight:var(--shiki-dark-font-weight)!important;text-decoration:var(--shiki-dark-text-decoration)!important}html.dark .card .primary-text,html.dark .card .prose>div>h2,html.dark .card .prose>div>h3{color:#9b83ff}.card .prose>div>h2,.card .prose>div>h3{color:#7857ff}.card:has(.prose>div>h2) [data-component-part=card-content-container]{padding:1rem 1.25rem}html.dark .card:hover{border-color:#9b83ff!important;box-shadow:0 0 0 1px rgba(155,131,255,.25)}html:not(.dark) .card:hover{border-color:#7857ff!important;box-shadow:0 0 0 1px rgba(120,87,255,.18)}"}],"page":{"pagePath":"simulations/guides/mint-approve-transfer-bundle","slug":"/simulations/guides/mint-approve-transfer-bundle","pageMetadata":{"title":"Simulate a Token Mint, Approve, and TransferFrom Bundle","description":"Simulate a 3-step bundle that mints DAI, approves a spender, and transfers tokens, with shared state across steps for testing multi-transaction flows.","href":"/simulations/guides/mint-approve-transfer-bundle"},"description":{"compiledSource":"\"use strict\";\nconst {jsx: _jsx} = arguments[0];\nconst {useMDXComponents: _provideComponents} = arguments[0];\nfunction _createMdxContent(props) {\n const _components = {\n p: \"p\",\n ..._provideComponents(),\n ...props.components\n };\n return _jsx(_components.p, {\n children: \"Simulate a 3-step bundle that mints DAI, approves a spender, and transfers tokens, with shared state across steps for testing multi-transaction flows.\"\n });\n}\nfunction MDXContent(props = {}) {\n const {wrapper: MDXLayout} = {\n ..._provideComponents(),\n ...props.components\n };\n return MDXLayout ? _jsx(MDXLayout, {\n ...props,\n children: _jsx(_createMdxContent, {\n ...props\n })\n }) : _createMdxContent(props);\n}\nreturn {\n default: MDXContent\n};\n","frontmatter":{},"scope":{}},"pageType":"default","mdx":{"mdxSource":{"compiledSource":"\"use strict\";const{Fragment:_Fragment,jsx:_jsx,jsxs:_jsxs}=arguments[0];const{useMDXComponents:_provideComponents}=arguments[0];function _createMdxContent(props){const _components={a:`a`,code:`code`,li:`li`,p:`p`,pre:`pre`,span:`span`,strong:`strong`,tbody:`tbody`,td:`td`,th:`th`,thead:`thead`,tr:`tr`,ul:`ul`,..._provideComponents(),...props.components},{CodeBlock,Frame,Heading,OptimizedImage,Step,Steps,Table}=_components;if(!CodeBlock)_missingMdxReference(`CodeBlock`,true);if(!Frame)_missingMdxReference(`Frame`,true);if(!Heading)_missingMdxReference(`Heading`,true);if(!OptimizedImage)_missingMdxReference(`OptimizedImage`,true);if(!Step)_missingMdxReference(`Step`,true);if(!Steps)_missingMdxReference(`Steps`,true);if(!Table)_missingMdxReference(`Table`,true);return _jsxs(_Fragment,{children:[_jsxs(_components.p,{children:[`This guide builds a 3-step simulation bundle that exercises the classic ERC-20 approval flow: mint tokens to a holder, approve a spender, then let the spender call `,_jsx(_components.code,{children:`transferFrom`}),`. Each step depends on state that the previous step creates, which is why a bundle is the right tool here.`]}),`\n`,_jsx(Heading,{level:`2`,id:`why-a-bundle`,children:`Why a bundle?`}),`\n`,_jsx(_components.p,{children:`Simulating each transaction in isolation breaks down:`}),`\n`,_jsxs(_components.ul,{children:[`\n`,_jsxs(_components.li,{children:[_jsx(_components.strong,{children:`Mint alone`}),`: you can verify the mint logic, but the holder address has no tokens on mainnet.`]}),`\n`,_jsxs(_components.li,{children:[_jsx(_components.strong,{children:`Approve alone`}),`: the simulation needs the holder to actually have a balance to approve from.`]}),`\n`,_jsxs(_components.li,{children:[_jsx(_components.strong,{children:`TransferFrom alone`}),`: requires both the balance and the approval to be in place.`]}),`\n`]}),`\n`,_jsx(_components.p,{children:`A Sim Bundle runs all three in sequence, sharing the resulting state. Step 2 sees the minted balance from step 1. Step 3 sees the approval from step 2.`}),`\n`,_jsx(Heading,{level:`2`,id:`the-three-transactions`,children:`The three transactions`}),`\n`,_jsxs(_components.p,{children:[`All three transactions target the DAI contract on Ethereum mainnet (`,_jsx(_components.code,{children:`0x6b175474e89094c44da98b954eedeac495271d0f`}),`).`]}),`\n`,_jsx(Heading,{level:`3`,id:`step-1-mint-2-dai`,children:`Step 1: Mint 2 DAI`}),`\n`,_jsx(CodeBlock,{filename:``,numberOfLines:`5`,language:`shellscript`,children:_jsx(_components.pre,{className:`shiki shiki-themes catppuccin-latte catppuccin-mocha`,style:{backgroundColor:`#eff1f5`,\"--shiki-dark-bg\":`#1e1e2e`,color:`#4c4f69`,\"--shiki-dark\":`#cdd6f4`},language:`shellscript`,children:_jsxs(_components.code,{language:`shellscript`,numberOfLines:`5`,children:[_jsxs(_components.span,{className:`line`,children:[_jsx(_components.span,{style:{color:`#1E66F5`,\"--shiki-light-font-style\":`italic`,\"--shiki-dark\":`#89B4FA`,\"--shiki-dark-font-style\":`italic`},children:`From:`}),_jsx(_components.span,{style:{color:`#FE640B`,\"--shiki-dark\":`#FAB387`},children:` 0xe2e2e2e2e2e2e2e2e2e2e2e2e2e2e2e2e2e2e2e2`}),_jsx(_components.span,{style:{color:`#4C4F69`,\"--shiki-dark\":`#CDD6F4`},children:` (fake `}),_jsx(_components.span,{style:{color:`#40A02B`,\"--shiki-dark\":`#A6E3A1`},children:`ward`}),_jsx(_components.span,{style:{color:`#4C4F69`,\"--shiki-dark\":`#CDD6F4`},children:`)`})]}),`\n`,_jsxs(_components.span,{className:`line`,children:[_jsx(_components.span,{style:{color:`#1E66F5`,\"--shiki-light-font-style\":`italic`,\"--shiki-dark\":`#89B4FA`,\"--shiki-dark-font-style\":`italic`},children:`To:`}),_jsx(_components.span,{style:{color:`#FE640B`,\"--shiki-dark\":`#FAB387`},children:` 0x6b175474e89094c44da98b954eedeac495271d0f`}),_jsx(_components.span,{style:{color:`#4C4F69`,\"--shiki-dark\":`#CDD6F4`},children:` (DAI)`})]}),`\n`,_jsxs(_components.span,{className:`line`,children:[_jsx(_components.span,{style:{color:`#1E66F5`,\"--shiki-light-font-style\":`italic`,\"--shiki-dark\":`#89B4FA`,\"--shiki-dark-font-style\":`italic`},children:`Input:`}),_jsx(_components.span,{style:{color:`#FE640B`,\"--shiki-dark\":`#FAB387`},children:` 0x40c10f19`})]}),`\n`,_jsxs(_components.span,{className:`line`,children:[_jsx(_components.span,{style:{color:`#1E66F5`,\"--shiki-light-font-style\":`italic`,\"--shiki-dark\":`#89B4FA`,\"--shiki-dark-font-style\":`italic`},children:` 000000000000000000000000e58b9ee93700a616b50509c8292977fa7a0f8ce1`}),_jsx(_components.span,{style:{color:`#4C4F69`,\"--shiki-dark\":`#CDD6F4`},children:` (recipient)`})]}),`\n`,_jsxs(_components.span,{className:`line`,children:[_jsx(_components.span,{style:{color:`#1E66F5`,\"--shiki-light-font-style\":`italic`,\"--shiki-dark\":`#89B4FA`,\"--shiki-dark-font-style\":`italic`},children:` 0000000000000000000000000000000000000000000000001bc16d674ec80000`}),_jsx(_components.span,{style:{color:`#4C4F69`,\"--shiki-dark\":`#CDD6F4`},children:` (2 `}),_jsx(_components.span,{style:{color:`#40A02B`,\"--shiki-dark\":`#A6E3A1`},children:`DAI`}),_jsx(_components.span,{style:{color:`#4C4F69`,\"--shiki-dark\":`#CDD6F4`},children:`)`})]}),`\n`]})})}),`\n`,_jsxs(_components.p,{children:[`DAI’s `,_jsx(_components.code,{children:`mint`}),` function is guarded by a `,_jsx(_components.code,{children:`wards`}),` mapping: only addresses registered as wards can call it. The fake ward (`,_jsx(_components.code,{children:`0xe2e2...e2`}),`) is not a ward on mainnet. To make this step succeed, add a `,_jsx(_components.strong,{children:`state override`}),` that sets the ward storage slot for that address to `,_jsx(_components.code,{children:`1`}),`:`]}),`\n`,_jsxs(Table,{children:[_jsx(_components.thead,{children:_jsxs(_components.tr,{children:[_jsx(_components.th,{children:`Field`}),_jsx(_components.th,{children:`Value`})]})}),_jsxs(_components.tbody,{children:[_jsxs(_components.tr,{children:[_jsx(_components.td,{children:`Contract`}),_jsx(_components.td,{\"data-numeric\":`true`,children:_jsx(_components.code,{children:`0x6b175474e89094c44da98b954eedeac495271d0f`})})]}),_jsxs(_components.tr,{children:[_jsx(_components.td,{children:`Storage key`}),_jsx(_components.td,{\"data-numeric\":`true`,children:_jsx(_components.code,{children:`0xedd7d04419e9c48ceb6055956cbb4e2091ae310313a4d1fa7cbcfe7561616e03`})})]}),_jsxs(_components.tr,{children:[_jsx(_components.td,{children:`Value`}),_jsx(_components.td,{\"data-numeric\":`true`,children:_jsx(_components.code,{children:`0x0000000000000000000000000000000000000000000000000000000000000001`})})]})]})]}),`\n`,_jsxs(_components.p,{children:[`The storage key is `,_jsx(_components.code,{children:`keccak256(abi.encode(wardAddress, 0))`}),`, the standard Solidity mapping slot for `,_jsx(_components.code,{children:`wards[fakeWardAddress]`}),` at storage position `,_jsx(_components.code,{children:`0`}),`.`]}),`\n`,_jsx(Heading,{level:`3`,id:`step-2-approve-1-dai`,children:`Step 2: Approve 1 DAI`}),`\n`,_jsx(CodeBlock,{filename:``,numberOfLines:`5`,language:`shellscript`,children:_jsx(_components.pre,{className:`shiki shiki-themes catppuccin-latte catppuccin-mocha`,style:{backgroundColor:`#eff1f5`,\"--shiki-dark-bg\":`#1e1e2e`,color:`#4c4f69`,\"--shiki-dark\":`#cdd6f4`},language:`shellscript`,children:_jsxs(_components.code,{language:`shellscript`,numberOfLines:`5`,children:[_jsxs(_components.span,{className:`line`,children:[_jsx(_components.span,{style:{color:`#1E66F5`,\"--shiki-light-font-style\":`italic`,\"--shiki-dark\":`#89B4FA`,\"--shiki-dark-font-style\":`italic`},children:`From:`}),_jsx(_components.span,{style:{color:`#FE640B`,\"--shiki-dark\":`#FAB387`},children:` 0xe58b9ee93700a616b50509c8292977fa7a0f8ce1`}),_jsx(_components.span,{style:{color:`#4C4F69`,\"--shiki-dark\":`#CDD6F4`},children:` (token `}),_jsx(_components.span,{style:{color:`#40A02B`,\"--shiki-dark\":`#A6E3A1`},children:`holder`}),_jsx(_components.span,{style:{color:`#40A02B`,\"--shiki-dark\":`#A6E3A1`},children:` from`}),_jsx(_components.span,{style:{color:`#40A02B`,\"--shiki-dark\":`#A6E3A1`},children:` step`}),_jsx(_components.span,{style:{color:`#FE640B`,\"--shiki-dark\":`#FAB387`},children:` 1`}),_jsx(_components.span,{style:{color:`#4C4F69`,\"--shiki-dark\":`#CDD6F4`},children:`)`})]}),`\n`,_jsxs(_components.span,{className:`line`,children:[_jsx(_components.span,{style:{color:`#1E66F5`,\"--shiki-light-font-style\":`italic`,\"--shiki-dark\":`#89B4FA`,\"--shiki-dark-font-style\":`italic`},children:`To:`}),_jsx(_components.span,{style:{color:`#FE640B`,\"--shiki-dark\":`#FAB387`},children:` 0x6b175474e89094c44da98b954eedeac495271d0f`}),_jsx(_components.span,{style:{color:`#4C4F69`,\"--shiki-dark\":`#CDD6F4`},children:` (DAI)`})]}),`\n`,_jsxs(_components.span,{className:`line`,children:[_jsx(_components.span,{style:{color:`#1E66F5`,\"--shiki-light-font-style\":`italic`,\"--shiki-dark\":`#89B4FA`,\"--shiki-dark-font-style\":`italic`},children:`Input:`}),_jsx(_components.span,{style:{color:`#FE640B`,\"--shiki-dark\":`#FAB387`},children:` 0x095ea7b3`})]}),`\n`,_jsxs(_components.span,{className:`line`,children:[_jsx(_components.span,{style:{color:`#1E66F5`,\"--shiki-light-font-style\":`italic`,\"--shiki-dark\":`#89B4FA`,\"--shiki-dark-font-style\":`italic`},children:` 000000000000000000000000f7ddedc66b1d482e5c38e4730b3357d32411e5dd`}),_jsx(_components.span,{style:{color:`#4C4F69`,\"--shiki-dark\":`#CDD6F4`},children:` (spender)`})]}),`\n`,_jsxs(_components.span,{className:`line`,children:[_jsx(_components.span,{style:{color:`#1E66F5`,\"--shiki-light-font-style\":`italic`,\"--shiki-dark\":`#89B4FA`,\"--shiki-dark-font-style\":`italic`},children:` 0000000000000000000000000000000000000000000000000de0b6b3a7640000`}),_jsx(_components.span,{style:{color:`#4C4F69`,\"--shiki-dark\":`#CDD6F4`},children:` (1 `}),_jsx(_components.span,{style:{color:`#40A02B`,\"--shiki-dark\":`#A6E3A1`},children:`DAI`}),_jsx(_components.span,{style:{color:`#4C4F69`,\"--shiki-dark\":`#CDD6F4`},children:`)`})]}),`\n`]})})}),`\n`,_jsx(_components.p,{children:`The holder approves a spender to pull up to 1 DAI. This step works because step 1 already credited 2 DAI to the holder’s balance in the shared state stream.`}),`\n`,_jsx(Heading,{level:`3`,id:`step-3-transferfrom-0-03-dai`,children:`Step 3: TransferFrom 0.03 DAI`}),`\n`,_jsx(CodeBlock,{filename:``,numberOfLines:`6`,language:`shellscript`,children:_jsx(_components.pre,{className:`shiki shiki-themes catppuccin-latte catppuccin-mocha`,style:{backgroundColor:`#eff1f5`,\"--shiki-dark-bg\":`#1e1e2e`,color:`#4c4f69`,\"--shiki-dark\":`#cdd6f4`},language:`shellscript`,children:_jsxs(_components.code,{language:`shellscript`,numberOfLines:`6`,children:[_jsxs(_components.span,{className:`line`,children:[_jsx(_components.span,{style:{color:`#1E66F5`,\"--shiki-light-font-style\":`italic`,\"--shiki-dark\":`#89B4FA`,\"--shiki-dark-font-style\":`italic`},children:`From:`}),_jsx(_components.span,{style:{color:`#FE640B`,\"--shiki-dark\":`#FAB387`},children:` 0xf7ddedc66b1d482e5c38e4730b3357d32411e5dd`}),_jsx(_components.span,{style:{color:`#4C4F69`,\"--shiki-dark\":`#CDD6F4`},children:` (approved `}),_jsx(_components.span,{style:{color:`#40A02B`,\"--shiki-dark\":`#A6E3A1`},children:`spender`}),_jsx(_components.span,{style:{color:`#4C4F69`,\"--shiki-dark\":`#CDD6F4`},children:`)`})]}),`\n`,_jsxs(_components.span,{className:`line`,children:[_jsx(_components.span,{style:{color:`#1E66F5`,\"--shiki-light-font-style\":`italic`,\"--shiki-dark\":`#89B4FA`,\"--shiki-dark-font-style\":`italic`},children:`To:`}),_jsx(_components.span,{style:{color:`#FE640B`,\"--shiki-dark\":`#FAB387`},children:` 0x6b175474e89094c44da98b954eedeac495271d0f`}),_jsx(_components.span,{style:{color:`#4C4F69`,\"--shiki-dark\":`#CDD6F4`},children:` (DAI)`})]}),`\n`,_jsxs(_components.span,{className:`line`,children:[_jsx(_components.span,{style:{color:`#1E66F5`,\"--shiki-light-font-style\":`italic`,\"--shiki-dark\":`#89B4FA`,\"--shiki-dark-font-style\":`italic`},children:`Input:`}),_jsx(_components.span,{style:{color:`#FE640B`,\"--shiki-dark\":`#FAB387`},children:` 0x23b872dd`})]}),`\n`,_jsxs(_components.span,{className:`line`,children:[_jsx(_components.span,{style:{color:`#1E66F5`,\"--shiki-light-font-style\":`italic`,\"--shiki-dark\":`#89B4FA`,\"--shiki-dark-font-style\":`italic`},children:` 000000000000000000000000e58b9ee93700a616b50509c8292977fa7a0f8ce1`}),_jsx(_components.span,{style:{color:`#4C4F69`,\"--shiki-dark\":`#CDD6F4`},children:` (sender `}),_jsx(_components.span,{style:{color:`#40A02B`,\"--shiki-dark\":`#A6E3A1`},children:`/`}),_jsx(_components.span,{style:{color:`#40A02B`,\"--shiki-dark\":`#A6E3A1`},children:` token`}),_jsx(_components.span,{style:{color:`#40A02B`,\"--shiki-dark\":`#A6E3A1`},children:` holder`}),_jsx(_components.span,{style:{color:`#4C4F69`,\"--shiki-dark\":`#CDD6F4`},children:`)`})]}),`\n`,_jsxs(_components.span,{className:`line`,children:[_jsx(_components.span,{style:{color:`#1E66F5`,\"--shiki-light-font-style\":`italic`,\"--shiki-dark\":`#89B4FA`,\"--shiki-dark-font-style\":`italic`},children:` 000000000000000000000000bd8daa414fda8a8a129f7035e7496759c5af8570`}),_jsx(_components.span,{style:{color:`#4C4F69`,\"--shiki-dark\":`#CDD6F4`},children:` (recipient)`})]}),`\n`,_jsxs(_components.span,{className:`line`,children:[_jsx(_components.span,{style:{color:`#1E66F5`,\"--shiki-light-font-style\":`italic`,\"--shiki-dark\":`#89B4FA`,\"--shiki-dark-font-style\":`italic`},children:` 000000000000000000000000000000000000000000000000006a94d74f430000`}),_jsx(_components.span,{style:{color:`#4C4F69`,\"--shiki-dark\":`#CDD6F4`},children:` (0.03 `}),_jsx(_components.span,{style:{color:`#40A02B`,\"--shiki-dark\":`#A6E3A1`},children:`DAI`}),_jsx(_components.span,{style:{color:`#4C4F69`,\"--shiki-dark\":`#CDD6F4`},children:`)`})]}),`\n`]})})}),`\n`,_jsx(_components.p,{children:`The spender moves 0.03 DAI from the holder to a recipient. This works because step 2 granted the allowance, which is only visible inside the bundle’s state stream, not on-chain.`}),`\n`,_jsx(Heading,{level:`2`,id:`run-via-the-simulator-ui`,children:`Run via the Simulator UI`}),`\n`,_jsxs(Steps,{children:[_jsx(Step,{title:`Open the Sim Bundle Builder`,children:_jsxs(_components.p,{children:[`Go to `,_jsx(_components.strong,{children:`Simulator`}),` in the left navigation, then click `,_jsx(_components.strong,{children:`New Simulation`}),`. The bundle builder opens with one empty step.`]})}),_jsx(Step,{title:`Configure the session strip`,children:_jsxs(_components.p,{children:[`The session strip runs across the top. Set `,_jsx(_components.strong,{children:`Network`}),` to `,_jsx(_components.strong,{children:`Mainnet`}),` and leave `,_jsx(_components.strong,{children:`Block`}),` as `,_jsx(_components.strong,{children:`Pending`}),`.`]})}),_jsxs(Step,{title:`Fill Step 1: Mint`,children:[_jsxs(_components.p,{children:[`Switch the step to `,_jsx(_components.strong,{children:`Raw`}),` mode. Set:`]}),_jsxs(_components.ul,{children:[`\n`,_jsxs(_components.li,{children:[_jsx(_components.strong,{children:`From`}),`: `,_jsx(_components.code,{children:`0xe2e2e2e2e2e2e2e2e2e2e2e2e2e2e2e2e2e2e2e2`})]}),`\n`,_jsxs(_components.li,{children:[_jsx(_components.strong,{children:`To`}),`: `,_jsx(_components.code,{children:`0x6b175474e89094c44da98b954eedeac495271d0f`})]}),`\n`,_jsxs(_components.li,{children:[_jsx(_components.strong,{children:`Calldata`}),`: `,_jsx(_components.code,{children:`0x40c10f19000000000000000000000000e58b9ee93700a616b50509c8292977fa7a0f8ce10000000000000000000000000000000000000000000000001bc16d674ec80000`})]}),`\n`]}),_jsxs(_components.p,{children:[`Then expand `,_jsx(_components.strong,{children:`State overrides`}),`, add the DAI contract, and enter the ward storage slot and value from the table above. Click `,_jsx(_components.strong,{children:`Add storage override`}),` to commit the slot.`]}),_jsx(Frame,{caption:`Step 1 with the mint calldata filled and the ward state override configured.`,children:_jsx(OptimizedImage,{src:`https://mintcdn.com/tenderly/XsEZlaGXYskrtN68/images/simulator-ui/sim-bundle-step1-mint-result.webp?fit=max\u0026auto=format\u0026n=XsEZlaGXYskrtN68\u0026q=85\u0026s=7bc42b094c26b08690b3d36992cc2f58`,alt:`Step 1 mint transaction configured with state override`,\"data-og-width\":`1600`,width:`1600`,\"data-og-height\":`1000`,height:`1000`,\"data-path\":`images/simulator-ui/sim-bundle-step1-mint-result.webp`,\"data-optimize\":`true`,\"data-opv\":`3`,srcset:`https://mintcdn.com/tenderly/XsEZlaGXYskrtN68/images/simulator-ui/sim-bundle-step1-mint-result.webp?w=280\u0026fit=max\u0026auto=format\u0026n=XsEZlaGXYskrtN68\u0026q=85\u0026s=b1d8125888010939343873a8f35fb59c 280w, https://mintcdn.com/tenderly/XsEZlaGXYskrtN68/images/simulator-ui/sim-bundle-step1-mint-result.webp?w=560\u0026fit=max\u0026auto=format\u0026n=XsEZlaGXYskrtN68\u0026q=85\u0026s=7a723f73749a729e5754ab94f98c4ac8 560w, https://mintcdn.com/tenderly/XsEZlaGXYskrtN68/images/simulator-ui/sim-bundle-step1-mint-result.webp?w=840\u0026fit=max\u0026auto=format\u0026n=XsEZlaGXYskrtN68\u0026q=85\u0026s=897a334c90f8545af1a083e06c232cb7 840w, https://mintcdn.com/tenderly/XsEZlaGXYskrtN68/images/simulator-ui/sim-bundle-step1-mint-result.webp?w=1100\u0026fit=max\u0026auto=format\u0026n=XsEZlaGXYskrtN68\u0026q=85\u0026s=2af8fcd824e550827c1e0dbd619c385c 1100w, https://mintcdn.com/tenderly/XsEZlaGXYskrtN68/images/simulator-ui/sim-bundle-step1-mint-result.webp?w=1650\u0026fit=max\u0026auto=format\u0026n=XsEZlaGXYskrtN68\u0026q=85\u0026s=8f761f8b78e148b814eec686790bee51 1650w, https://mintcdn.com/tenderly/XsEZlaGXYskrtN68/images/simulator-ui/sim-bundle-step1-mint-result.webp?w=2500\u0026fit=max\u0026auto=format\u0026n=XsEZlaGXYskrtN68\u0026q=85\u0026s=e2022c1ae737daf1e2647f8f26722336 2500w`})})]}),_jsxs(Step,{title:`Add Step 2: Approve`,children:[_jsxs(_components.p,{children:[`Click `,_jsx(_components.strong,{children:`+ Add function call`}),` in the bundle rail. Switch the new step to `,_jsx(_components.strong,{children:`Raw`}),` mode. Set:`]}),_jsxs(_components.ul,{children:[`\n`,_jsxs(_components.li,{children:[_jsx(_components.strong,{children:`From`}),`: `,_jsx(_components.code,{children:`0xe58b9ee93700a616b50509c8292977fa7a0f8ce1`})]}),`\n`,_jsxs(_components.li,{children:[_jsx(_components.strong,{children:`To`}),`: `,_jsx(_components.code,{children:`0x6b175474e89094c44da98b954eedeac495271d0f`})]}),`\n`,_jsxs(_components.li,{children:[_jsx(_components.strong,{children:`Calldata`}),`: `,_jsx(_components.code,{children:`0x095ea7b3000000000000000000000000f7ddedc66b1d482e5c38e4730b3357d32411e5dd0000000000000000000000000000000000000000000000000de0b6b3a7640000`})]}),`\n`]})]}),_jsxs(Step,{title:`Add Step 3: TransferFrom`,children:[_jsxs(_components.p,{children:[`Add another step. Switch to `,_jsx(_components.strong,{children:`Raw`}),` mode. Set:`]}),_jsxs(_components.ul,{children:[`\n`,_jsxs(_components.li,{children:[_jsx(_components.strong,{children:`From`}),`: `,_jsx(_components.code,{children:`0xf7ddedc66b1d482e5c38e4730b3357d32411e5dd`})]}),`\n`,_jsxs(_components.li,{children:[_jsx(_components.strong,{children:`To`}),`: `,_jsx(_components.code,{children:`0x6b175474e89094c44da98b954eedeac495271d0f`})]}),`\n`,_jsxs(_components.li,{children:[_jsx(_components.strong,{children:`Calldata`}),`: `,_jsx(_components.code,{children:`0x23b872dd000000000000000000000000e58b9ee93700a616b50509c8292977fa7a0f8ce1000000000000000000000000bd8daa414fda8a8a129f7035e7496759c5af8570000000000000000000000000000000000000000000000000006a94d74f430000`})]}),`\n`]})]}),_jsxs(Step,{title:`Run the bundle`,children:[_jsxs(_components.p,{children:[`Click `,_jsx(_components.strong,{children:`Simulate`}),` (or press `,_jsx(_components.code,{\"data-symbols\":`true`,children:`⌘↵`}),`). All three steps execute in sequence. Click each step in the rail to inspect its decoded output, gas used, events, and token transfers.`]}),_jsx(Frame,{caption:`The bundle after running: step 2 (approve) is focused, showing the Approval event and decoded output.`,children:_jsx(OptimizedImage,{src:`https://mintcdn.com/tenderly/XsEZlaGXYskrtN68/images/simulator-ui/sim-bundle-step2-approve-result.webp?fit=max\u0026auto=format\u0026n=XsEZlaGXYskrtN68\u0026q=85\u0026s=f5e7d7ea168a4e57c85d8f900b632e53`,alt:`Step 2 approve result showing the Approval event`,\"data-og-width\":`1600`,width:`1600`,\"data-og-height\":`1000`,height:`1000`,\"data-path\":`images/simulator-ui/sim-bundle-step2-approve-result.webp`,\"data-optimize\":`true`,\"data-opv\":`3`,srcset:`https://mintcdn.com/tenderly/XsEZlaGXYskrtN68/images/simulator-ui/sim-bundle-step2-approve-result.webp?w=280\u0026fit=max\u0026auto=format\u0026n=XsEZlaGXYskrtN68\u0026q=85\u0026s=56cacb798c3919121275abecafba05fc 280w, https://mintcdn.com/tenderly/XsEZlaGXYskrtN68/images/simulator-ui/sim-bundle-step2-approve-result.webp?w=560\u0026fit=max\u0026auto=format\u0026n=XsEZlaGXYskrtN68\u0026q=85\u0026s=7b8a9b80e495a2da2b28cfaa2b38da7e 560w, https://mintcdn.com/tenderly/XsEZlaGXYskrtN68/images/simulator-ui/sim-bundle-step2-approve-result.webp?w=840\u0026fit=max\u0026auto=format\u0026n=XsEZlaGXYskrtN68\u0026q=85\u0026s=37d07a160024ea5d82b6c1bd39b889a7 840w, https://mintcdn.com/tenderly/XsEZlaGXYskrtN68/images/simulator-ui/sim-bundle-step2-approve-result.webp?w=1100\u0026fit=max\u0026auto=format\u0026n=XsEZlaGXYskrtN68\u0026q=85\u0026s=c254bb28e69625812d2b6b4f6349c9ee 1100w, https://mintcdn.com/tenderly/XsEZlaGXYskrtN68/images/simulator-ui/sim-bundle-step2-approve-result.webp?w=1650\u0026fit=max\u0026auto=format\u0026n=XsEZlaGXYskrtN68\u0026q=85\u0026s=1e94e0ff586c64344cd38280b3810dfa 1650w, https://mintcdn.com/tenderly/XsEZlaGXYskrtN68/images/simulator-ui/sim-bundle-step2-approve-result.webp?w=2500\u0026fit=max\u0026auto=format\u0026n=XsEZlaGXYskrtN68\u0026q=85\u0026s=8a8b15bd6006072c6a2ac83c72ea1246 2500w`})}),_jsx(Frame,{caption:`Step 3 (transferFrom) succeeded. The 0.03 DAI transfer is visible in the ERC-20 transfers tab.`,children:_jsx(OptimizedImage,{src:`https://mintcdn.com/tenderly/XsEZlaGXYskrtN68/images/simulator-ui/sim-bundle-step3-transfer-result.webp?fit=max\u0026auto=format\u0026n=XsEZlaGXYskrtN68\u0026q=85\u0026s=3880b61afb94b616875f6c3be3d71467`,alt:`Step 3 transferFrom result showing the DAI transfer`,\"data-og-width\":`1600`,width:`1600`,\"data-og-height\":`1000`,height:`1000`,\"data-path\":`images/simulator-ui/sim-bundle-step3-transfer-result.webp`,\"data-optimize\":`true`,\"data-opv\":`3`,srcset:`https://mintcdn.com/tenderly/XsEZlaGXYskrtN68/images/simulator-ui/sim-bundle-step3-transfer-result.webp?w=280\u0026fit=max\u0026auto=format\u0026n=XsEZlaGXYskrtN68\u0026q=85\u0026s=8cbc207873e24388f119e5b0c2789c4a 280w, https://mintcdn.com/tenderly/XsEZlaGXYskrtN68/images/simulator-ui/sim-bundle-step3-transfer-result.webp?w=560\u0026fit=max\u0026auto=format\u0026n=XsEZlaGXYskrtN68\u0026q=85\u0026s=7945be2dd941fe83de0041e3dc02f8dd 560w, https://mintcdn.com/tenderly/XsEZlaGXYskrtN68/images/simulator-ui/sim-bundle-step3-transfer-result.webp?w=840\u0026fit=max\u0026auto=format\u0026n=XsEZlaGXYskrtN68\u0026q=85\u0026s=21f203c31fcad5734fdc5754d9667933 840w, https://mintcdn.com/tenderly/XsEZlaGXYskrtN68/images/simulator-ui/sim-bundle-step3-transfer-result.webp?w=1100\u0026fit=max\u0026auto=format\u0026n=XsEZlaGXYskrtN68\u0026q=85\u0026s=e695e4413a951c0dd964707896d20e85 1100w, https://mintcdn.com/tenderly/XsEZlaGXYskrtN68/images/simulator-ui/sim-bundle-step3-transfer-result.webp?w=1650\u0026fit=max\u0026auto=format\u0026n=XsEZlaGXYskrtN68\u0026q=85\u0026s=6d549c27ea4c90bf79ad486c83f13864 1650w, https://mintcdn.com/tenderly/XsEZlaGXYskrtN68/images/simulator-ui/sim-bundle-step3-transfer-result.webp?w=2500\u0026fit=max\u0026auto=format\u0026n=XsEZlaGXYskrtN68\u0026q=85\u0026s=e6edcf0bc3c59319903ae193724fab6f 2500w`})})]})]}),`\n`,_jsx(Heading,{level:`2`,id:`run-via-the-simulation-api`,children:`Run via the Simulation API`}),`\n`,_jsxs(_components.p,{children:[`Use the `,_jsx(_components.code,{children:`simulate-bundle`}),` endpoint to run the same sequence programmatically. Replace `,_jsx(_components.code,{children:`{accountSlug}`}),` and `,_jsx(_components.code,{children:`{projectSlug}`}),` with your values.`]}),`\n`,_jsx(CodeBlock,{filename:``,numberOfLines:`42`,language:`shellscript`,children:_jsx(_components.pre,{className:`shiki shiki-themes catppuccin-latte catppuccin-mocha`,style:{backgroundColor:`#eff1f5`,\"--shiki-dark-bg\":`#1e1e2e`,color:`#4c4f69`,\"--shiki-dark\":`#cdd6f4`},language:`shellscript`,children:_jsxs(_components.code,{language:`shellscript`,numberOfLines:`42`,children:[_jsxs(_components.span,{className:`line`,children:[_jsx(_components.span,{style:{color:`#1E66F5`,\"--shiki-light-font-style\":`italic`,\"--shiki-dark\":`#89B4FA`,\"--shiki-dark-font-style\":`italic`},children:`curl`}),_jsx(_components.span,{style:{color:`#40A02B`,\"--shiki-dark\":`#A6E3A1`},children:` --request`}),_jsx(_components.span,{style:{color:`#40A02B`,\"--shiki-dark\":`#A6E3A1`},children:` POST`}),_jsx(_components.span,{style:{color:`#EA76CB`,\"--shiki-dark\":`#F5C2E7`},children:` \\\\`})]}),`\n`,_jsxs(_components.span,{className:`line`,children:[_jsx(_components.span,{style:{color:`#40A02B`,\"--shiki-dark\":`#A6E3A1`},children:` --url`}),_jsx(_components.span,{style:{color:`#40A02B`,\"--shiki-dark\":`#A6E3A1`},children:` https://api.tenderly.co/api/v1/account/{accountSlug}/project/{projectSlug}/simulate-bundle`}),_jsx(_components.span,{style:{color:`#EA76CB`,\"--shiki-dark\":`#F5C2E7`},children:` \\\\`})]}),`\n`,_jsxs(_components.span,{className:`line`,children:[_jsx(_components.span,{style:{color:`#40A02B`,\"--shiki-dark\":`#A6E3A1`},children:` --header`}),_jsx(_components.span,{style:{color:`#40A02B`,\"--shiki-dark\":`#A6E3A1`},children:` 'Content-Type: application/json'`}),_jsx(_components.span,{style:{color:`#EA76CB`,\"--shiki-dark\":`#F5C2E7`},children:` \\\\`})]}),`\n`,_jsxs(_components.span,{className:`line`,children:[_jsx(_components.span,{style:{color:`#40A02B`,\"--shiki-dark\":`#A6E3A1`},children:` --header`}),_jsx(_components.span,{style:{color:`#40A02B`,\"--shiki-dark\":`#A6E3A1`},children:` 'X-Access-Key: \u003capi-key>'`}),_jsx(_components.span,{style:{color:`#EA76CB`,\"--shiki-dark\":`#F5C2E7`},children:` \\\\`})]}),`\n`,_jsxs(_components.span,{className:`line`,children:[_jsx(_components.span,{style:{color:`#40A02B`,\"--shiki-dark\":`#A6E3A1`},children:` --data`}),_jsx(_components.span,{style:{color:`#40A02B`,\"--shiki-dark\":`#A6E3A1`},children:` '{`})]}),`\n`,_jsx(_components.span,{className:`line`,children:_jsx(_components.span,{style:{color:`#40A02B`,\"--shiki-dark\":`#A6E3A1`},children:` \"simulations\": [`})}),`\n`,_jsx(_components.span,{className:`line`,children:_jsx(_components.span,{style:{color:`#40A02B`,\"--shiki-dark\":`#A6E3A1`},children:` {`})}),`\n`,_jsx(_components.span,{className:`line`,children:_jsx(_components.span,{style:{color:`#40A02B`,\"--shiki-dark\":`#A6E3A1`},children:` \"network_id\": \"1\",`})}),`\n`,_jsx(_components.span,{className:`line`,children:_jsx(_components.span,{style:{color:`#40A02B`,\"--shiki-dark\":`#A6E3A1`},children:` \"save\": true,`})}),`\n`,_jsx(_components.span,{className:`line`,children:_jsx(_components.span,{style:{color:`#40A02B`,\"--shiki-dark\":`#A6E3A1`},children:` \"save_if_fails\": true,`})}),`\n`,_jsx(_components.span,{className:`line`,children:_jsx(_components.span,{style:{color:`#40A02B`,\"--shiki-dark\":`#A6E3A1`},children:` \"simulation_type\": \"full\",`})}),`\n`,_jsx(_components.span,{className:`line`,children:_jsx(_components.span,{style:{color:`#40A02B`,\"--shiki-dark\":`#A6E3A1`},children:` \"from\": \"0xe2e2e2e2e2e2e2e2e2e2e2e2e2e2e2e2e2e2e2e2\",`})}),`\n`,_jsx(_components.span,{className:`line`,children:_jsx(_components.span,{style:{color:`#40A02B`,\"--shiki-dark\":`#A6E3A1`},children:` \"to\": \"0x6b175474e89094c44da98b954eedeac495271d0f\",`})}),`\n`,_jsx(_components.span,{className:`line`,children:_jsx(_components.span,{style:{color:`#40A02B`,\"--shiki-dark\":`#A6E3A1`},children:` \"input\": \"0x40c10f19000000000000000000000000e58b9ee93700a616b50509c8292977fa7a0f8ce10000000000000000000000000000000000000000000000001bc16d674ec80000\",`})}),`\n`,_jsx(_components.span,{className:`line`,children:_jsx(_components.span,{style:{color:`#40A02B`,\"--shiki-dark\":`#A6E3A1`},children:` \"state_objects\": {`})}),`\n`,_jsx(_components.span,{className:`line`,children:_jsx(_components.span,{style:{color:`#40A02B`,\"--shiki-dark\":`#A6E3A1`},children:` \"0x6b175474e89094c44da98b954eedeac495271d0f\": {`})}),`\n`,_jsx(_components.span,{className:`line`,children:_jsx(_components.span,{style:{color:`#40A02B`,\"--shiki-dark\":`#A6E3A1`},children:` \"storage\": {`})}),`\n`,_jsx(_components.span,{className:`line`,children:_jsx(_components.span,{style:{color:`#40A02B`,\"--shiki-dark\":`#A6E3A1`},children:` \"0xedd7d04419e9c48ceb6055956cbb4e2091ae310313a4d1fa7cbcfe7561616e03\": \"0x0000000000000000000000000000000000000000000000000000000000000001\"`})}),`\n`,_jsx(_components.span,{className:`line`,children:_jsx(_components.span,{style:{color:`#40A02B`,\"--shiki-dark\":`#A6E3A1`},children:` }`})}),`\n`,_jsx(_components.span,{className:`line`,children:_jsx(_components.span,{style:{color:`#40A02B`,\"--shiki-dark\":`#A6E3A1`},children:` }`})}),`\n`,_jsx(_components.span,{className:`line`,children:_jsx(_components.span,{style:{color:`#40A02B`,\"--shiki-dark\":`#A6E3A1`},children:` }`})}),`\n`,_jsx(_components.span,{className:`line`,children:_jsx(_components.span,{style:{color:`#40A02B`,\"--shiki-dark\":`#A6E3A1`},children:` },`})}),`\n`,_jsx(_components.span,{className:`line`,children:_jsx(_components.span,{style:{color:`#40A02B`,\"--shiki-dark\":`#A6E3A1`},children:` {`})}),`\n`,_jsx(_components.span,{className:`line`,children:_jsx(_components.span,{style:{color:`#40A02B`,\"--shiki-dark\":`#A6E3A1`},children:` \"network_id\": \"1\",`})}),`\n`,_jsx(_components.span,{className:`line`,children:_jsx(_components.span,{style:{color:`#40A02B`,\"--shiki-dark\":`#A6E3A1`},children:` \"save\": true,`})}),`\n`,_jsx(_components.span,{className:`line`,children:_jsx(_components.span,{style:{color:`#40A02B`,\"--shiki-dark\":`#A6E3A1`},children:` \"save_if_fails\": true,`})}),`\n`,_jsx(_components.span,{className:`line`,children:_jsx(_components.span,{style:{color:`#40A02B`,\"--shiki-dark\":`#A6E3A1`},children:` \"simulation_type\": \"full\",`})}),`\n`,_jsx(_components.span,{className:`line`,children:_jsx(_components.span,{style:{color:`#40A02B`,\"--shiki-dark\":`#A6E3A1`},children:` \"from\": \"0xe58b9ee93700a616b50509c8292977fa7a0f8ce1\",`})}),`\n`,_jsx(_components.span,{className:`line`,children:_jsx(_components.span,{style:{color:`#40A02B`,\"--shiki-dark\":`#A6E3A1`},children:` \"to\": \"0x6b175474e89094c44da98b954eedeac495271d0f\",`})}),`\n`,_jsx(_components.span,{className:`line`,children:_jsx(_components.span,{style:{color:`#40A02B`,\"--shiki-dark\":`#A6E3A1`},children:` \"input\": \"0x095ea7b3000000000000000000000000f7ddedc66b1d482e5c38e4730b3357d32411e5dd0000000000000000000000000000000000000000000000000de0b6b3a7640000\"`})}),`\n`,_jsx(_components.span,{className:`line`,children:_jsx(_components.span,{style:{color:`#40A02B`,\"--shiki-dark\":`#A6E3A1`},children:` },`})}),`\n`,_jsx(_components.span,{className:`line`,children:_jsx(_components.span,{style:{color:`#40A02B`,\"--shiki-dark\":`#A6E3A1`},children:` {`})}),`\n`,_jsx(_components.span,{className:`line`,children:_jsx(_components.span,{style:{color:`#40A02B`,\"--shiki-dark\":`#A6E3A1`},children:` \"network_id\": \"1\",`})}),`\n`,_jsx(_components.span,{className:`line`,children:_jsx(_components.span,{style:{color:`#40A02B`,\"--shiki-dark\":`#A6E3A1`},children:` \"save\": true,`})}),`\n`,_jsx(_components.span,{className:`line`,children:_jsx(_components.span,{style:{color:`#40A02B`,\"--shiki-dark\":`#A6E3A1`},children:` \"save_if_fails\": true,`})}),`\n`,_jsx(_components.span,{className:`line`,children:_jsx(_components.span,{style:{color:`#40A02B`,\"--shiki-dark\":`#A6E3A1`},children:` \"simulation_type\": \"full\",`})}),`\n`,_jsx(_components.span,{className:`line`,children:_jsx(_components.span,{style:{color:`#40A02B`,\"--shiki-dark\":`#A6E3A1`},children:` \"from\": \"0xf7ddedc66b1d482e5c38e4730b3357d32411e5dd\",`})}),`\n`,_jsx(_components.span,{className:`line`,children:_jsx(_components.span,{style:{color:`#40A02B`,\"--shiki-dark\":`#A6E3A1`},children:` \"to\": \"0x6b175474e89094c44da98b954eedeac495271d0f\",`})}),`\n`,_jsx(_components.span,{className:`line`,children:_jsx(_components.span,{style:{color:`#40A02B`,\"--shiki-dark\":`#A6E3A1`},children:` \"input\": \"0x23b872dd000000000000000000000000e58b9ee93700a616b50509c8292977fa7a0f8ce1000000000000000000000000bd8daa414fda8a8a129f7035e7496759c5af8570000000000000000000000000000000000000000000000000006a94d74f430000\"`})}),`\n`,_jsx(_components.span,{className:`line`,children:_jsx(_components.span,{style:{color:`#40A02B`,\"--shiki-dark\":`#A6E3A1`},children:` }`})}),`\n`,_jsx(_components.span,{className:`line`,children:_jsx(_components.span,{style:{color:`#40A02B`,\"--shiki-dark\":`#A6E3A1`},children:` ]`})}),`\n`,_jsx(_components.span,{className:`line`,children:_jsx(_components.span,{style:{color:`#40A02B`,\"--shiki-dark\":`#A6E3A1`},children:`}'`})}),`\n`]})})}),`\n`,_jsxs(_components.p,{children:[`The response is an array of three simulation results, one per step. Each entry contains `,_jsx(_components.code,{children:`status`}),`, `,_jsx(_components.code,{children:`gasUsed`}),`, decoded `,_jsx(_components.code,{children:`logs`}),`, a `,_jsx(_components.code,{children:`trace`}),`, `,_jsx(_components.code,{children:`assetChanges`}),`, and `,_jsx(_components.code,{children:`balanceChanges`}),`.`]}),`\n`,_jsxs(_components.p,{children:[`A successful run shows `,_jsx(_components.code,{children:`\"status\": true`}),` for all three steps. If a step reverts (for example, because the state override is missing from step 1), the API returns all results up to and including the failing step, and subsequent steps are not run.`]}),`\n`,_jsx(Heading,{level:`2`,id:`what-to-look-for-in-the-results`,children:`What to look for in the results`}),`\n`,_jsxs(Table,{children:[_jsx(_components.thead,{children:_jsxs(_components.tr,{children:[_jsx(_components.th,{children:`Step`}),_jsx(_components.th,{children:`Key signals`})]})}),_jsxs(_components.tbody,{children:[_jsxs(_components.tr,{children:[_jsx(_components.td,{children:`Mint`}),_jsxs(_components.td,{children:[_jsx(_components.code,{children:`assetChanges`}),` entry with `,_jsx(_components.code,{children:`\"type\": \"Mint\"`}),` and 2 DAI credited to the holder. `,_jsx(_components.code,{children:`Transfer`}),` event from the zero address.`]})]}),_jsxs(_components.tr,{children:[_jsx(_components.td,{children:`Approve`}),_jsxs(_components.td,{children:[_jsx(_components.code,{children:`Approval`}),` event in `,_jsx(_components.code,{children:`logs`}),`. No asset changes (approvals don’t move tokens).`]})]}),_jsxs(_components.tr,{children:[_jsx(_components.td,{children:`TransferFrom`}),_jsxs(_components.td,{children:[_jsx(_components.code,{children:`assetChanges`}),` entry with `,_jsx(_components.code,{children:`\"type\": \"Transfer\"`}),` and 0.03 DAI moving from holder to recipient. `,_jsx(_components.code,{children:`Transfer`}),` event in `,_jsx(_components.code,{children:`logs`}),`. `,_jsx(_components.code,{children:`balanceChanges`}),` showing negative delta for the holder and positive for the recipient.`]})]})]})]}),`\n`,_jsx(Heading,{level:`2`,id:`next-steps`,children:`Next steps`}),`\n`,_jsxs(_components.ul,{children:[`\n`,_jsxs(_components.li,{children:[_jsx(_components.a,{href:`/simulations/bundled-simulations`,children:`Bundled Simulations (API reference)`}),`: full endpoint documentation and response schema.`]}),`\n`,_jsxs(_components.li,{children:[_jsx(_components.a,{href:`/simulations/state-overrides`,children:`State overrides`}),`: how to override storage, balance, and bytecode in simulations.`]}),`\n`,_jsxs(_components.li,{children:[_jsx(_components.a,{href:`/simulator-ui/overview`,children:`Simulator UI`}),`: layout reference and keyboard shortcuts for the bundle builder.`]}),`\n`]})]})}function MDXContent(props={}){const{wrapper:MDXLayout}={..._provideComponents(),...props.components};return MDXLayout?_jsx(MDXLayout,{...props,children:_jsx(_createMdxContent,{...props})}):_createMdxContent(props)}return{default:MDXContent};function _missingMdxReference(id,component){throw new Error(`Expected `+(component?`component`:`object`)+\" `\"+id+\"` to be defined: you likely forgot to import, pass, or provide it.\")}","frontmatter":{},"scope":{"codeStyling":{"theme":{"light":"catppuccin-latte","dark":"catppuccin-mocha"}},"config":{},"pageMetadata":{"title":"Simulate a Token Mint, Approve, and TransferFrom Bundle","description":"Simulate a 3-step bundle that mints DAI, approves a spender, and transfers tokens, with shared state across steps for testing multi-transaction flows.","href":"/simulations/guides/mint-approve-transfer-bundle"}}},"mdxSourceWithNoJs":null},"mdxExtracts":{"tableOfContents":[{"title":"Why a bundle?","slug":"why-a-bundle","depth":2,"children":[]},{"title":"The three transactions","slug":"the-three-transactions","depth":2,"children":[{"title":"Step 1: Mint 2 DAI","slug":"step-1-mint-2-dai","depth":3,"children":[]},{"title":"Step 2: Approve 1 DAI","slug":"step-2-approve-1-dai","depth":3,"children":[]},{"title":"Step 3: TransferFrom 0.03 DAI","slug":"step-3-transferfrom-0-03-dai","depth":3,"children":[]}]},{"title":"Run via the Simulator UI","slug":"run-via-the-simulator-ui","depth":2,"children":[]},{"title":"Run via the Simulation API","slug":"run-via-the-simulation-api","depth":2,"children":[]},{"title":"What to look for in the results","slug":"what-to-look-for-in-the-results","depth":2,"children":[]},{"title":"Next steps","slug":"next-steps","depth":2,"children":[]}],"codeExamples":{}},"jsLinks":["/_mintlify/custom/tenderly/bdc6ff9b2874c3ef/node-rpc/rpc-explorer.js","/_mintlify/custom/tenderly/184f3e34ea3ab109/platform/supported-networks.js","/_mintlify/custom/tenderly/896485a8a0369426/seo-schema.js","/_mintlify/custom/tenderly/072d16806bddf995/matomo.js"],"subdomain":"tenderly","siteName":"Tenderly","title":"Simulate a Token Mint, Approve, and TransferFrom Bundle - Tenderly","contextualStarterQuestions":[{"_id":"6a6a0439b86208ad1a84c7f9","deploymentId":"6a01e29b70901983f3805261","questionText":"What is a simulation bundle?","status":"active","generatedBy":"contextual","path":"simulations/guides/mint-approve-transfer-bundle","createdAt":"2026-07-29T13:46:33.202Z","updatedAt":"2026-07-29T13:46:33.202Z","__v":0},{"_id":"6a6a0439b86208ad1a84c7fb","deploymentId":"6a01e29b70901983f3805261","questionText":"Why use bundles for multi-step flows?","status":"active","generatedBy":"contextual","path":"simulations/guides/mint-approve-transfer-bundle","createdAt":"2026-07-29T13:46:33.202Z","updatedAt":"2026-07-29T13:46:33.202Z","__v":0},{"_id":"6a6a0439b86208ad1a84c7fa","deploymentId":"6a01e29b70901983f3805261","questionText":"How do I set up state overrides?","status":"active","generatedBy":"contextual","path":"simulations/guides/mint-approve-transfer-bundle","createdAt":"2026-07-29T13:46:33.202Z","updatedAt":"2026-07-29T13:46:33.202Z","__v":0}],"navMaps":{"firstHrefInVersion":{},"firstHrefInLanguage":{"en":{"href":"/simulations/guides/mint-approve-transfer-bundle","matchLevel":0},"ru":{"href":"/ru/simulations/guides/mint-approve-transfer-bundle","matchLevel":1},"zh":{"href":"/zh/simulations/guides/mint-approve-transfer-bundle","matchLevel":1},"hi":{"href":"/hi/simulations/guides/mint-approve-transfer-bundle","matchLevel":1}}},"lastModified":"2026-06-19T15:32:56.174Z","originalFileLocation":"simulations/guides/mint-approve-transfer-bundle.mdx","locale":"en"},"headHtml":"\u003cscript data-mint-head>(function(){var d=document.documentElement,p=null;if(!p){try{p=localStorage.getItem(\"isDarkMode\")}catch(e){}if(p==='true')p='dark';else if(p==='false')p='light';if(p!=='light'\u0026\u0026p!=='dark'\u0026\u0026p!=='system')p=\"dark\"}var r=p==='system'?(matchMedia(\"(prefers-color-scheme: dark)\").matches?'dark':'light'):p;d.classList.remove(r==='dark'?'light':'dark');d.classList.add(r);d.setAttribute(\"data-theme-preference\",p)})();\u003c/script>\u003cmeta data-mint-head name=\"description\" content=\"Simulate a 3-step bundle that mints DAI, approves a spender, and transfers tokens, with shared state across steps for testing multi-transaction flows.\">\u003cmeta data-mint-head name=\"application-name\" content=\"Tenderly\">\u003cmeta data-mint-head name=\"generator\" content=\"Mintlify\">\u003clink data-mint-head rel=\"icon\" type=\"image/png\" sizes=\"192x192\" href=\"/mintlify-assets/_mintlify/favicons/tenderly/eQa6_1msdloETVQa/_generated/favicon/android-chrome-192x192.png\" media=\"(prefers-color-scheme: light)\">\u003clink data-mint-head rel=\"apple-touch-icon\" type=\"image/png\" sizes=\"180x180\" href=\"/mintlify-assets/_mintlify/favicons/tenderly/eQa6_1msdloETVQa/_generated/favicon/apple-touch-icon.png\">\u003clink data-mint-head rel=\"icon\" type=\"image/png\" sizes=\"16x16\" href=\"/mintlify-assets/_mintlify/favicons/tenderly/eQa6_1msdloETVQa/_generated/favicon/favicon-16x16.png\" media=\"(prefers-color-scheme: light)\">\u003clink data-mint-head rel=\"icon\" type=\"image/png\" sizes=\"32x32\" href=\"/mintlify-assets/_mintlify/favicons/tenderly/eQa6_1msdloETVQa/_generated/favicon/favicon-32x32.png\" media=\"(prefers-color-scheme: light)\">\u003clink data-mint-head rel=\"shortcut icon\" type=\"image/x-icon\" href=\"/mintlify-assets/_mintlify/favicons/tenderly/eQa6_1msdloETVQa/_generated/favicon/favicon.ico\" media=\"(prefers-color-scheme: light)\">\u003clink data-mint-head rel=\"icon\" type=\"image/png\" sizes=\"192x192\" href=\"/mintlify-assets/_mintlify/favicons/tenderly/eQa6_1msdloETVQa/_generated/favicon-dark/android-chrome-192x192.png\" media=\"(prefers-color-scheme: dark)\">\u003clink data-mint-head rel=\"icon\" type=\"image/png\" sizes=\"16x16\" href=\"/mintlify-assets/_mintlify/favicons/tenderly/eQa6_1msdloETVQa/_generated/favicon-dark/favicon-16x16.png\" media=\"(prefers-color-scheme: dark)\">\u003clink data-mint-head rel=\"icon\" type=\"image/png\" sizes=\"32x32\" href=\"/mintlify-assets/_mintlify/favicons/tenderly/eQa6_1msdloETVQa/_generated/favicon-dark/favicon-32x32.png\" media=\"(prefers-color-scheme: dark)\">\u003clink data-mint-head rel=\"shortcut icon\" type=\"image/x-icon\" href=\"/mintlify-assets/_mintlify/favicons/tenderly/eQa6_1msdloETVQa/_generated/favicon-dark/favicon.ico\" media=\"(prefers-color-scheme: dark)\">\u003cmeta data-mint-head property=\"og:title\" content=\"Simulate a Token Mint, Approve, and TransferFrom Bundle - Tenderly\">\u003cmeta data-mint-head property=\"og:description\" content=\"Simulate a 3-step bundle that mints DAI, approves a spender, and transfers tokens, with shared state across steps for testing multi-transaction flows.\">\u003cmeta data-mint-head property=\"og:site_name\" content=\"Tenderly\">\u003cmeta data-mint-head property=\"og:url\" content=\"https://docs.tenderly.co/simulations/guides/mint-approve-transfer-bundle\">\u003cmeta data-mint-head property=\"og:type\" content=\"website\">\u003cmeta data-mint-head property=\"og:image\" content=\"https://tenderly.mintlify.app/_mintlify/api/og/v2?division=Simulation+Bundles\u0026amp;title=Simulate+a+Token+Mint%2C+Approve%2C+and+TransferFrom+Bundle\u0026amp;description=Simulate+a+3-step+bundle+that+mints+DAI%2C+approves+a+spender%2C+and+transfers+tokens%2C+with+shared+state+across+steps+for+testing+multi-transaction+flows.\u0026amp;theme=9310d4144b9d3c109a12dda2\u0026amp;signature=f8039dab8012342e76df9ef18de7fec6240e2bca198152fcfe31e9bfacc40ce6\">\u003cmeta data-mint-head property=\"og:image:width\" content=\"1200\">\u003cmeta data-mint-head property=\"og:image:height\" content=\"630\">\u003cmeta data-mint-head name=\"twitter:card\" content=\"summary_large_image\">\u003cmeta data-mint-head name=\"twitter:title\" content=\"Simulate a Token Mint, Approve, and TransferFrom Bundle - Tenderly\">\u003cmeta data-mint-head name=\"twitter:description\" content=\"Simulate a 3-step bundle that mints DAI, approves a spender, and transfers tokens, with shared state across steps for testing multi-transaction flows.\">\u003cmeta data-mint-head name=\"twitter:image\" content=\"https://tenderly.mintlify.app/_mintlify/api/og/v2?division=Simulation+Bundles\u0026amp;title=Simulate+a+Token+Mint%2C+Approve%2C+and+TransferFrom+Bundle\u0026amp;description=Simulate+a+3-step+bundle+that+mints+DAI%2C+approves+a+spender%2C+and+transfers+tokens%2C+with+shared+state+across+steps+for+testing+multi-transaction+flows.\u0026amp;theme=9310d4144b9d3c109a12dda2\u0026amp;signature=f8039dab8012342e76df9ef18de7fec6240e2bca198152fcfe31e9bfacc40ce6\">\u003cmeta data-mint-head name=\"twitter:image:width\" content=\"1200\">\u003cmeta data-mint-head name=\"twitter:image:height\" content=\"630\">\u003cmeta data-mint-head name=\"msapplication-config\" content=\"/mintlify-assets/_mintlify/favicons/tenderly/eQa6_1msdloETVQa/_generated/favicon/browserconfig.xml\">\u003cmeta data-mint-head name=\"apple-mobile-web-app-title\" content=\"Tenderly\">\u003cmeta data-mint-head name=\"msapplication-TileColor\" content=\"#7857FF\">\u003clink data-mint-head rel=\"canonical\" href=\"https://docs.tenderly.co/simulations/guides/mint-approve-transfer-bundle\">\u003clink data-mint-head rel=\"alternate\" type=\"application/xml\" href=\"/sitemap.xml\">\u003clink data-mint-head rel=\"alternate\" type=\"text/markdown\" href=\"/simulations/guides/mint-approve-transfer-bundle.md\">\u003clink data-mint-head rel=\"alternate\" hreflang=\"en\" href=\"https://docs.tenderly.co/simulations/guides/mint-approve-transfer-bundle\">\u003clink data-mint-head rel=\"alternate\" hreflang=\"ru\" href=\"https://docs.tenderly.co/ru/simulations/guides/mint-approve-transfer-bundle\">\u003clink data-mint-head rel=\"alternate\" hreflang=\"zh\" href=\"https://docs.tenderly.co/zh/simulations/guides/mint-approve-transfer-bundle\">\u003clink data-mint-head rel=\"alternate\" hreflang=\"hi\" href=\"https://docs.tenderly.co/hi/simulations/guides/mint-approve-transfer-bundle\">\u003clink data-mint-head rel=\"alternate\" hreflang=\"x-default\" href=\"https://docs.tenderly.co/simulations/guides/mint-approve-transfer-bundle\">\u003cscript data-mint-head type=\"application/ld+json\">{\"@context\":\"https://schema.org\",\"@graph\":[{\"@type\":\"Organization\",\"@id\":\"https://docs.tenderly.co/#organization\",\"name\":\"Tenderly\",\"url\":\"https://docs.tenderly.co\",\"logo\":{\"@type\":\"ImageObject\",\"url\":\"https://mintcdn.com/tenderly/OpA99rKrR1G10AGk/logo/tenderly-logo-light-background.svg?fit=max\u0026auto=format\u0026n=OpA99rKrR1G10AGk\u0026q=85\u0026s=8655a53ac5f0fdc1af7c82f4e2e270ef\"}},{\"@type\":\"WebSite\",\"@id\":\"https://docs.tenderly.co#website\",\"name\":\"Tenderly\",\"url\":\"https://docs.tenderly.co\",\"publisher\":{\"@id\":\"https://docs.tenderly.co/#organization\"}},{\"@type\":\"WebPage\",\"@id\":\"https://docs.tenderly.co/simulations/guides/mint-approve-transfer-bundle#webpage\",\"url\":\"https://docs.tenderly.co/simulations/guides/mint-approve-transfer-bundle\",\"name\":\"Simulate a Token Mint, Approve, and TransferFrom Bundle\",\"description\":\"Simulate a 3-step bundle that mints DAI, approves a spender, and transfers tokens, with shared state across steps for testing multi-transaction flows.\",\"dateModified\":\"2026-06-19T15:32:56.174Z\",\"isPartOf\":{\"@id\":\"https://docs.tenderly.co#website\"},\"breadcrumb\":{\"@id\":\"https://docs.tenderly.co/simulations/guides/mint-approve-transfer-bundle#breadcrumb\"}},{\"@type\":\"BreadcrumbList\",\"@id\":\"https://docs.tenderly.co/simulations/guides/mint-approve-transfer-bundle#breadcrumb\",\"itemListElement\":[{\"@type\":\"ListItem\",\"position\":1,\"name\":\"Simulator\",\"item\":\"https://docs.tenderly.co/virtual-environments/overview\"},{\"@type\":\"ListItem\",\"position\":2,\"name\":\"Simulator UI Builder\",\"item\":\"https://docs.tenderly.co/simulator-ui/overview\"},{\"@type\":\"ListItem\",\"position\":3,\"name\":\"Simulation Bundles\",\"item\":\"https://docs.tenderly.co/simulator-ui/simulation-bundles\"},{\"@type\":\"ListItem\",\"position\":4,\"name\":\"Simulate a Token Mint, Approve, and TransferFrom Bundle\",\"item\":\"https://docs.tenderly.co/simulations/guides/mint-approve-transfer-bundle\"}]},{\"@type\":[\"Article\",\"TechArticle\"],\"@id\":\"https://docs.tenderly.co/simulations/guides/mint-approve-transfer-bundle#article\",\"headline\":\"Simulate a Token Mint, Approve, and TransferFrom Bundle\",\"name\":\"Simulate a Token Mint, Approve, and TransferFrom Bundle\",\"description\":\"Simulate a 3-step bundle that mints DAI, approves a spender, and transfers tokens, with shared state across steps for testing multi-transaction flows.\",\"url\":\"https://docs.tenderly.co/simulations/guides/mint-approve-transfer-bundle\",\"mainEntityOfPage\":{\"@id\":\"https://docs.tenderly.co/simulations/guides/mint-approve-transfer-bundle#webpage\"},\"dateModified\":\"2026-06-19T15:32:56.174Z\",\"publisher\":{\"@id\":\"https://docs.tenderly.co/#organization\"},\"isPartOf\":{\"@id\":\"https://docs.tenderly.co#website\"}}]}\u003c/script>\u003cscript data-mint-head type=\"application/ld+json\">{\"@context\":\"https://schema.org\",\"@type\":\"WebSite\",\"name\":\"Tenderly\",\"creator\":{\"@type\":\"Organization\",\"name\":\"Mintlify\",\"url\":\"https://mintlify.com\"}}\u003c/script>","siteName":"Tenderly","nav":{"global":null,"languages":[{"language":"en","tabs":[{"tab":"Documentation","groups":[{"group":"Getting Started","public":true,"pages":[{"title":"Tenderly Docs: Simulate, Debug, and Monitor Onchain","sidebarTitle":"What is Tenderly?","href":"/introduction"},{"title":"What you get","href":"/what-you-get"}]},{"group":"Simulator","public":true,"pages":[{"group":"Virtual Environments","public":true,"pages":[{"title":"Virtual Environments","href":"/virtual-environments/overview"},{"group":"Get started","public":true,"pages":[{"title":"Virtual Environment quickstart","href":"/virtual-environments/quickstart"},{"title":"Multichain quickstart","href":"/virtual-environments/multichain/quickstart"}]},{"group":"How-to guides","public":true,"pages":[{"group":"Setup \u0026 connections","public":true,"pages":[{"title":"Adding Virtual Environments to Wallets","href":"/virtual-environments/interact/add-to-wallet"},{"title":"Connect to a WebSocket on Virtual Environments","href":"/virtual-environments/interact/websockets"},{"title":"Virtual Environment Integration Guides","href":"/virtual-environments/integrations"},{"group":"Libraries","public":true,"pages":[{"title":"Ethers.js","href":"/virtual-environments/libraries/ethers"},{"title":"Viem","href":"/virtual-environments/libraries/viem"}]},{"group":"Wallet UIs","public":true,"pages":[{"title":"Wagmi","href":"/virtual-environments/dapp-ui/wagmi"},{"title":"Reown AppKit","href":"/virtual-environments/dapp-ui/reown"},{"title":"ConnectKit","href":"/virtual-environments/dapp-ui/connectkit"},{"title":"Dynamic","href":"/virtual-environments/dapp-ui/dynamic"},{"title":"RainbowKit","href":"/virtual-environments/dapp-ui/rainbowkit"}]}]},{"group":"Network \u0026 state","public":true,"pages":[{"title":"Fork a Virtual Environment","href":"/virtual-environments/develop/fork-testnet"},{"title":"Revert Virtual Environment state","href":"/virtual-environments/develop/revert-state"},{"title":"Working with timestamps on Virtual Environments","href":"/virtual-environments/develop/timestamps"},{"title":"Backtest a token position by replaying historical blocks","href":"/virtual-environments/network-mirror-backtest"}]},{"group":"Transactions \u0026 debugging","public":true,"pages":[{"title":"Sending Transactions to Virtual Environments","href":"/virtual-environments/interact/send-transactions"},{"title":"Simulate Transactions in Virtual Environments","href":"/virtual-environments/interact/simulate-transactions"},{"title":"Debugging Transactions","href":"/virtual-environments/develop/debug-transactions"}]},{"group":"Smart contracts","public":true,"pages":[{"title":"Deploy and verify contracts","href":"/virtual-environments/develop/deploy-contracts"},{"title":"Verify proxy contracts with Foundry","href":"/virtual-environments/develop/verify-proxy-contracts"},{"title":"Bytecode deployment cheatcode","href":"/virtual-environments/develop/bytecode-deployment"},{"title":"Foundry Cheatcode Tutorial","href":"/virtual-environments/develop/solidity-cheatcodes"},{"title":"Index a Virtual Environment with The Graph","href":"/virtual-environments/develop/thegraph"}]},{"group":"CI/CD \u0026 staging","public":true,"pages":[{"title":"Hardhat and Github Actions","href":"/virtual-environments/ci-cd/github-actions-hardhat"},{"title":"Foundry and Github Actions","href":"/virtual-environments/ci-cd/github-actions-foundry"},{"title":"Staging Contracts","href":"/virtual-environments/ci-cd/stage-contracts"},{"title":"Connect Dapp UI to Virtual Environment","href":"/virtual-environments/ci-cd/stage-dapps"},{"title":"Create Virtual Environments via API","href":"/virtual-environments/develop/create-virtual-environment-via-api"}]}]},{"group":"Concepts","public":true,"pages":[{"title":"Virtual Environment Explorer","href":"/virtual-environments/explorer"},{"title":"Unlimited Faucet","href":"/virtual-environments/unlimited-faucet"},{"title":"State Sync","href":"/virtual-environments/state-sync"},{"title":"Network Mirror Mode","href":"/virtual-environments/network-mirror-mode"},{"title":"Named RPC URLs","href":"/virtual-environments/named-rpc-urls"},{"group":"Multichain","public":true,"pages":[{"title":"Multichain Virtual Environments","href":"/virtual-environments/multichain/overview"},{"title":"Bridges","href":"/virtual-environments/multichain/bridges"}]}]},{"group":"Reference","public":true,"pages":[{"title":"Virtual Environment dashboard reference","sidebarTitle":"Dashboard reference","href":"/virtual-environments/dashboard"},{"title":"Custom RPC Methods","href":"/virtual-environments/admin-rpc"},{"title":"Solidity Cheatcodes","href":"/virtual-environments/precompiles"},{"title":"REST API","href":"/virtual-environments/rest-api"}]}]},{"group":"Simulator UI Builder","public":true,"pages":[{"group":"Simulator UI","public":true,"pages":[{"title":"Simulator UI","sidebarTitle":"Overview","href":"/simulator-ui/overview"},{"title":"Simulation with State Overrides","href":"/simulator-ui/state-overrides"},{"title":"Share a Simulator draft link","href":"/simulator-ui/draft-links"},{"title":"Share a simulation with a public link","sidebarTitle":"Share a simulation","href":"/simulator-ui/share-simulation"}]},{"group":"Simulation Bundles","public":true,"pages":[{"title":"Simulation Bundles","sidebarTitle":"Overview","description":"Run up to five simulated transactions that share state, where each step sees prior changes. Build and inspect multi-step flows in the simulation builder.","href":"/simulator-ui/simulation-bundles"},{"title":"Simulate a Token Mint, Approve, and TransferFrom Bundle","href":"/simulations/guides/mint-approve-transfer-bundle"}]},{"title":"Simulation Parameters","description":"Reference for every input in the simulation builder: session defaults, block and transaction index, sender addresses, step fields, and per-step cheatcodes.","href":"/simulator-ui/parameters"},{"title":"Editing Contract Source","href":"/simulator-ui/editing-contract-source"}]},{"group":"Simulation API","public":true,"pages":[{"title":"Simulations Overview","href":"/simulations/overview"},{"title":"Simulations Quickstart","href":"/simulations/quickstart"},{"group":"Features","public":true,"pages":[{"title":"Single Simulations","href":"/simulations/single-simulations"},{"title":"Bundled Simulations","href":"/simulations/bundled-simulations"}]},{"group":"Use Cases","public":true,"pages":[{"title":"Transaction Preview","href":"/simulations/transaction-preview"},{"title":"Asset and Balance Changes","href":"/simulations/asset-balance-changes"},{"title":"Simulation API With State Overrides","href":"/simulations/state-overrides"},{"title":"Gas Estimation","href":"/simulations/gas-estimation"}]},{"title":"Simulation Modes","href":"/simulations/simulation-modes"},{"title":"Tenderly TX Preview Snap","href":"/platform/tx-preview-snap"},{"group":"Guides","public":true,"pages":[{"title":"Dry-Run User Transactions","href":"/simulations/guides/dry-run-user-transactions"},{"title":"MetaMask Snap Transaction Preview","href":"/simulations/guides/metamask-snap"},{"title":"Rabby Wallet Transaction Preview","href":"/simulations/guides/rabby-wallet"},{"title":"Simulate Safe{Wallet} transactions in your Tenderly project","sidebarTitle":"Safe{Wallet} simulations","href":"/simulations/guides/safe-wallet"},{"title":"Using Simulation RPC in Dapp UI","href":"/simulations/guides/simulation-rpc-dapp-ui"}]}]},{"group":"Simulation Mode","public":true,"pages":[{"title":"Simulation Mode","href":"/simulator-ui/simulation-mode"}]},{"group":"Tenderly SDK","public":true,"pages":[{"title":"Intro to Tenderly SDK","href":"/platform/sdk/introduction"},{"title":"Basic Concepts \u0026 FAQs","href":"/platform/sdk/concepts"},{"title":"Simulating Transactions","href":"/platform/sdk/simulating-transactions"},{"title":"Managing Contracts","href":"/platform/sdk/managing-contracts"},{"title":"Managing Wallets","href":"/platform/sdk/managing-wallets"},{"title":"Practical Examples","href":"/platform/sdk/examples"},{"group":"Tutorials","public":true,"pages":[{"title":"Simulate Transactions via SDK","href":"/platform/sdk/tutorials/simulate-transactions"},{"title":"Simulation Bundles with SDK","href":"/platform/sdk/tutorials/simulation-bundles"}]}]}]},{"group":"Console","public":true,"pages":[{"group":"Explorer","public":true,"pages":[{"title":"Developer Explorer","href":"/developer-explorer/overview"},{"title":"Project Home dashboard","sidebarTitle":"Project Home","href":"/developer-explorer/project-home"},{"title":"Transaction Listing","href":"/developer-explorer/transaction-listing"},{"group":"Inspect Transaction","public":true,"pages":[{"title":"Inspect transaction call traces and state changes","sidebarTitle":"Transactions","href":"/developer-explorer/inspect-transaction/overview"},{"title":"Fund Flow","href":"/developer-explorer/inspect-transaction/fund-flow"}]},{"title":"Smart Contracts","href":"/developer-explorer/contracts"},{"title":"Add and track wallets in a Tenderly project","sidebarTitle":"Wallets","href":"/developer-explorer/wallets"},{"title":"Simulation Mode in the Explorer","href":"/developer-explorer/simulation-mode"}]},{"group":"DeFi Modules","public":true,"pages":[{"title":"DeFi Modules: protocol-native UI surfaces","sidebarTitle":"DeFi Modules","href":"/defi-modules/overview"},{"title":"Aave V3","href":"/defi-modules/aave"},{"title":"Uniswap V3","href":"/defi-modules/uniswap"},{"title":"Morpho","href":"/defi-modules/morpho"},{"title":"Chainlink and Chronicle price feeds","sidebarTitle":"Oracle price feeds","href":"/defi-modules/oracle-price-feeds"}]},{"group":"Debugger","public":true,"pages":[{"title":"How to Use Tenderly Debugger","href":"/debugger/overview"},{"title":"Execution Overview","href":"/debugger/execution-overview"},{"title":"Commenting \u0026 Prioritizing Traces","href":"/debugger/commenting"},{"title":"Gas Profiler","href":"/debugger/gas-profiler"},{"title":"Evaluate Expressions with Advanced Debugger","href":"/debugger/evaluate-expression"},{"title":"War Room Aid Kit","href":"/debugger/war-room-aid-kit"},{"title":"Dev Toolkit Browser Extension","href":"/debugger/dev-toolkit"},{"group":"Guides","public":true,"pages":[{"title":"Investigating a Failed Transaction","href":"/debugger/guides/failed-transaction"},{"title":"Investigating a Hack (Cover Protocol)","href":"/debugger/guides/hack-investigation"}]}]},{"group":"Contract Verification","public":true,"pages":[{"title":"Smart Contract Verification","href":"/contract-verification/overview"},{"title":"Verify Contracts via Dashboard","href":"/contract-verification/dashboard"},{"title":"Smart Contract Verification Using Foundry","href":"/contract-verification/foundry"},{"title":"Smart Contract Verification Using Hardhat","href":"/contract-verification/hardhat"},{"title":"Verifying Proxy Contracts","href":"/contract-verification/hardhat-proxy"}]}]},{"group":"Monitor","public":true,"pages":[{"group":"Alerts","public":true,"pages":[{"title":"Intro to Alerts","href":"/monitoring/alerts/introduction"},{"title":"Alert Types, Targets, and Parameters","href":"/monitoring/alerts/types"},{"title":"Using Alerts API","href":"/monitoring/alerts/api"},{"group":"Destinations","public":true,"pages":[{"title":"Alert Destinations","href":"/monitoring/alerts/destinations/overview"},{"title":"Project-Scoped","href":"/monitoring/alerts/destinations/project-scoped"},{"title":"Account-Scoped","href":"/monitoring/alerts/destinations/account-scoped"},{"title":"Setting Up Alerts as Triggers for Web3Actions","href":"/monitoring/alerts/destinations/web3-action"}]},{"group":"Tutorials","public":true,"pages":[{"title":"Alerting Quickstart Guide","href":"/monitoring/alerts/tutorials/quickstart"},{"title":"How to Use Webhooks for Alerting","href":"/monitoring/alerts/tutorials/webhooks"}]}]},{"group":"Web3 Actions","public":true,"pages":[{"title":"Intro to Web3 Actions","href":"/monitoring/web3-actions/introduction"},{"title":"Usage Rate Limits","href":"/monitoring/web3-actions/usage-rate-limits"},{"group":"Tutorials","public":true,"pages":[{"title":"Deploy Web3 Actions via Dashboard","href":"/monitoring/web3-actions/tutorials/deploy-via-dashboard"},{"title":"Deploy Web3 Action via CLI","href":"/monitoring/web3-actions/tutorials/deploy-via-cli"},{"title":"How to Handle On-Chain Events","href":"/monitoring/web3-actions/tutorials/on-chain-events"},{"title":"How to Access Node RPC from Web3 Actions","href":"/monitoring/web3-actions/tutorials/node-rpc-access"},{"title":"How to Build a Custom Oracle","href":"/monitoring/web3-actions/tutorials/custom-oracle"},{"title":"Discord Alerts for New Uniswap Pools","href":"/monitoring/web3-actions/tutorials/discord-uniswap-pools"},{"title":"Monitor UniswapV3 Pool Creation","href":"/monitoring/web3-actions/tutorials/monitor-uniswap-v3-pools"},{"title":"Lido Validator Exit Notifications","href":"/monitoring/web3-actions/tutorials/validators-exits"},{"title":"Modular Monitoring with Web3Actions","href":"/monitoring/web3-actions/tutorials/modular-actions"}]},{"group":"References","public":true,"pages":[{"title":"Node RPC Access","href":"/monitoring/web3-actions/references/node-rpc-access"},{"title":"Action Functions, Events, and Triggers","href":"/monitoring/web3-actions/references/functions-events-triggers"},{"title":"Context: Gateway, Storage, Secrets","href":"/monitoring/web3-actions/references/context"},{"title":"Action Execution","href":"/monitoring/web3-actions/references/execution"},{"title":"Project Structure","href":"/monitoring/web3-actions/references/project-structure"},{"title":"CLI Cheatsheet","href":"/monitoring/web3-actions/references/cli-cheatsheet"},{"title":"Local Development and Testing","href":"/monitoring/web3-actions/references/local-development"},{"title":"Web3 Action failure notifications","sidebarTitle":"Notifications","href":"/monitoring/web3-actions/references/notifications"},{"title":"Manage Web3 Actions Lifecycle","href":"/monitoring/web3-actions/references/lifecycle"},{"title":"Error Reporting","href":"/monitoring/web3-actions/references/error-reporting"}]}]}]},{"group":"Node RPC","public":true,"pages":[{"title":"Node RPC","href":"/node-rpc/overview"},{"title":"Monitor Node RPC Usage, Errors, and Rate Limits","href":"/node-rpc/usage-and-errors"},{"group":"Simulations \u0026 Gas Estimation","public":true,"pages":[{"title":"Simulate Transactions with JSON-RPC Methods","href":"/node-rpc/guides/simulate-json-rpc"},{"title":"Simulate Bundles","href":"/node-rpc/guides/simulate-bundle-json-rpc"},{"title":"Simulate Blocks with eth_simulateV1","href":"/node-rpc/guides/eth-simulatev1"},{"title":"Trace Transactions","href":"/node-rpc/guides/trace-json-rpc"}]},{"group":"Integrations","public":true,"pages":[{"title":"Integration Guides","href":"/node-rpc/integrations"},{"group":"Libraries","public":true,"pages":[{"title":"Connect Ethers.js v6 and v5 to Tenderly Node RPC","href":"/node-rpc/libraries/ethers"},{"title":"Connect viem clients to Tenderly Node RPC endpoints","href":"/node-rpc/libraries/viem"},{"title":"Connect Go apps to Tenderly Node RPC with go-ethereum","href":"/node-rpc/libraries/go"},{"title":"Connect Web3.py Python apps to Tenderly Node RPC","href":"/node-rpc/libraries/web3-py"}]},{"group":"Frameworks","public":true,"pages":[{"title":"Deploy smart contracts with Foundry via Tenderly Node RPC","href":"/node-rpc/frameworks/foundry"},{"title":"Deploy and test Hardhat projects with Tenderly Node RPC","href":"/node-rpc/frameworks/hardhat"}]},{"group":"Wallet UIs","public":true,"pages":[{"title":"Configure wagmi transports with Tenderly Node RPC","href":"/node-rpc/dapp-ui/wagmi"},{"title":"Set up Reown AppKit with Tenderly Node RPC transports","href":"/node-rpc/dapp-ui/reown"},{"title":"Connect ConnectKit wallet components to Tenderly Node RPC","href":"/node-rpc/dapp-ui/connectkit"},{"title":"Use Tenderly Node RPC with Dynamic Web3 authentication","href":"/node-rpc/dapp-ui/dynamic"},{"title":"Configure RainbowKit with Tenderly Node RPC transports","href":"/node-rpc/dapp-ui/rainbowkit"}]},{"group":"Indexers","public":true,"pages":[{"title":"Run Graph Node on Tenderly Node RPC","href":"/node-rpc/indexers/graph-node"}]}]},{"group":"Reference","public":true,"pages":[{"title":"JSON-RPC Reference","href":"/node-rpc/rpc-reference"}]},{"title":"Node RPC Pricing","href":"/node-rpc/pricing"}]},{"group":"AI Tools","public":true,"pages":[{"title":"Tenderly MCP Server for Claude and AI assistants","href":"/ai-tools/overview"},{"title":"Tenderly MCP Server quickstart for Claude clients","href":"/ai-tools/quickstart"},{"title":"Tenderly MCP Server tools reference","href":"/ai-tools/tools"},{"title":"Tenderly MCP Server examples with Claude","href":"/ai-tools/examples"}]},{"group":"Account \u0026 Settings","public":true,"pages":[{"group":"Account Management","public":true,"pages":[{"title":"Account Management","href":"/platform/account/overview"},{"title":"Manage Security Email Notifications","sidebarTitle":"Email Notifications","href":"/platform/account/email-notifications"},{"group":"Projects","public":true,"pages":[{"title":"Create a Tenderly Project","href":"/platform/account/projects/overview"},{"title":"Restrict Project Access to Invited Members","href":"/platform/account/projects/restricted-projects"},{"title":"Project Settings","href":"/platform/account/projects/settings"},{"title":"Project Slug and Account Slug","href":"/platform/account/projects/slug"},{"title":"Generate and Manage API Access Tokens","href":"/platform/account/projects/api-tokens"}]},{"group":"Organizations","public":true,"pages":[{"title":"Organizations and Team Members","href":"/platform/account/organizations/overview"},{"title":"Add Member","href":"/platform/account/organizations/members"},{"title":"Activity Logs","href":"/platform/account/organizations/activity-logs"}]}]},{"group":"Billing \u0026 Usage","public":true,"pages":[{"title":"Manage Your Plan, Seats, and Billing","href":"/platform/account/billing/overview"},{"title":"Track Usage and Tenderly Units (TUs)","href":"/platform/account/billing/usage"},{"title":"Usage Limits, Rate Limits, and Write Limits: Which One Did I Hit?","href":"/platform/account/billing/limits"},{"title":"Plan Features, Limits, and Restricted Access","href":"/platform/account/billing/plan-restrictions"}]}]}]},{"tab":"Supported Networks","pages":[{"title":"Supported Networks","href":"/platform/supported-networks"}]},{"tab":"API Reference","pages":[{"title":"API Reference","href":"/api-reference/projects/list-projects"}]},{"tab":"Troubleshooting","pages":[{"title":"Troubleshooting","href":"/troubleshooting/overview"}]},{"tab":"Changelog","pages":[{"title":"Changelog","href":"/changelog/overview"}]}]},{"language":"ru","pages":[{"title":"ru","href":"/ru/simulations/guides/mint-approve-transfer-bundle"}]},{"language":"zh","pages":[{"title":"zh","href":"/zh/simulations/guides/mint-approve-transfer-bundle"}]},{"language":"hi","pages":[{"title":"hi","href":"/hi/simulations/guides/mint-approve-transfer-bundle"}]}]},"title":"Simulate a Token Mint, Approve, and TransferFrom Bundle - Tenderly","buildId":"dpl_9DauxEjb9gzCtcuhPQFbquJvx7FJ","deploymentId":"dpl_9DauxEjb9gzCtcuhPQFbquJvx7FJ","dynamics":["07c022d89b","a74be98ba7"],"chunks":["Frame-DpBmNN95.js","DynamicMarkdown-BY_qDhTn.js","zoom-image-lightbox-D4WcYaf4.js","PlusIcon-CwhPVjTe.js","lightbox-handle-r17bVUz3.js"]}