

.env files, or hardcoded RPC URLs every time you spin up a fresh environment for a pull request, a local dev loop, or a staging deployment.
RPC URL format
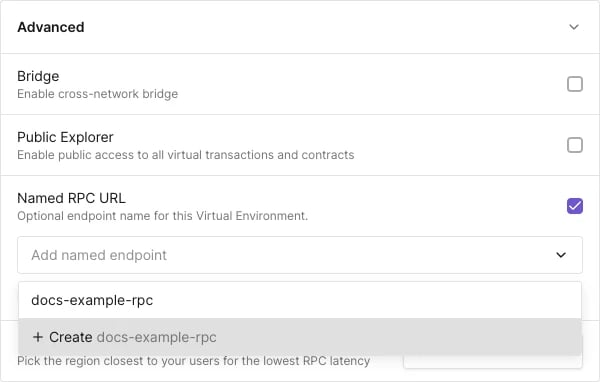
The Advanced section of the Create Virtual Environment dialog: Named RPC URL enabled and the Add named endpoint field open, showing the option to create a new name.
https://virtual.mainnet.eu.rpc.tenderly.co/tenderly/demo/89e9b3-4bcd00, and a new one is generated every time you re-fork.
With a name attached, the Public and Admin RPC URLs take this form instead:
[REGION] is eu or us-east, whichever you pick when assigning the name. [RPC_NAME] must be unique within your project. Once a name is attached, it, not the auto-generated identifier, is what stays fixed across re-forks.
Assign a name when creating a Virtual Environment
- Start creating a Virtual Environment and expand the Advanced section.
- Enable Named RPC URL.
- In Add named endpoint, type a new name and select Create
<name>, or pick an existing name from the list. - Click Create Virtual Environment.

The Integrate Virtual RPC panel on a Virtual Environment's Home page, showing the resolved Admin RPC and Public RPC URLs once a name is attached.
Change or remove a name after creation
Open the Virtual Environment’s Settings page. The Named RPC URL section there mirrors the one in the creation dialog:- To reassign the environment to a different name, open the name picker and select another entry, or type a new name and select Create
<name>. - To detach the name from this environment, disable Named RPC URL and save. The name itself is not deleted, it just becomes free to attach elsewhere.
A name maps to one environment at a time
Attaching a name to a Virtual Environment is a one-to-one relationship. In the name picker, existing names that are already assigned elsewhere in the project are labeled In use on another environment. Selecting one of them attaches it to the current environment and detaches it from the environment that previously held it, so that environment’s named RPC URL stops resolving there and instead routes to the current environment. This makes swapping the target of a fixed RPC URL a single action: create the replacement environment, assign it the same name as the one you’re retiring, and every script, CI pipeline, or dapp config pointed at that URL now resolves to the new environment without any changes on their end.Set a name via the REST API
PassrpcName when creating an environment through the environment creation endpoint:
environment-create-named.sh
active_instance.vnets[].rpcs array contains the named Admin and Public RPC URLs:
See also
- Quickstart for the full Virtual Environment creation flow.
- Admin RPC for the cheatcodes available on the Admin RPC.
- CI/CD with GitHub Actions for pipelines that create and tear down environments per pull request.